
Winter-Proof Your Home: 10 Fixes You Can Do Yourself (No Contractor Needed)
Winter’s no joke when your home isn’t ready. Drafty windows, frozen pipes, crazy heating bills — I’ve dealt with all of it, and I can tell you: prepping your place for the cold doesn’t need a professional or a big budget. You just need to know where heat escapes, what the cold damages first, and how to fix those things before they become a problem.
In this guide, I’ll walk you through 10 smart, practical ways to winter-proof your home — all doable on your own, without calling in a contractor. These are the fixes I trust and use myself, backed by real data and expert advice. If you want to stay warm, cut costs, and avoid mid-winter disasters, start here.
So—how ready is your home, really?
1. Why Winter-Proofing Saves You More Than Just Money
Most people only start fixing winter issues something breaks — like a frozen pipe or a sudden furnace failure. But by that point, the damage (and cost) is already done. What I’ve learned over the years is this: winter-proofing early can save you hundreds on energy bills and thousands on emergency repairs.
Heating bills have gone up by 17% across the U.S. — and that’s before factoring in surprise leaks, drafts, or broken systems. Many of the same habits that waste energy in winter are common in summer too — if you want to lower your utility bills year-round, here are 5 things you should stop doing at home this summer. Even small things, like air leaks around windows or uninsulated pipes, can quietly drain your wallet all season long.
The good news? Most of these issues are preventable — and you don’t need to hire a pro to fix them. All it takes is knowing where to look and what to do before the cold hits hard.
You’re not just prepping your house — you’re protecting your comfort, your safety, and your peace of mind.
2. Find the Sneaky Spots Where Heat Escapes
Before you seal or insulate anything, you need to know where your home is losing heat. And trust me, it’s usually not where you think.
Walk around your house on a cold, windy day. Use the back of your hand to feel around window edges, baseboards, outlets, and door frames. If you feel a chill — that’s heat leaking out, and money going with it.
Single-pane windows? Big culprit. In fact, Better Homes & Gardens says windows alone can account for up to 70% of your heat loss. Even electrical outlets on exterior walls can leak more than you’d expect.
Don’t guess — investigate. Grab a cheap infrared thermometer if you want to get serious, or even light a candle and watch the flame flicker near drafty areas. Once you spot the problem zones, fixing them becomes easy (and actually worth your time).
3. Seal the Gaps: Caulking, Weather-Stripping, and Simple Fixes
Once you’ve found the leaks, it’s time to seal them up — and this part’s easier than most people think. You don’t need special skills, just the right materials and a bit of patience.
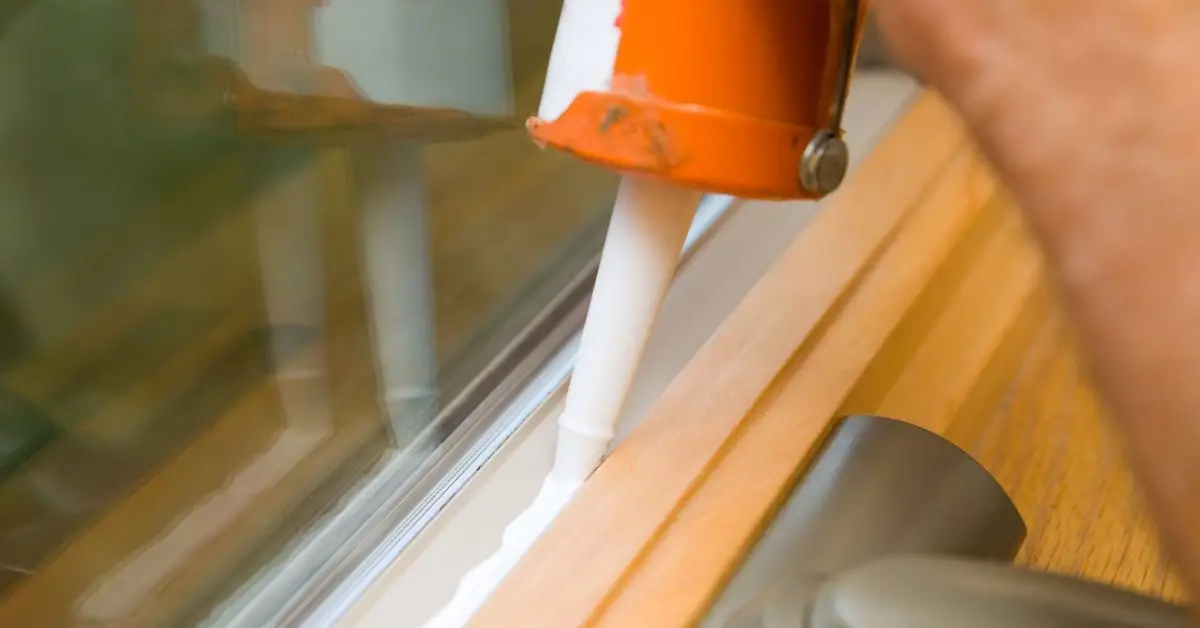
Start with caulk around windows, baseboards, and door frames. I always recommend a hybrid silicone or paintable latex caulk — it’s flexible, durable, and works in cold temps. A smooth-rod caulk gun will make your life easier, trust me.
Next, add weather-stripping around exterior doors. If you can see daylight around the frame, you’re losing heat. Stick-on foam strips or rubber seals usually do the trick in minutes. For under-door drafts, grab a door sweep or make your own with rolled-up towels if you’re in a pinch.
Also: cover those wall outlets and light switches on outside-facing walls. A cheap pack of foam gaskets from any hardware store can block air you didn’t even know was sneaking through.
These fixes may seem small, but together, they make a huge difference — both in how warm your home feels and how much your heater has to work to keep up.
4. Insulate Windows Without Replacing Them
Can’t afford new windows? You’re not alone — and honestly, you don’t need them. There are budget-friendly hacks that seriously reduce window heat loss, even in the dead of winter.
One of my go-tos: bubble wrap insulation. It’s not fancy, but it works. Spray a little water on the inside of the glass, press the bubble wrap against it, and boom — instant “fake double glazing.”
Next: window insulation kits — clear plastic film you apply with a hair dryer. It tightens up like shrink-wrap and adds a barrier without ruining your view.
Don’t forget thermal curtains. They block drafts and hold heat in — especially at night. Add a draft snake along the window sill or even lay down rugs in drafty rooms with bare floors.
It’s not about making your windows perfect — it’s about stopping warm air from sneaking out every time you turn on the heat.
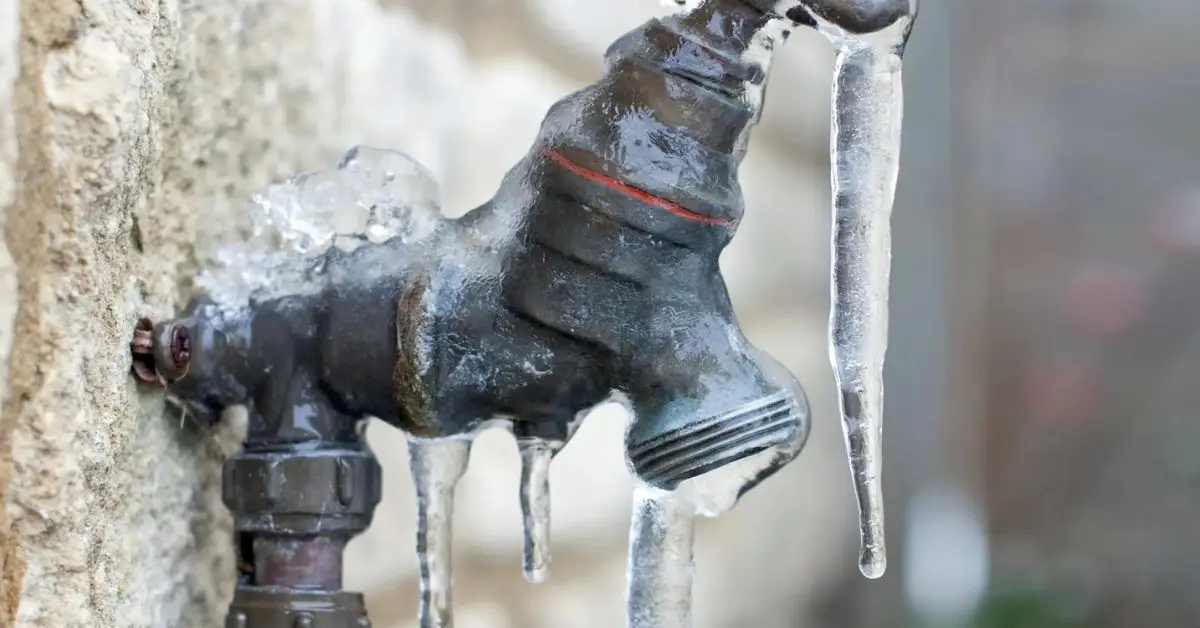
5. Protect Your Pipes Before They Freeze
Frozen pipes aren’t just inconvenient — they’re expensive. A single burst can flood a room, wreck flooring, and cost thousands to repair. The good news? It’s one of the easiest things to prevent.
Start by wrapping any exposed pipes — especially in basements, garages, or under sinks — with pipe insulation sleeves or even old towels secured with duct tape if you’re in a bind. You can find proper foam tubing at any hardware store for a few bucks.
For kitchen and bathroom sinks along exterior walls, open the cabinet doors to let warm air circulate. It’s a simple trick that can make a big difference during cold snaps.
And don’t forget outdoor faucets. Shut them off from the inside (using the shut-off valve if your house has one), drain the line, and install foam faucet covers.
The key is to do this before temps drop below freezing. Because once a pipe is frozen, you’re not winter-proofing anymore — you’re in damage-control mode.
6. Clear Your Roof and Gutters to Prevent Ice Dams
If you’ve ever dealt with an ice dam, you know how brutal they can be. Water backs up under your shingles, leaks into ceilings and walls, and causes hidden damage that’s expensive to fix. And here’s the worst part: most people don’t even realize what’s happening until it’s too late.
That’s why gutters matter more in winter than you think.
Start by cleaning out leaves, sticks, and debris — anything that can trap melting snow. Clogged gutters force water to refreeze on your roof edge, creating that dam. Use gloves, a stable ladder, and play it safe. If you’re not comfortable up there, get a gutter scoop on a pole or ask a neighbor for help.
Then check your roofline for trouble spots — loose shingles, cracked flashing, or overhanging tree branches. These can all lead to snow build-up and leaks.
You don’t need to climb on the roof to do most of this. A little prevention at ground level can keep thousands of pounds of ice — and water — from finding its way into your ceiling later.
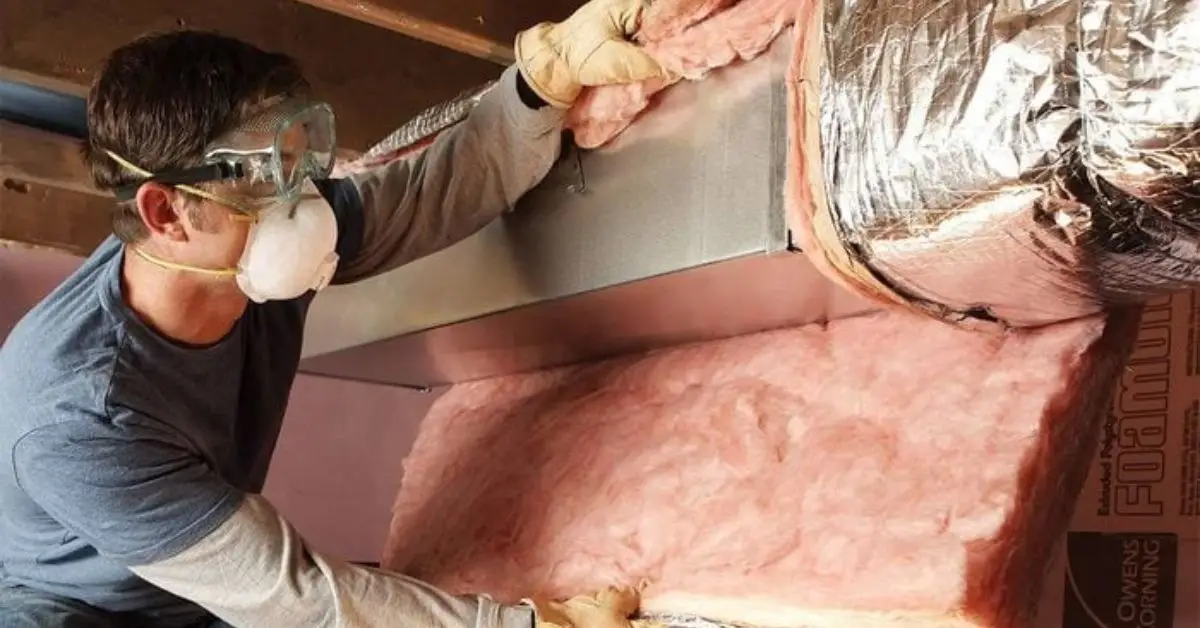
7. Insulate the Places You Usually Forget
Everyone thinks about windows and doors — but what about your attic, crawlspace, or even floors? Heat rises, and if your attic isn’t insulated well, you’re basically paying to warm the sky.
Family Handyman
Start with your attic hatch — it’s a major escape point most people overlook. Add foam board or batt insulation around the hatch frame to seal it tight. If you can safely get into the attic, check if the insulation is at least 10–14 inches deep (that’s the standard for colder climates).
For floors above unheated spaces like garages or basements, lay down area rugs to add a thermal barrier. Even something as simple as a bath mat can cut the chill in small spaces.
If you’re not sure how much insulation your home actually needs, this insulation guide from the U.S. Department of Energy breaks it down by region and room type. It’s worth bookmarking.
The bottom line: don’t just heat your home — hold onto that heat by insulating the parts of your house that get ignored the most.
8. Get the Most Out of Your Heating System
You don’t need a new furnace to stay warm — you just need to make the one you have work smarter, not harder. While these winter-proofing fixes are simple DIYs, if you ever want to take your home’s comfort to the next level, these 10 easy renovation projects can keep you cool all summer long might inspire you.
Start with the basics: replace or clean your furnace filter every 1–2 months in winter. A clogged filter chokes airflow and makes your system work overtime. If you have radiators, bleed out trapped air to keep them heating evenly. And for electric baseboards, make sure they’re clean and free of dust buildup.
If you haven’t already, it’s time to install a programmable or smart thermostat. These can lower your heating costs by up to 10% a year just by adjusting temps when you’re asleep or away.
One more tip that sounds small but works: reverse your ceiling fans. Flip the switch so the blades push warm air down — especially in rooms with high ceilings. It’s free, takes 30 seconds, and you’ll feel the difference immediately.
9. Use Passive Heat and Everyday Habits to Your Advantage
You don’t need fancy tech to stay warm — sometimes, it’s the simple stuff that makes the biggest difference.
Open your blinds or curtains during the day, especially on south-facing windows. Let the sun do its job — it’s free heat. Then close them tightly at night to trap warmth inside. Pair that with thick thermal curtains, and your windows instantly become more efficient.
In big or drafty homes, close off unused rooms. It’s easier (and cheaper) to heat the spaces you’re actually using. I also use rolled towels at the base of closed doors to stop heat from drifting where it’s not needed.
Want a full list of low-cost tricks that work? This guide from Real Simple has some of my favorites — and they’re actually practical, not gimmicky.
Small changes in your routine — like baking more often or drying laundry at night — can also raise indoor temps naturally. Just like you can winter-proof your home to keep the cold out, there are smart, low-tech ways to cool your home efficiently in summer — you can check out these 9 genius methods to stay cool without AC. The trick is using every bit of warmth you already have before turning up the heat.
10. Stock Up and Stay Ready for Emergencies
Even if your home is perfectly winter-proofed, storms can still knock out power, heat, or water when you least expect it. That’s why having a few basic supplies on hand isn’t just smart — it’s essential.
At the very least, keep a stash of flashlights, batteries, blankets, bottled water, and non-perishable food. A portable phone charger or power bank is a must. If you rely on electric heat, think about a safe backup — like a propane heater rated for indoor use, or even a wood-burning option if your home allows it.
Also, double-check your smoke and carbon monoxide detectors. Winter increases the risk of CO buildup, especially if you’re using space heaters or fireplaces. Test the batteries and replace them if you’re unsure.
Not sure what else you might need? This emergency winter checklist from Ready.gov lays out everything clearly — from car kits to pet supplies.
Because when the power goes out and the temperature drops, it’s not about being overprepared. It’s about being able to stay safe and warm until help or heat returns.
Bonus Tips Most People Overlook (But You Shouldn’t)
Use the Viral Foil Trick Behind Radiators
One of the best hacks I’ve picked up? Putting reflective foil behind your radiators — especially on external walls. It bounces heat back into the room instead of letting it seep into the wall. This tip blew up on TikTok thanks to property experts like “That Property Guy,” and for good reason: it’s cheap, easy, and it works.
You can buy proper radiator foil or even use aluminum kitchen foil as a quick fix.
Prevent Condensation and Mould Before It Starts
When it’s freezing outside, it’s tempting to keep windows sealed 24/7. But that leads to trapped moisture, which turns into mould and condensation — especially in kitchens, bathrooms, and bedrooms.
The solution? Run exhaust fans, crack a window briefly while cooking or showering, and avoid drying clothes indoors whenever possible. These small habits help your home breathe.
Look Into Tax Credits and Rebates
If you’re investing in insulation, energy-efficient windows, or smart thermostats, check for local or federal rebates. The U.S. government offers incentives for energy-saving home improvements under the Inflation Reduction Act. A quick search could save you hundreds.
You Don’t Need a Pro — Just a Plan
Winter-proofing your home isn’t about doing everything perfectly. It’s about knowing where heat escapes, what’s vulnerable, and fixing those things before the weather turns harsh. With the steps we’ve covered, you can stay warm, avoid costly emergencies, and keep your energy bills in check — all without hiring anyone.
Even if you just tackle a few of these tips today, you’re already ahead of the game.
So — what’s the first fix you’re going to start with?
Drop it in the comments or share this with a friend who always waits until the last minute to prep for winter. Let’s stay warm, smart, and ready this season — without wasting a dime.
For more smart DIY tips and home fixes, visit Build Like New — your go-to guide for making your home work better, every season.
Disclaimer: The tips in this article are for general informational purposes only. Always use caution with tools, electrical systems, and ladders. For complex repairs or safety concerns, consult a qualified professional.

