
4 Smart Tricks to Keep Needles Off the Floor With a Real Christmas Tree
Every year when I bring home a real Christmas tree, I love that first moment—the smell of fresh pine, the warmth it brings to the room, the feeling that the season has officially started. And then, almost immediately, the needles start showing up. First a few on the tree skirt… then a small pile near the back… then a trail across the hallway like the tree decided to migrate on its own.
If you’ve dealt with this before, you know it’s not just about keeping the floor clean. Loose needles get stuck in socks, clog vacuums, scratch hardwood, and somehow end up hiding under furniture until spring. After testing different trees, tools, and tricks over the years—and digging through what experts actually recommend—I realized most “needle-drop tips” online repeat the same obvious advice but don’t show you how to stop the mess before it starts.
So in this guide, I’m sharing the four strategies that actually make a visible difference. They’re simple, practical, and based on what both experts and real homeowners say works—not the usual recycled text you see everywhere. If you want the look and smell of a real tree without spending the whole month sweeping, you’re in the right place.
Before you scroll, I’d love to know: what’s the biggest needle problem you usually run into—daily shedding, floor scratches, or the cleanup after taking the tree down?
Why Real Christmas Trees Shed Needles (and Why It Matters)
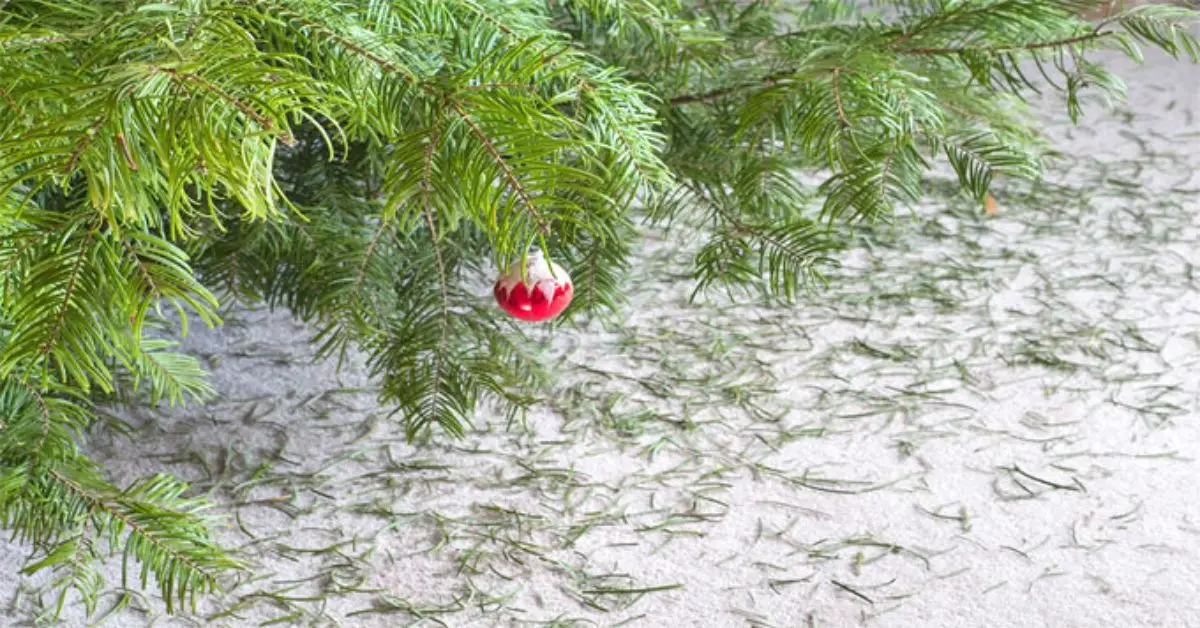
Every time I bring home a real tree, I know exactly what’s waiting for me if I’m not careful: needles on the floor. But a tree never starts shedding without a cause. Once it’s cut, it begins losing moisture, and dry needles fall faster—especially if the tree was stressed during transport. And the moment you place it near a heat source, the drying speeds up even more.
Experts point out that most needle drop comes from lack of moisture, transport shock, and heat exposure. You can see this explained clearly in this guide from Ideal Home that breaks down why Christmas trees shed when they’re stressed: “how to stop your Christmas tree from dropping its needles”.
Quick signs your tree is stressed:
• Needles snap instead of bending
• Branch tips feel dry within a day
• More shedding when heating turns on
• Water in the stand drops fast
Genius Strategy #1: Buy & Prep Your Tree the Right Way
Most people focus on watering, but the real prevention starts long before the tree enters your home. A fresh, well-handled tree will shed far fewer needles, and you’ll notice the difference within the first week.
Choose a Fresh, High Needle-Retention Tree
Some species are naturally better at holding their needles—Fraser, Noble, and Nordmann firs stay fuller, bend better, and don’t snap as quickly. When I’m picking out a tree, I test its freshness the same way every year.
What to check when choosing your tree:
• Gently pull a branch—only a few needles should come off
• Needles should look flexible, not dry or brittle
• The trunk should have a moist, clean cut
• The tree should feel heavy (heavier = more moisture)
A fresh tree starts with fewer loose needles, so the mess stays under control from day one.
Shake & Trim Before You Bring It Inside
Even a great tree carries loose needles from the field and transport. Shaking it outside drops a surprising amount before it ever hits your floor. After that, a quick half-inch trim at the base reopens the trunk so it can drink water properly.
Before bringing the tree inside, do this:
• Shake the tree outside
• Trim half an inch off the base
• Tap the trunk to release hidden debris
• Brush branches lightly to remove stuck needles
Before bringing the tree inside, make sure you clear the area properly to prevent accidents and mess — you can check this guide on 6 items you must clear before setting up your Christmas tree for a full checklist.
A few minutes of prep now saves hours of cleanup later.
Genius Strategy #2: Keep Your Tree Hydrated & Cool
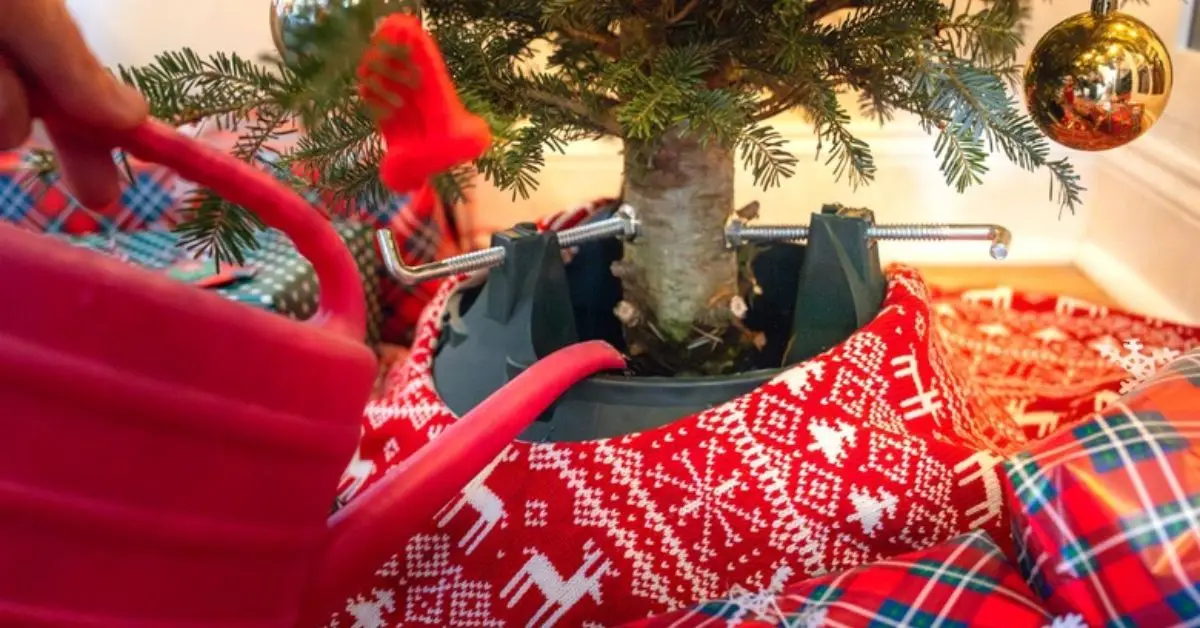
If there’s one habit that makes the biggest difference in needle drop, it’s hydration and avoiding heat stress. A real tree behaves like a giant cut flower — when it gets water and stays cool, its needles stay supple and cling to the branches. Most articles stop at “just water it,” but the details matter a lot more.
Daily Watering Routine That Works
In the first week especially, a tree can drink up to a gallon of water every day. I learned early on that letting the stand run low even once can set the tree up to dry out faster for the rest of its life in your house.
Your watering routine should include:
• Checking the stand first thing each morning
• Keeping the base submerged at all times
• Having a small watering jug beside the stand for quick refills
Placement Tips to Preserve Moisture
Where you put your tree matters just as much as how much water it gets. Heat sources — vents, radiators, and fireplaces — act like drying machines. When your tree is near heat, the needles dehydrate faster and start falling sooner than they should.
For practical, expert-backed tips on avoiding heat-related needle drop and keeping your tree fresher longer, you can reference this guide on how to stop Christmas tree needles from falling.
Smart placement habits:
• Keep the tree well away from heat vents and radiators
• Don’t place it directly beside a fireplace. Keep your tree away from fireplaces, not only to prevent drying but also because certain items can create dangerous fumes — check out this list of 7 things you should never burn in your fireplace to stay safe this holiday.
• Avoid spots that get direct afternoon sun
• Use cool LED lights to reduce heat from bulbs
While decorating, there are a few common mistakes that can actually worsen needle drop — here’s a helpful post on 6 things you should stop doing when decorating your Christmas tree to keep it fresh longer.
Boost Humidity Around the Tree
Indoor air in winter is dry, and dry air pulls moisture right out of needles. I place a small humidifier near the tree or mist lightly once a day. It’s a simple step that most guides overlook, but it really helps keep needles elastic and less likely to drop.
Easy humidity boosters:
• Use a mini humidifier on a low setting near the tree base
• Lightly mist the branches once each day
• Place a shallow bowl of water nearby if the room is very dry
Genius Strategy #3: Smart Set-Up & Floor Protection

Even with perfect care, some needle drop is inevitable. The real win is keeping those needles contained so they don’t spread across your home or scratch your floors. A smart setup saves you hours of cleanup and keeps your space looking neat the entire season.
Catch Mess Before It Happens
Over the years, I learned that a wide tree skirt or protective mat is more than just decoration — it’s the first line of defense. The needles that do fall usually land from the outer branches, so anything that extends beyond that drip line makes cleanup much easier.
Simple setup wins:
• Use a wide, heavier tree skirt so it doesn’t bunch or slide
• Choose a waterproof mat if your tree tends to drip sap
• Make sure the skirt or mat reaches the widest branch tips
Pre-Vacuum the Area and Create No-Go Zones
Before I put the tree up, I vacuum the entire area. It sounds small, but starting with a clean floor helps you spot new needles instantly. And if you have a robot vacuum or pets, creating a small buffer zone around the tree can save you from a lot of accidental bumps.
Many people share this tip on Reddit — pre-clean, then block off a small perimeter so pets and bots don’t run into the stand.
Before setting up, try this:
• Vacuum the floor where the tree will stand
• Create a soft boundary using furniture, baskets, or a small gate
• Use robot-vacuum “no-go” settings to keep it from hitting the tree
• Keep pets from sleeping under the branches to avoid needle tracking
Catch Needles During Removal
Taking the tree down is when most people face the real needle explosion. I’ve learned to prep the area before touching the tree. A large sheet, towel, or old blanket around the base catches nearly everything that falls during the process.
Make removal painless:
• Lay a sheet under the tree before you begin
• Wrap the sheet loosely around the trunk as you tilt the tree
• Carry the tree out with the sheet catching the fallout
• Shake the sheet outdoors before washing or tossing it
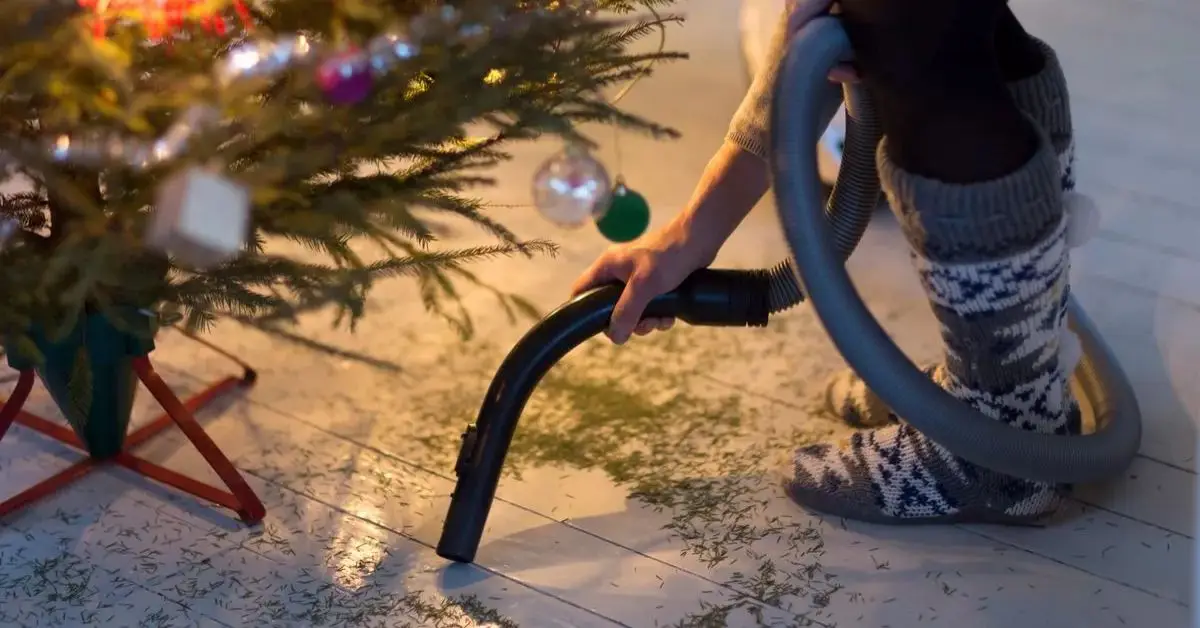
Genius Strategy #4: Fast Cleanup Without Damage
No matter how careful you are, some needles will drop. What separates a stressful cleanup from a quick one is the tools and techniques you use — and a few tricks most blogs don’t bother to share.
Let’s be honest: I’ve made the mistake of grabbing my vacuum only to clog it with sap and needles. After a few of those frustrating mornings, I figured out the tools that work with the mess instead of against it.
Safe Tools for Needle Pickup
Standard vacuum brushes can catch needles at first, but they also trap sap and dull bristles fast. Over time, that wears down your machine and makes cleanup harder, not easier.
Instead, pros and experienced homeowners swear by things like rubber brooms and soft carpet rakes. These tools pull needles up without pushing them deeper into carpet fibers.
You can check a practical guide on how to get pine needles out of carpets and rugs to see which tools experts recommend.
Best tools to keep handy:
• Rubber broom for carpet and rugs
• Soft-bristled brush for hardwood floors
• Carpet rake or lint sweeper for stubborn needles
Vacuum Smart (Only When You Need It)
If you’re going to use your vacuum, go in with a plan. Skip the main roller brush on hardwood — that’s a fast way to scratch floors and jam the machine with sap and needles.
Try this instead:
• Use the hose + crevice tool for edges and tight spots
• Avoid the main beater bar on rugs unless it’s detachable
• Go slow — multiple quick passes work better than one fast one
Make Cleanup Part of Your Routine
Once a day, I spend just a few minutes sweeping around the base and edges of the skirt or mat. A quick sweep before dinner or before bed keeps needles from migrating into high-traffic areas.
Daily mini-routine:
• Sweep around the tree base
• Empty the mat or skirt into your outdoor trash bag
• Spot clean with rubber broom before a big vacuum session
Wrap-Up: Keep Your Home Needle-Free This Holiday
After years of trial and error, I’ve realized that keeping a real Christmas tree needle-free isn’t about luck—it’s about small, smart steps: choosing the right tree, prepping it properly, keeping it hydrated and cool, protecting your floors, and cleaning strategically. Each step makes a real difference, and together they save you hours of frustration while keeping your home looking festive and fresh.
I’d love to hear from you: what’s your biggest needle challenge—daily shedding, messy cleanup, or tracking across the house? Drop a comment below and share your tips or ask questions—let’s learn from each other!
And if you want more practical, tested advice on home hacks, decor tips, and seasonal maintenance, make sure to visit Build Like New. I post guides there that are designed to save time, protect your home, and make life a little easier every day.
Your turn—how do you keep your holiday tree looking perfect without the needle nightmare? Let’s get the conversation started in the comments!
Disclaimer: The tips and advice in this article are for general informational purposes only. Results may vary depending on tree type, home environment, and individual circumstances. Always use caution when handling trees, tools, and cleaning equipment.

