How to Clean Your Refrigerator Coils in 5 Easy Steps and Save on Your Energy Bill
Cleaning your refrigerator coils is one of those tasks that often gets pushed to the back burner — out of sight, out of mind. But trust me, taking just a few minutes to clean those coils can make a big difference, not only in keeping your fridge running smoothly but also in slashing your energy bills. I used to ignore them myself, until I realized how much effort my fridge was putting in to stay cool when the coils were clogged with dust and dirt.
In this guide, I’ll walk you through five quick, easy steps to clean your fridge coils — no special tools needed, and you won’t have to spend hours doing it. Plus, I’ll show you why regular maintenance of those coils can save you a chunk of change each month. Ready to make your fridge work smarter, not harder? Let’s get started.
Why You Need to Clean Your Refrigerator Coils
You might not think about your fridge coils often, but they play a major role in keeping your refrigerator running efficiently. When the coils get covered in dust and debris, they have to work much harder to release heat. This means your fridge is using more energy, which leads to higher electricity bills.
Think of the coils as the lungs of your fridge — if they’re clogged, your fridge can’t “breathe” properly. The science behind it is simple: dirty coils make the fridge’s compressor work overtime, using up more electricity. In fact, studies show that cleaning your fridge coils can reduce energy consumption by up to 30%.
By taking just a few minutes to clean the coils, you’re helping your fridge run more efficiently, and in turn, saving money. And it’s not just me saying this. Trusted sources like the U.S. Department of Energy recommend regular fridge maintenance for energy efficiency. It’s an easy fix that leads to big savings over time.
Tools You’ll Need for Cleaning Refrigerator Coils
Before we dive into cleaning, let’s talk about the tools you’ll need. Don’t worry — you won’t need anything fancy. Just a few basic items will do the trick and make the job a whole lot easier:
- Vacuum cleaner with a hose attachment: This is key for getting rid of the loose dirt and dust around the coils. It’ll save you time and effort in the long run.
- Coil cleaning brush: A specialized brush with thin bristles is perfect for getting deep between the coils, where dirt tends to hide.
- Soap and water solution: A simple solution for wiping away any stubborn grime or sticky residue left behind.
- Optional: Compressed air: If you want to go the extra mile, compressed air works wonders for blowing out the dust in tight spaces.
With these tools, you’ll be ready to tackle those coils in no time. It’s a quick, straightforward process that doesn’t require a lot of specialized gear — just a few basic tools you probably already have at home.
Step 1: Unplug Your Refrigerator and Locate the Coils

Before you start cleaning, safety is key! Always unplug your refrigerator to prevent the risk of electric shock while working near the coils. It only takes a moment to unplug, and it ensures you can work safely without worrying about electrical hazards.
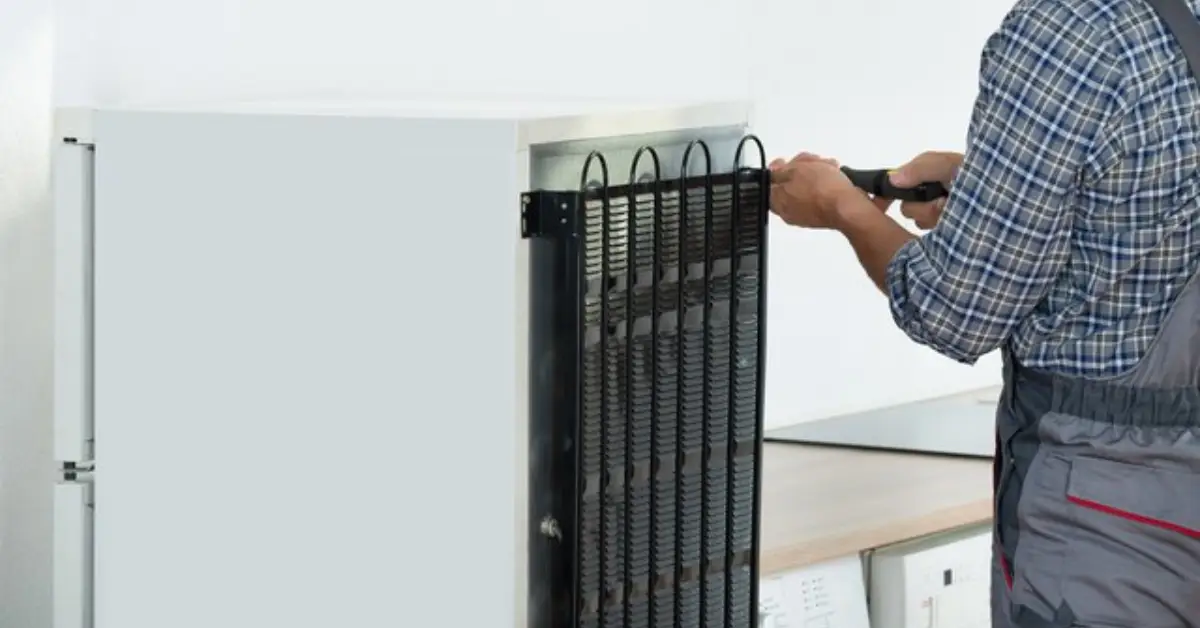
Now, let’s find the coils! Depending on the model of your fridge, they can be located in different places:
- Behind the fridge (usually on the back).
- Underneath the fridge (sometimes beneath a grille).
- At the back near the bottom, behind a panel or grille.
If the coils are underneath, you’ll likely need to remove the base grille to access them. Once that’s done, you’ll be able to easily spot the coils and begin the cleaning process.
After this, you can add a helpful tip: If you’re interested in more home cleaning tips, like ways to make your kitchen more efficient, check out 10 Kitchen Cleaning Shortcuts You Should Try Today. This would fit naturally after explaining how to locate the coils.
Step 2: Vacuum Away Loose Dirt and Dust
Dusting the coils is one of the most important parts of the cleaning process — but it’s a step that’s often skipped. Using a vacuum with a hose attachment, you can easily suck up loose dirt and dust from the coils.
- How to vacuum: Gently run the vacuum hose along the coils to remove the buildup of dust. Focus on the areas between the coils, as dirt tends to collect in these tight spaces.
- Why it matters: Loose dust prevents the coils from releasing heat properly, which causes the fridge to overwork and consume more energy.
- Pro-tip: Try to vacuum once a month or at least every three months, depending on your environment (e.g., pet hair, dust).
Right after explaining vacuuming, add: If you’re dealing with tough cleaning tasks around your home, be sure to explore Mold on Wood: 6 DIY Cleaning Tricks Every Homeowner Must Know, for more advice on tackling stubborn stains. This fits after the section where you explain how vacuuming can make a difference.
Step 3: Use a Coil Cleaning Brush for Deep Cleaning
Vacuuming alone doesn’t get the deep dirt that can really clog up your coils. For optimal fridge performance, you need to break out the coil cleaning brush. Here’s how to use it effectively:
- How to use the brush: Take the brush and gently scrub between the coils to dislodge any stuck dirt, grime, or debris. You can also use the brush to clean the surface of the coils that the vacuum didn’t reach.
- Thorough cleaning: Make sure you get into every nook and cranny of the coils — a thorough clean is key to keeping your fridge running efficiently.
- Be gentle: Avoid applying too much pressure when cleaning the coils. You don’t want to bend or damage them.
Once you explain using the brush, add: For additional cleaning hacks that help save time, you might want to read From Messy to Marvelous: 10 Pantry Cleaning Secrets That Work, for effective kitchen organization. This complements the cleaning theme in the section.
This step will make your fridge run much more smoothly, saving energy and prolonging the lifespan of your appliance. For a detailed guide on how to clean your refrigerator coils, check out this WikiHow article.
Step 4: Clean the Area Around the Coils
Cleaning the coils is crucial, but it’s just one part of the process. The area around the coils needs attention too. Over time, dust, pet hair, and dirt can collect around the fridge’s vents and beneath it. This buildup can block airflow, making your fridge work harder to stay cool.
- Clear the surrounding area: Remove any debris, dust, and pet hair that may have accumulated around the fridge. Don’t forget the vents and the space beneath the fridge — these areas can trap dirt.
- Why it helps: Proper airflow is vital for efficient cooling. Any blockage can lead to overheating, causing the fridge to use more energy to maintain the right temperature.
- Pro-tip: Clean underneath and behind the fridge at least once a year to ensure full maintenance. It’ll keep your fridge running optimally and help with energy savings.
Step 5: Reconnect the Power and Monitor

After all that hard work, it’s time to plug the fridge back in and see the results. This final step ensures that your fridge is running smoothly again after the cleaning process.
- Plug the fridge back in: Before doing so, make sure the coils are completely dry to avoid any electrical issues.
- Monitor the fridge: Once plugged in, make sure the fridge cools properly. It might take a few hours for the temperature to stabilize, so give it time to adjust.
- Pro-tip: Keep an eye on your energy bill over the next month to see the difference cleaning has made. You might notice a reduction in your monthly electricity usage.
For additional tips on cleaning and maintaining your fridge, check out this guide on The DIY Playbook.
How Often Should You Clean Your Refrigerator Coils?
A common question that comes up is: how often should you clean your fridge coils? The answer depends on your home environment, but for most households, cleaning the coils 2–3 times a year is enough. If you live in a dustier area or have pets, you may want to clean them more frequently — perhaps every couple of months.
Why it’s important: Regular cleaning keeps your fridge running at its best, ensuring optimal efficiency and extending the lifespan of your appliance. The less your fridge has to work to stay cool, the longer it will last and the less energy it will consume.
Final Thoughts on Cleaning Refrigerator Coils for Energy Savings
Now that you know how to clean your refrigerator coils and how often to do it, it’s time to take action. Remember, cleaning your coils can reduce your fridge’s energy consumption by up to 30%. That means lower electricity bills and a more efficient fridge that lasts longer.
Don’t wait — start cleaning your coils today! Share your experience in the comments below, and let us know how much energy you’ve saved.
For more tips on home maintenance and energy savings, visit Build Like New. We’ve got plenty of helpful guides to keep your home running efficiently.
Disclaimer: The information provided in this article is for general informational purposes only. While every effort has been made to ensure accuracy, we recommend consulting a professional for specific maintenance or technical issues with your appliance. Always follow safety guidelines when performing any DIY tasks.


