
Keep Water Out: 5 Must-Know Steps for Installing a French Drain
I learned about French drains the hard way. After one week of nonstop rain, I walked into a musty basement, soggy carpet, and a line of water creeping along the wall. A neighbor said, “You need a French drain.” I thought it was overkill—until I saw how simple the fix really is when you do it right.
If you’re staring at puddles by the foundation, gutters that dump water into flower beds, or a lawn that stays swampy for days, you don’t need a miracle—you need a controlled path for water to leave. That’s all a French drain is: a gravel trench with a perforated pipe that quietly moves water away from trouble.
Before we grab a shovel, I’ll help you plan like a pro—where the drain should start and end, how much slope you actually need, and the one step most DIYers skip: calling 811 to mark utilities. We’ll also talk materials that last (the right gravel and fabric), and a layout that won’t clog in six months.
I’ll be straight with you about costs, weekend timing, and the trade-offs between DIY and hiring help. You’ll see the five steps I use on real homes, the mistakes that cause most failures, and a simple maintenance check so you don’t fight the same leak twice.
If you want a clear, no-nonsense guide on how to install a French drain—without jargon, guesswork, or wasted money—you’re in the right place.
Quick question before we dig in: what’s the one spot where water always shows up at your place—along a wall, a window well, or a low patch in the yard?
What is a French Drain and How Does it Work?
I used to think a French drain was some complicated system only contractors could figure out. The truth is, it’s just a smart way to move water from where it’s a problem to where it can safely drain away. Imagine this: you dig a trench, line it with fabric, add gravel, lay a perforated pipe inside, cover it back up with more gravel and soil — and gravity does the rest.
Here’s how it works in plain language:
- Water that soaks into the ground finds the path of least resistance.
- Instead of pooling near your foundation or flooding your lawn, it seeps into the gravel trench.
- The perforated pipe inside collects that water and guides it downhill to a safe outlet — usually a curb, ditch, or lower area of your yard.
Think of it like giving excess rainwater its own hidden highway underground. No pumps, no electronics — just slope, gravel, and a pipe working quietly day and night. According to Housing.com, the key is making sure the pipe slopes away from your home so gravity always keeps water moving.
Tools & Materials Checklist (Before You Dig)

Before you grab a shovel, it helps to have every material on hand. I’ve learned that running back to the store halfway through digging a trench is the fastest way to lose motivation. Here’s a simple checklist to keep you ready:
- Perforated drain pipe (4-inch) – The backbone of the system; usually sold in 10- or 25-foot rolls.
- Gravel (¾-inch clean stone) – Keeps the pipe in place and lets water flow easily.
- Landscape fabric – Prevents soil and roots from clogging the gravel and pipe.
- Shovel and trenching spade – For digging the trench to the right depth and slope.
- Pickaxe or mattock – If your soil is rocky or compacted, you’ll need extra muscle.
- Level and string line – Helps you keep that all-important slope consistent.
- Wheelbarrow – Moving gravel without it is back-breaking.
- Gloves and safety glasses – Digging sounds easy until a chunk of soil hits your eye.
Cost Snapshot (average ranges):
- Gravel: $30–$60 per cubic yard
- Perforated pipe: $1–$2 per foot
- Landscape fabric: $20–$40 per roll
- Tool rentals (trencher, if needed): $150–$250 per day
A DIY French drain project usually runs a few hundred dollars in materials. Compare that to the thousands you’d pay a contractor, and it’s clear why many homeowners choose to tackle it themselves. And while you’re planning drainage, don’t forget about cold-weather risks. Taking steps to prevent frozen water pipes in winter can save you from another kind of costly water damage.
5-Step DIY Installation Guide
I’ll be honest with you — installing a French drain isn’t complicated, but it does demand patience and attention to detail. Skip one step and you’ll end up with standing water again. Here’s the five-step plan I recommend when walking homeowners through the process:
Step 1: Plan Your Drain Path: Before you even think about digging, map out exactly where the water should go. Start at the problem area (near a wall, soggy yard, or patio) and trace a path downhill to a safe exit point, like a curb or dry well. Always call your local utility service to mark underground lines — hitting a gas or cable line is no joke.
- Pro Tip: What most homeowners overlook is slope. You need at least 1 inch of drop for every 8–10 feet of trench to keep water moving.
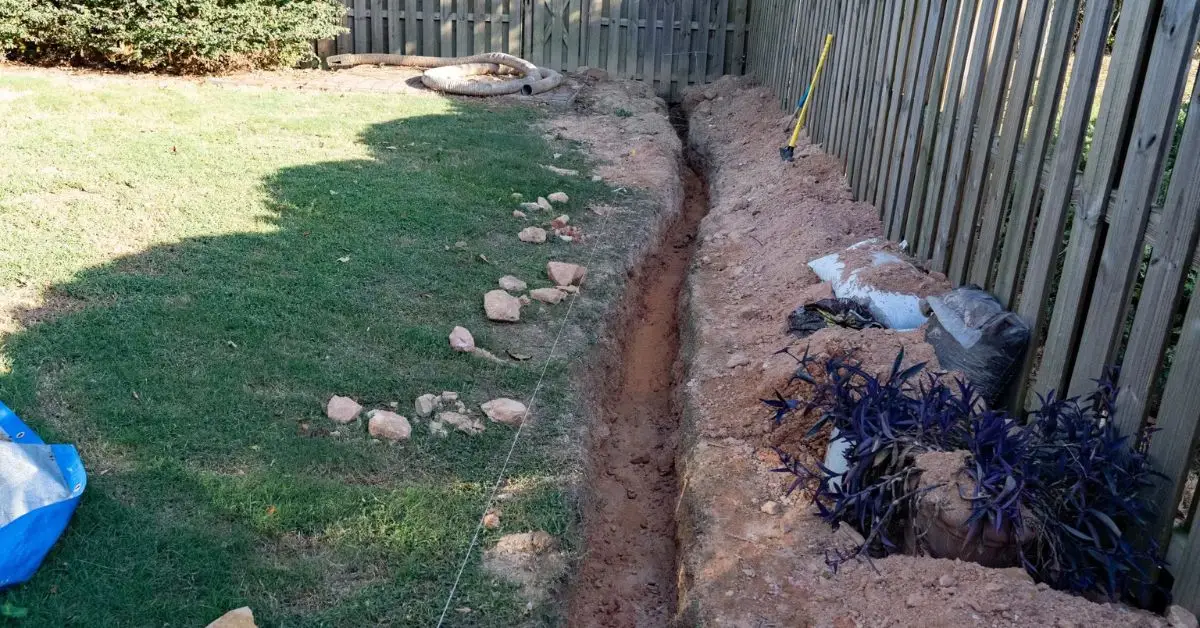
Step 2: Dig the Trench: Now comes the sweat. A typical trench should be about 18–24 inches deep and 12 inches wide. Keep your slope consistent the whole way — use a string line and level every few feet to stay on track.
- Pro Tip: Many people make the trench too shallow, which means the pipe sits close to the surface and clogs faster.
Step 3: Lay the Fabric & Gravel Base: Roll out landscape fabric along the trench, leaving enough to wrap over the top later. Add a few inches of gravel on the bottom — this is your drainage bed. The fabric keeps soil from mixing with gravel and clogging the system.
- Pro Tip: Don’t skip the fabric. Without it, dirt will slowly choke your drain.
Step 4: Place the Pipe & Cover with Gravel: Lay the perforated pipe with the holes facing down. Why? So water pools under the pipe and seeps in naturally. Cover it with at least 6 inches of gravel, then fold the fabric over the top.
- Pro Tip: Make sure the pipe outlet is clear and far enough from your foundation. A blocked outlet is the #1 reason drains fail.
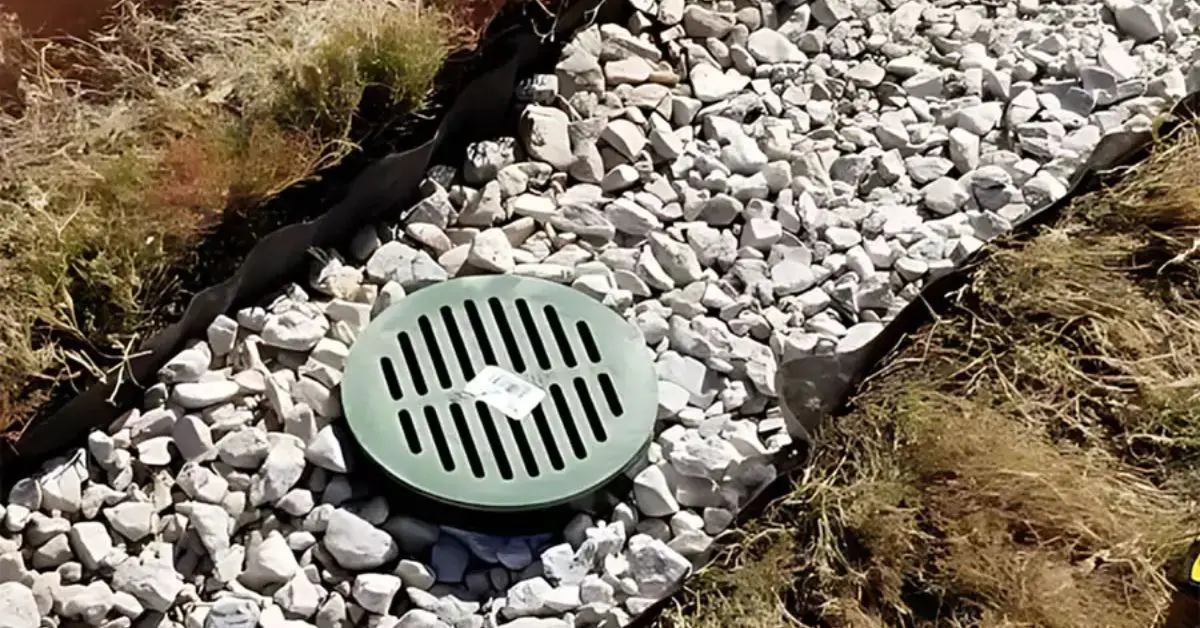
Step 5: Finish the Surface: Top the trench with soil, sod, or even decorative stones so it blends into your yard. If done right, no one will even know a drain is there — but you’ll know the difference when the next storm hits.
- Pro Tip: Don’t pack the topsoil too tightly. Let the surface breathe so water can filter down into the drain.
DIY vs Hiring a Pro – Which is Right for You?
Now here’s the big question: should you tackle this on your own or pay a professional? I’ve seen both sides — some homeowners save thousands, while others regret cutting corners. Let’s lay it out side by side.
| Factor | DIY | Professional |
|---|---|---|
| Cost | $300–$1,500 for materials | $5,000–$10,000 full install |
| Time | 1–2 weekends of digging & setup | 1–3 days, handled start to finish |
| Tools | Shovel, wheelbarrow, level, possible trencher rental | Heavy equipment, precision grading tools |
| Warranty | None, you’re on your own | Most pros offer multi-year guarantees |
| Drainage Effectiveness | Depends on your slope & care | Consistent results, fewer failures |
According to Better Homes & Gardens, hiring a pro often makes sense if you’re dealing with basement flooding or a large property, while smaller yard issues can be solved with a careful DIY approach.
Common Mistakes That Lead to Drain Failure
Edens Structural Solutions
I’ve lost count of how many times I’ve seen a French drain project fail not because of bad materials, but because of avoidable mistakes. If you know these ahead of time, you’ll save yourself frustration (and money).
- Wrong slope – If your trench doesn’t drop at least 1 inch every 8–10 feet, water will sit still instead of flowing out. A drain without gravity is just a buried pipe.
- No landscape fabric – Skipping the fabric is a recipe for clogged gravel. Soil and roots slowly creep in and choke the system. Moisture problems don’t just stop at clogged drains. Excess dampness indoors can also trigger mold growth, so it’s worth learning the key steps to protect your home from excess moisture before small leaks turn into major repairs.
- Wrong gravel size – Pea gravel looks tidy but packs too tightly. Use ¾-inch clean stone so water flows freely.
- Pipe outlet near foundations – I’ve seen people end their pipe right next to the house. All you’re doing then is moving water from one wall to another. Always direct it well away from your home.
How Much Does a French Drain Really Cost? (With Time Estimates)
When I priced out my first French drain, I was shocked by how much variation there was online. Some sources said “a few hundred,” others said “several thousand.” The truth lies somewhere in between — and depends on whether you DIY or hire a contractor.
Material Breakdown (average ranges):
- Perforated pipe (4-inch): $1–$2 per foot
- Gravel: $30–$60 per cubic yard
- Landscape fabric: $20–$40 per roll
- Misc supplies (connectors, outlet grate): $50–$100
Tool Rental Costs:
- Trencher: $150–$250 per day
- Wheelbarrow, shovel, level: often free if you already own them
Timeline:
- DIY Project: Plan for 1–2 full weekends, depending on soil and trench length
- Professional Installation: Usually 1–3 days, but you’ll pay for the speed
According to HomeGuide, the average homeowner spends between $2,000 and $6,000 for a professionally installed French drain. DIY versions typically cost a fraction of that, though they demand sweat equity and careful planning.
My advice: do the math for your yard length and slope, then decide if the savings are worth your time.
Maintenance Tips for Long-Term Protection
Installing a French drain isn’t the finish line — it’s the starting point. If you want your system to keep working year after year, a little upkeep goes a long way. I tell homeowners to treat their drain like a car: check it, clean it, and don’t wait for a breakdown to notice something’s wrong.
- Seasonal checkups – After heavy rains or at the end of each season, walk the drain path. Look for standing water or soggy spots that could signal a blockage.
- Avoid debris clogging – Keep leaves, mulch, and soil from piling up around the outlet. Even a few sticks can stop water from flowing.
- Know when replacement is due – If you notice frequent backups, water seeping near the foundation again, or gravel that’s clogged with soil, it may be time to refresh the system. A well-installed drain usually lasts 10–15 years with care.
While you’re doing seasonal checkups, don’t forget other home systems. For example, making sure your kitchen runs smoothly with a healthy disposal is just as important — here are 7 garbage disposal mistakes you might be making and how to fix them.
A few minutes twice a year can save you thousands in water damage repairs.
Quick Takeaways & Next Steps
Here’s the no-fluff recap of what matters most:
- Plan carefully: map your path and call for utility checks.
- Slope right: gravity is your best friend — don’t ignore it.
- Don’t skip fabric: it’s the thin layer that makes the whole system last.
- DIY vs Pro: weigh your time, budget, and the size of your problem before deciding.
Bookmark this checklist for your next yard project. And before you go, I’d love to hear from you: have you ever tried tackling drainage issues on your own, or did you bring in a pro? Share your experience in the comments below.
For more practical home improvement tips like this, visit buildlikenew.com — your guide to making your home stronger, safer, and more comfortable.
Disclaimer: This guide is for informational purposes only. Always follow local building codes, call your utility service before digging, and consult a licensed contractor if you’re unsure. The cost figures are averages and may vary by location and project size.

