
6 Clever Tricks to Add Storage When You Only Have a Pedestal Sink
I’ve always loved the clean, open look of a pedestal sink, but let’s be honest—it’s a nightmare when it comes to storage. If you’re like me, you’ve probably stood in front of that sink, wondering where on earth to stash your toiletries, towels, or cleaning supplies without cluttering the bathroom. You want the elegance of a pedestal sink, but you also need practicality—and that’s exactly what this guide is for.
In this article, I’ll show you six smart ways to add bathroom storage with a pedestal sink, using solutions that actually work in real homes. These aren’t vague ideas or Pinterest-only inspiration; I’m talking about practical setups, clever hacks, and a few DIY tricks that can make a huge difference in small bathrooms. By the end, you’ll see that you don’t have to sacrifice style for storage—you can have both, and I’ll show you how.
Way 1: Wrap-Around Cabinets Designed for Pedestal Sinks
When I first realized how little room there was under my pedestal sink, I felt stuck. That empty space always seemed wasted. Then I discovered wrap-around cabinets, and honestly, it was a game-changer. These cabinets are specifically designed to fit snugly around the base of a pedestal sink, giving you storage without replacing your beautiful sink.
Here’s why I love them:
- Maximizes under-sink space: Perfect for bulky items like extra toilet paper, cleaning supplies, or hair tools.
- Keeps things organized: No more baskets strewn across the floor or cluttered countertops.
- Maintains the pedestal look: You don’t sacrifice style for functionality; your sink still looks open and airy.
If you want to see some practical examples, check out Lowe’s pedestal sink storage cabinets — they show how compact designs can completely transform tight bathrooms.
Pro tip: Measure the width and depth carefully before buying. Even a couple of inches can make a big difference in whether the cabinet fits comfortably around your sink without feeling cramped.
Way 2: Wall-Mounted Shelves and Vertical Storage
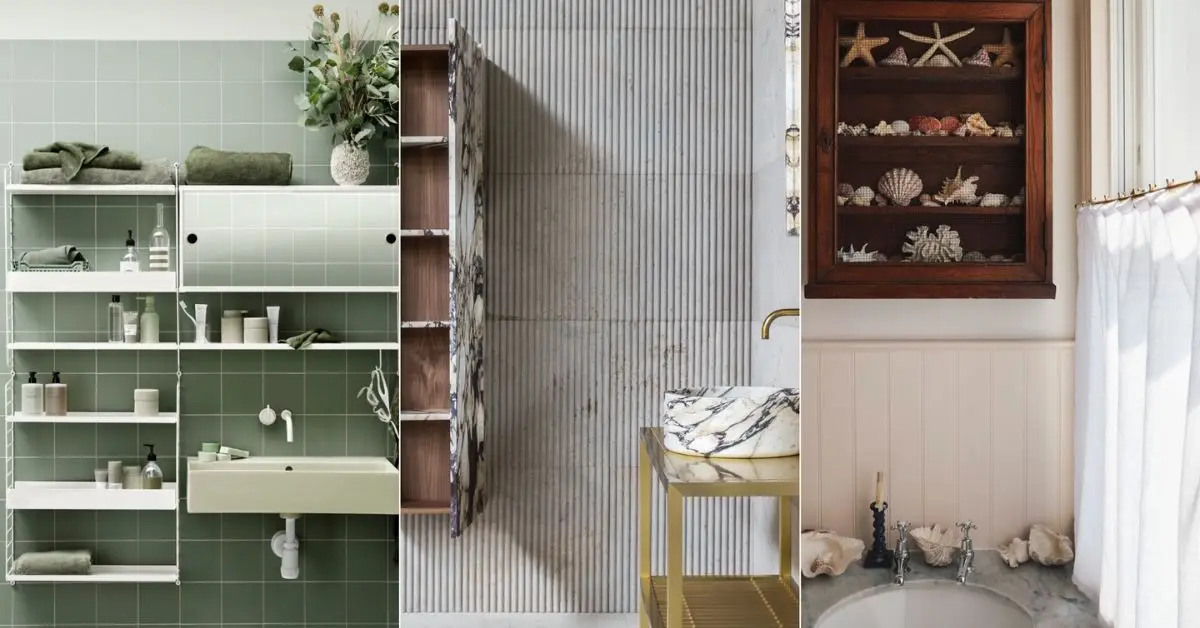
Once I added the wrap-around cabinet, I realized there was still a ton of vertical space going unused. That’s when wall-mounted shelves became my best friend. Using the walls above or beside your pedestal sink can dramatically increase storage without touching the floor.
Here’s what worked for me:
- Daily essentials in easy reach: Keep soap, hand towels, or toothbrushes right where you need them.
- Decor + function: You can mix storage with small plants, framed art, or decorative jars to make it feel intentional.
- Avoids floor clutter: Perfect for small bathrooms where every inch counts.
A common mistake I see is installing shelves too high or too low. You want them at a height that’s easy to reach but still leaves room for your mirror and lighting. For guidance, the Spruce wall-mounted shelf guide helped me get the placement just right.
Pro tip: Use baskets or bins on the shelves to group small items. This makes it look neat and prevents things from toppling over when you grab a towel or product.
Way 3: Pedestal Sink Skirt with Hidden Storage
I’ll admit, the first time I tried a pedestal sink skirt, I wasn’t sure it would look good. But when I installed one, it completely changed how I used the under-sink space. A simple fabric skirt hides baskets or bins, giving me extra storage for toiletries, cleaning supplies, or even a few hand towels—without any drilling or permanent installation.
Why I love it:
- Renter-friendly: No tools, no permanent fixtures, perfect for apartments or rental bathrooms.
- Affordable solution: A few yards of fabric and some hooks or Velcro is all you need.
- Keeps the sink stylish: You still see the pedestal silhouette, but now the clutter is out of sight.
Pro tip: Pick a fabric that coordinates with your bathroom’s color scheme. It makes the skirt feel like a design feature rather than a cover-up.
Way 4: Slim Rolling Carts or Tiered Corner Units
Even with cabinets and skirts, I quickly realized I needed flexible storage for items I reach for daily—especially in winter when bathrooms get extra messy quickly, making storage and organization even more critical. That’s where slim rolling carts and tiered corner units came in. That’s where slim rolling carts and tiered corner units came in. These pieces are small enough to fit next to your pedestal sink or in a corner, but they hold a surprising amount of essentials.
Here’s why they work:
- Flexible and movable: You can slide the cart out to clean or grab multiple items at once.
- Perfect for tight spaces: Narrow carts and tiered units fit where larger cabinets can’t.
- Organized and visible: Each tier can hold towels, soaps, or even a small basket for grooming tools.
I noticed a lot of people on Reddit recommending narrow rolling carts specifically for pedestal sinks—they’re a real solution for small, rental-friendly bathrooms. For some smart options, check out Wayfair’s narrow rolling carts for bathrooms — they show a variety of sizes that fit tight spaces perfectly.
Pro tip: Choose a cart with wheels that lock. It keeps everything in place while still letting you move it when needed.
Way 5: Recessed or Built-In Niche Storage
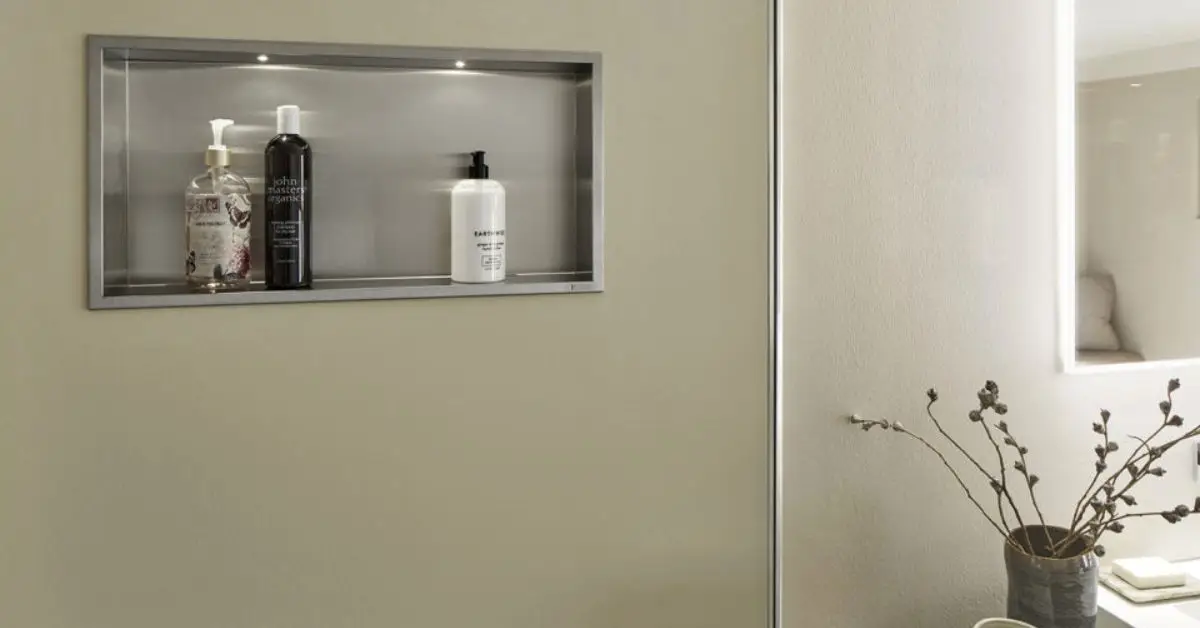
After trying cabinets, skirts, and carts, I realized there was still unused wall space that could be put to work. That’s when I started thinking about recessed or built-in niches. These clever storage spots use the depth of your walls to hold toiletries, decorative items, or even a few baskets—without taking up any floor space.
Why I like them:
- Permanent solution: Once built, you have a dedicated spot for essentials that won’t move or tip over.
- Maximizes wall depth: Even narrow walls can store soap, shampoo, or rolled towels neatly.
- Keeps everything organized: Each niche can be customized with shelves or containers to fit your needs.
Pro tip: If you’re renting or don’t want major construction, a shallow DIY niche using a slim wall shelf inset can mimic this effect. Even a small recessed shelf can make a big difference in cluttered bathrooms.
Way 6: Creative DIY Organizers (Magnetic Strips, Adhesive Hooks, Repurposed Furniture)
Sometimes, the simplest solutions are the most effective. I’ve found that a few low-cost DIY hacks can turn wasted spaces into functional storage almost instantly, while also helping prevent messes that guests might notice, like toiletries left out or expired products. I’ve found that a few low-cost DIY hacks can turn wasted spaces into functional storage almost instantly. Magnetic strips for grooming tools, adhesive hooks for brushes or loofahs, and small repurposed furniture pieces tucked beside the sink can hold more than you’d think.
Here’s how I use them:
- Magnetic strips: Perfect for metal grooming tools like scissors, tweezers, and nail clippers—keeps them in sight but off the counter.
- Adhesive hooks: Great for hanging brushes, washcloths, or even small baskets on walls or inside the cabinet doors.
- Repurposed furniture: A tiny dresser or a slim side cabinet can slide next to the pedestal sink and hold towels, supplies, or decorative baskets.
Pro tip: Start small. Even one or two hooks or a magnetic strip can clear up a lot of clutter and give you a sense of how much additional storage is really needed.
Styling Tips to Make Storage Look Intentional
Even after adding cabinets, shelves, and creative organizers, I noticed my bathroom could still feel cluttered if the storage didn’t “look right.” That’s why styling matters. You want your solutions to feel part of the design, not an afterthought.
Here’s what I focus on:
- Match hardware and finishes: If your sink has chrome fixtures, use baskets, knobs, or shelf brackets in a similar finish. It instantly feels cohesive.
- Group items in baskets or containers: Instead of random bottles and jars scattered, small baskets make everything look organized and intentional.
- Use symmetry where possible: Even a small bathroom benefits from visual balance. Pair shelves or bins evenly to create a clean look.
- Add decorative touches sparingly: A small plant, framed art, or a scented candle can make storage feel like part of the design rather than clutter.
Pro tip: Don’t overthink it—start with functional storage first, then style around it. Small touches go a long way in making your bathroom feel spacious and curated.
Final Checklist Before Installing Storage
Before you start drilling, measuring, or sliding cabinets into place, I always run through a quick checklist—and make sure your bathroom is fully clean so nothing gets in the way. This ensures that your storage works safely, fits perfectly, and doesn’t block plumbing or mirrors. This ensures that your storage works safely, fits perfectly, and doesn’t block plumbing or mirrors.
Here’s my go-to checklist:
- Measure everything twice: Width, depth, and height around your pedestal sink.
- Check plumbing access: Make sure nothing blocks pipes or shut-off valves.
- Confirm wall strength: Heavy shelves or cabinets need solid support.
- Consider clearance: Ensure drawers or doors can open without bumping the sink or walls.
- Plan placement for daily use: Keep items you reach for most within easy reach.
Pro tip: Take a photo of your space before installing anything—it helps when planning shelf heights or cabinet placement.
I’d love to hear how you’re tackling pedestal sink storage in your own bathroom! Share your tips, hacks, or questions in the comments below, and if you want more practical, real-life storage guides like this, check out Build Like New for step-by-step ideas and inspiration.
Disclaimer: This article is for informational and practical guidance only. Always measure your space, check plumbing, and follow safety instructions before installing or modifying any bathroom storage. Build Like New is not responsible for any damage or injuries resulting from DIY projects.

