
6 Effective Garage Door Seal Improvements You Can Do Yourself
Every time winter rolls around, I hear the same complaint from neighbors and clients: “My garage feels like a freezer, and the cold creeps into the house.” If that sounds familiar, you’re not alone. A poorly sealed garage door isn’t just uncomfortable — it hikes up your energy bills, lets in pests, and even shortens the life of your door.
I’ve spent years fixing these problems, and I’ve noticed most guides online repeat the same advice: “replace the bottom seal” or “add insulation.” Useful, yes, but not enough. What’s missing is the real homeowner’s perspective — the low-cost fixes that actually work, the mistakes that cause leaks to come back, and the hacks that keep your garage comfortable all year without draining your wallet.
That’s why I put together six practical weatherproofing hacks I trust. They’re easy to do, based on real results, and they’ll help you turn your garage from a drafty headache into a space you can rely on.
Before we dive in, let me ask: when was the last time you checked your garage door seals — last month, or not since you moved in?
Why Garage Door Weatherproofing Matters
If you’ve ever walked into your garage on a cold morning and felt that icy draft sweep across your feet, you know how much a weak seal can hurt. What many people don’t realize is that those small gaps aren’t just uncomfortable — they’re expensive. According to the U.S. Department of Energy, an unsealed garage can leak away up to 25% of a home’s heat, driving up your bills every single month.
And it’s not just about energy loss. When your garage door isn’t sealed properly:
- Drafts creep into your home, making heating and cooling systems work harder.
- Water seepage leads to damp corners, mold growth, and slippery floors.
- Pests like mice, roaches, and even snakes find an easy entry point.
- Dust and debris collect faster, leaving your garage messier than it should be.
I always tell homeowners: if you treat your garage as just a storage shed, you’ll ignore these leaks. But the moment you think of it as an extension of your home — a buffer zone for your comfort, safety, and energy bills — weatherproofing suddenly becomes non-negotiable.
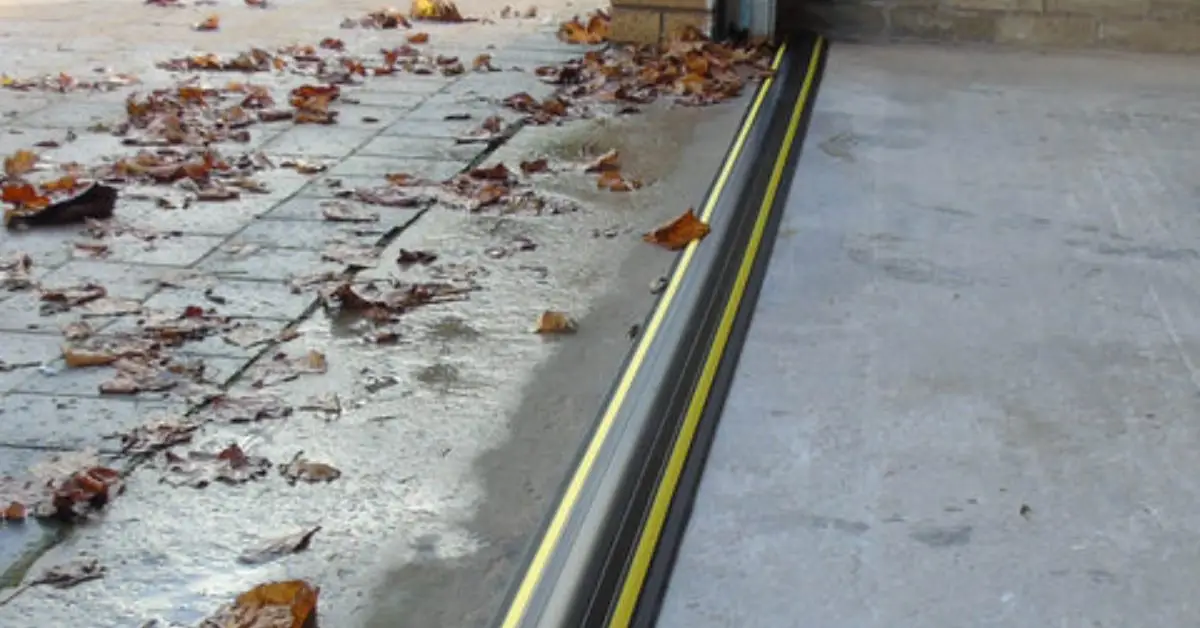
Hack #1 – Upgrade Bottom Seal & Threshold
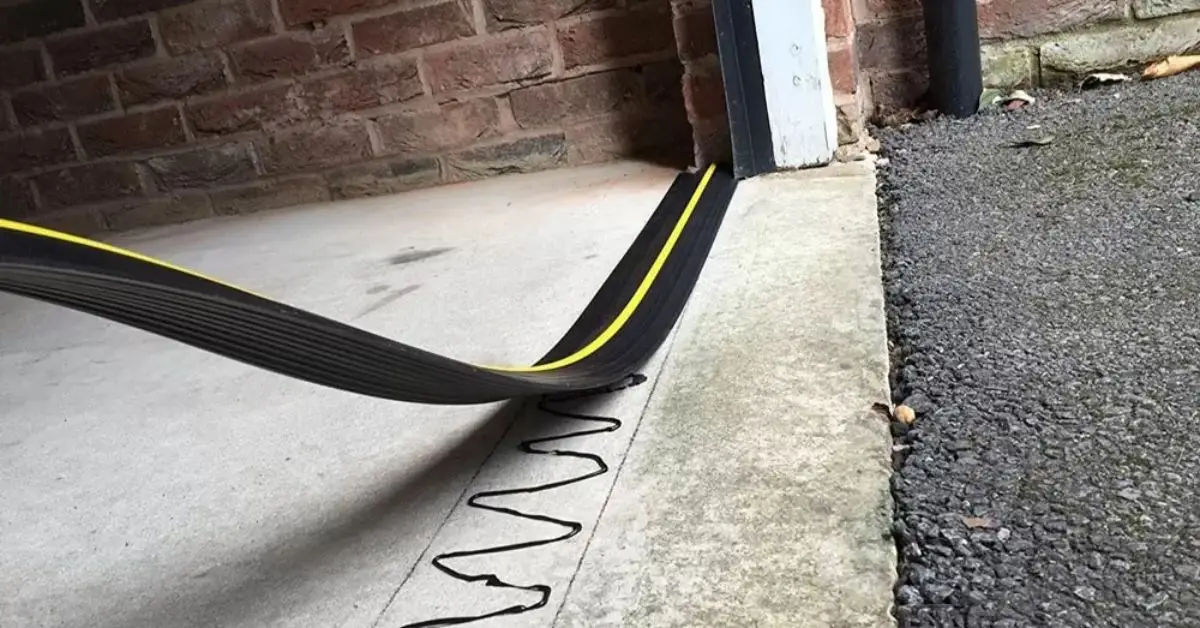
The very first place you should look is the bottom of your garage door. That thin rubber strip isn’t just decoration — it’s the barrier keeping out water, dirt, and critters. Over time, it gets brittle, cracks, and shrinks, leaving daylight (and cold air) shining through.
Here’s what I recommend you do:
- Replace the worn rubber or vinyl seal with a fresh one that matches your door’s thickness.
- Go one step further with a DIY threshold kit. This is a raised strip that bonds to the garage floor, creating a double defense against:
- Rain pooling inside
- Mice and bugs sneaking under
- Dust blowing in during windy days
I’ve seen households skip the threshold and end up mopping their garage every time it rains. For less than the cost of a dinner out, you can stop that problem permanently. If keeping out water and pests is a priority, you might also want to think about security. Here are 7 smart ways to protect your garage from burglars that go hand in hand with sealing and weatherproofing.
Hack #2 – Add Side and Top Weatherstripping
Once the bottom is sealed, don’t forget the sides and top edges of the garage door. Those slim gaps may look harmless, but they let in more cross-drafts than you’d expect. Proper weatherstripping along the vertical tracks and top frame keeps your garage airtight.
A few important things to keep in mind when installing:
- Cut strips to the exact length — don’t leave overhangs that peel back in the wind.
- Nail or screw them in straight and flush, so they press evenly against the door.
- Avoid thin or cheap materials; they won’t last a season.
One mistake I see all the time (and even HouseDigest has called this out) is homeowners leaving uneven gaps because of bad measurements. That defeats the entire purpose of the project. Take your time, measure twice, and you’ll get it right.
When you combine a new bottom seal, threshold, and side/top weatherstripping, you create a full perimeter barrier. Think of it like putting a jacket zipper all the way up — half-closed won’t keep you warm, and half-sealed won’t keep your garage protected.
Hack #3 – Insulate Garage Door Panels
Sealing the edges is a big step, but if your garage door itself is just a thin sheet of metal, it won’t hold back the cold. That’s where insulation panels come in. You’ve got two main options:
- Rigid foam boards – Lightweight, easy to cut, and excellent at reducing heat transfer.
- Reflective insulation kits – Foil-faced barriers that bounce radiant heat back, especially useful in hot summers.
From what I’ve seen, even a basic insulation kit can keep your garage 10–12°F warmer in winter and noticeably cooler during heat waves. If you use your garage as a workshop, gym, or even just for storage, this single upgrade makes the space usable year-round. It’s one of those fixes you notice immediately. And if heat is your main issue, especially in the summer, don’t miss these affordable garage cooling hacks that work even without an AC.
Hack #4 – Seal Cracks in Floor and Walls
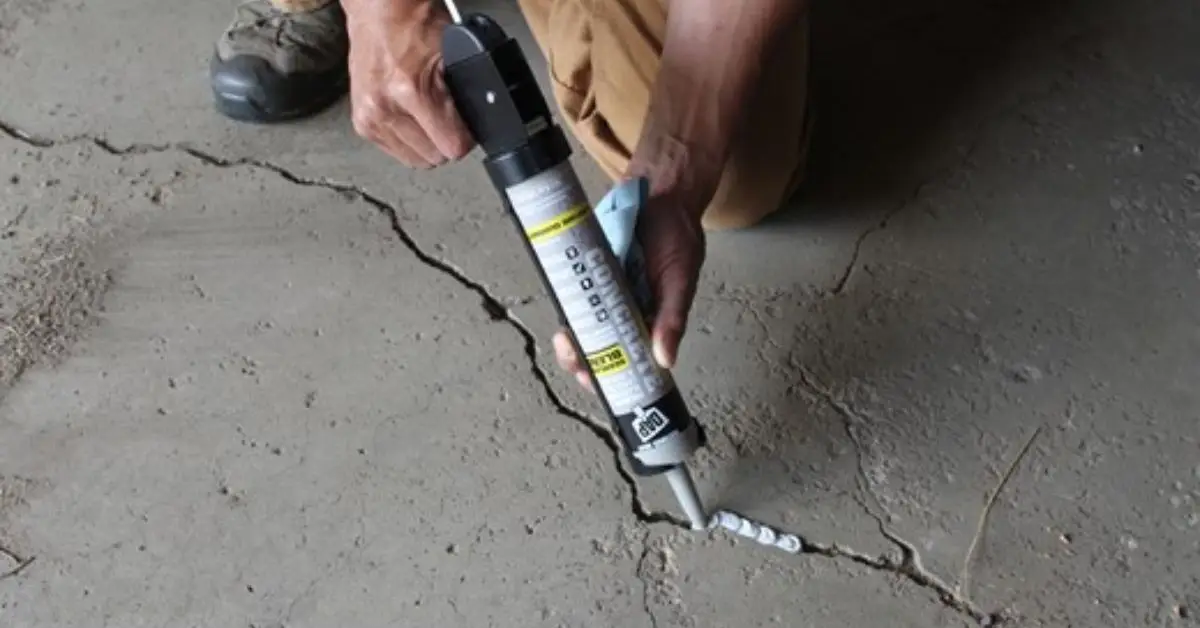
Don’t stop at the door itself. Look down at the concrete floor and around the walls. Any visible crack is basically an open invitation for water, bugs, and even mice. I’ve seen homeowners shocked when a heavy rainstorm sent water trickling across the garage because of a hairline crack.
Your fix:
- Use concrete caulk for smaller gaps.
- For wider cracks, grab a can of expanding foam.
Both are cheap, quick to apply, and they’ll save you from hours of cleanup later.
Hack #5 – Install Garage Door Brush Seals
Here’s a hack you don’t hear about often: brush seals. Instead of rubber or vinyl, these use stiff bristles that sweep along the ground or frame. They might look unusual, but they’re excellent at blocking:
- Dust and dirt in windy regions
- Leaves and debris that get blown around in the fall
- Small pests looking for a warm entry
I like to recommend brush seals for anyone who lives near open fields, construction zones, or areas where sand and grit constantly blow inside. They’re not as common in DIY guides, which is exactly why they stand out as a smart upgrade. A well-sealed garage also makes your whole home safer. If you want to go a step further, check out these smart solutions to keep your basement safe from break-ins.
Tell me honestly: if a storm hit tonight, would your garage stay dry and clean, or would you be sweeping water and dust out in the morning?
Hack #6 – Smart Weatherproofing Add-Ons
Not every solution has to be old-school rubber and foam. If you’re the type who likes a tech edge, a few smart add-ons can make weatherproofing easier and more effective.
- Motion-activated heaters or humidity sensors can kick in when the temperature dips or moisture rises, keeping your garage comfortable without wasting energy.
- Smart garage door openers now send alerts to your phone if the door isn’t fully shut. That means no more “Did I close it?” panic while you’re at work.
Seasonal Weatherproofing Checklist
Weatherproofing isn’t a one-and-done job — it shifts with the seasons. Here’s a quick guide you can keep handy:
- Winter: Focus on bottom seals, thresholds, and adding insulation to keep out icy drafts.
- Summer: Reflective insulation and ventilation are your best friends to cut down heat buildup.
- Rainy season: Threshold strips, caulking, and crack sealing stop water from sneaking in.
Think of it as rotating your tires — regular, small checks each season save you from big headaches later.
Cost vs Savings – Is Weatherproofing Worth It?
Let’s be real: every hack on this list costs money. But the numbers show why it’s worth doing.
- Average hack cost: anywhere from $20 for seals to $150 for full insulation kits.
- Potential yearly savings: over $200 on energy bills when your garage stops leaking air into the house.
Sealing and insulation are among the most cost-effective upgrades for reducing household energy waste. When you add up the comfort, cleaner garage, and fewer pests, the return goes beyond just the dollar amount.
Weatherproofing isn’t a flashy upgrade, but it’s one of those changes you’ll notice every time you walk through your garage — warmer winters, cooler summers, and bills that finally calm down.
Common Mistakes Homeowners Make
Even the best products won’t work if they’re installed wrong. I’ve seen plenty of DIY jobs where the effort was there, but small errors wiped out the benefits. A few mistakes to avoid:
- Overlapping weatherstripping – this leaves bumps and gaps instead of a tight seal.
- Using the wrong seal thickness – too thin, and drafts sneak through; too thick, and the door won’t close smoothly.
- Skipping primer before caulking – without primer, caulk peels away faster and water seeps back in.
These slip-ups don’t just waste your time, they make you think weatherproofing “doesn’t work.” Done right, it absolutely does.
Final Takeaway – Small Fixes, Big Comfort
You don’t need to tackle every hack in one weekend. Even replacing a bottom seal or adding a threshold can make your garage feel warmer, drier, and cleaner almost instantly. Once you see the difference, you’ll want to keep going.
Weatherproofing is one of those projects where small fixes add up to big comfort — and a healthier energy bill. So pick one hack, try it out this weekend, and notice how your garage feels when you walk in next week.
Your turn: Which of these hacks do you think will make the biggest impact in your garage? Drop your thoughts in the comments — I’d love to hear what worked for you.
For more smart home improvement tips and guides, check out Build Like New — where we turn everyday fixes into lasting upgrades.
Disclaimer: The tips in this article are for general DIY guidance only. Always follow product instructions and safety precautions. If your garage door requires spring, track, or motor adjustments, consult a licensed professional — attempting those repairs yourself can be dangerous.

