
7 Creative DIY Ideas to Conceal Outdoor Trash Cans and Beautify Your Yard
Let’s be honest — no one likes seeing trash cans lined up like soldiers at the end of the driveway. I used to think it didn’t matter much until a neighbour quietly said, “Your bins ruin your curb appeal.” That stung — but she was right. A beautiful garden or fresh paint job can’t compete with two giant plastic cans stealing the spotlight.
That’s when I started looking for simple, DIY outdoor trash can covers that don’t just hide the mess but actually make the space look better. You’d be surprised how a few boards, some creativity, and a weekend of effort can completely change the vibe of your front yard. Whether you want something sleek and modern or rustic and natural, I’ve rounded up seven stylish ideas you can build yourself — each tested, practical, and guaranteed to make your home’s exterior look cleaner and more inviting.
What about you — are your bins quietly ruining your curb appeal too?
Choosing the Right Materials & Design for Your Climate and Budget
Before grabbing a saw or hammer, take a step back and think about your surroundings. What works beautifully in a dry backyard might rot in a coastal town or warp during heavy rain.
Here’s a quick breakdown of material options and how they hold up:
Material Options — What Works Best for You
- Wood: Classic and beautiful, but it needs sealing every year if you live somewhere humid. Cedar and redwood last longer and resist termites.
- Vinyl: Lightweight, clean-looking, and almost maintenance-free. Ideal if you don’t want to deal with staining or repainting.
- Metal: Great for modern homes, but in coastal or rainy regions, it can rust fast without a protective coat.
- Composite: A mix of wood fibres and plastic — pricier, but it won’t rot, fade, or attract pests.
- Lattice or Recycled Plastic Panels: Perfect for renters or quick builds. They’re easy to move, cut, and install, and they hold up surprisingly well under sun or rain.
Tip: If you get long monsoons or summer heat, go for vinyl or composite. For dry, cooler regions, wood gives that warm, timeless finish.
Budget Tiers — How Much Should You Spend?
You don’t need a big budget to make a stylish bin cover. Here’s a rough guide based on what I’ve seen work well:
- Low Budget ($50–$100): Use recycled pallets, lattice panels, or leftover fencing. Great for quick weekend builds.
- Medium Budget ($150–$300): Opt for cedar planks or vinyl panels with a hinged lid. Durable and clean finish.
- Premium Budget ($400+): Composite boards or metal frames with top planters or dual-bin compartments — looks stunning and lasts years.
Tip: Spend more on weatherproof screws and hinges. Cheap hardware rusts quickly and ruins even the best designs.
Permits, HOA Rules & Safety Considerations
Before digging holes or building near fences, check with your local Homeowners Association (HOA) or city rules. Some neighbourhoods have restrictions on structure height, distance from sidewalks, or even colour.
Also, make sure to:
- Call your local utility service before digging (to avoid damaging underground cables or pipes).
- Leave enough space behind your structure for airflow and bin movement.
- Keep it at least a few feet from your house wall to prevent moisture buildup.
Remember: It’s always easier to build right once than to rebuild twice after a complaint or permit issue.
Method 1: Slatted Wooden Box / Cabinet-Style Cover
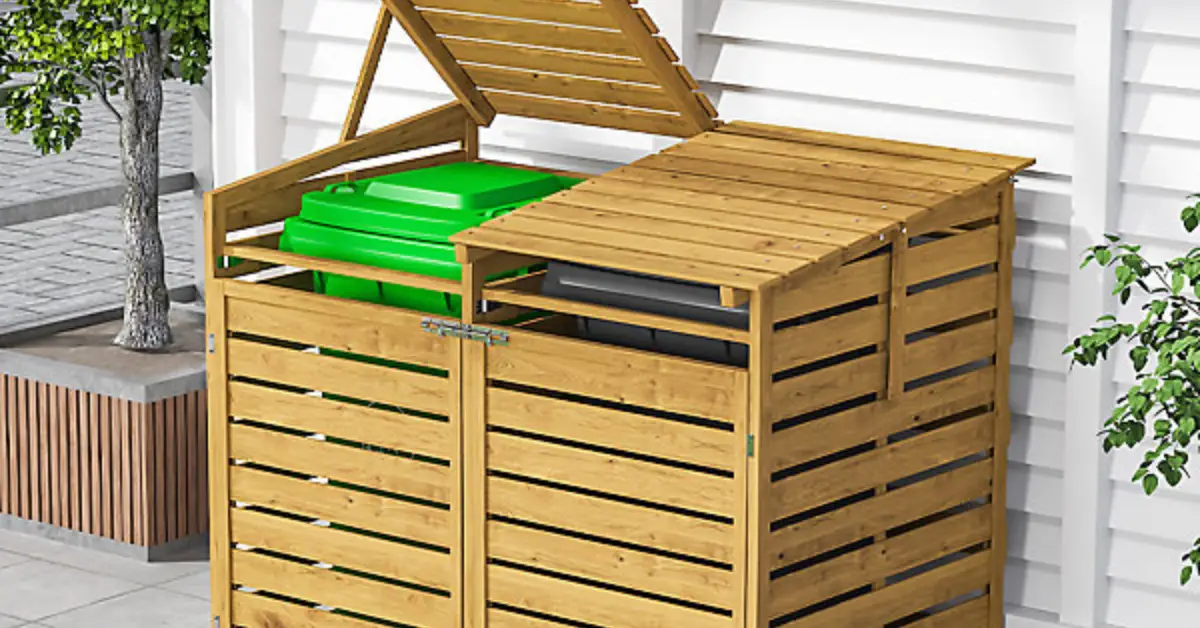
If you want something that blends in beautifully with your yard, this is the design I always recommend first. It’s simple, durable, and looks like a piece of outdoor furniture rather than a bin enclosure.
Here’s how you can approach it:
Step Essentials:
- Build a basic rectangular frame using treated wood.
- Add horizontal or vertical slats with small gaps in between for air circulation.
- Use a hinged lid or double doors for easy access.
- Add a sloped roof to let rainwater run off instead of pooling.
Drainage & Ventilation Tips:
- Keep at least half an inch of gap between slats to avoid trapped odours.
- Elevate the structure slightly off the ground using concrete pavers or treated feet.
- Apply a waterproof sealant once every year for long-lasting protection.
You can find a great visual reference and measurements guide on Woodshop Diaries — it’s one of the most practical DIY plans out there and fits standard 44-inch bins perfectly.
Once you finish, you’ll have a cover that looks handcrafted, stays sturdy through all seasons, and adds an instant boost to your home’s curb appeal. If you’re already planning a small outdoor upgrade, you might also like these outdoor deck renovation ideas that can instantly transform the look and function of your backyard.
What kind of look are you going for — rustic cedar charm or a clean, painted finish that matches your fence?
Method 2: Lattice or Trellis Wrap with Climbing Plants
If you want to hide your trash cans without committing to a full build, a lattice or trellis wrap is one of the easiest and most natural-looking ways to do it. It’s lightweight, easy to install, and turns your trash corner into a living, green focal point instead of an eyesore.
Here’s how to make it work:
Build a 3-Sided Screen:
- Use pre-made lattice panels or trellis frames from your local hardware store.
- Create a simple “U” shape — two sides and a back — leaving the front open for access.
- You can anchor them into the soil with metal posts or use planters to keep it freestanding.
Add Climbing Plants:
- Choose fast-growing vines like jasmine, ivy, or morning glory to soften the look.
- For hot, dry climates, go for bougainvillea or trumpet vine, which love full sun.
- If you’re somewhere cooler, clematis adds gorgeous blooms without heavy upkeep.
Quick, No-Tools Version:
If you rent or don’t want to drill into the ground, use large planters as your base. Simply slot a lattice panel into each planter and fill it with soil and climbing plants. This gives you the look without any digging or permanent structure.
This idea works beautifully if you prefer a green cover that blends into your garden. You’ll be amazed how quickly the plants take over and hide your bins completely — and in a few months, it’ll look like they were never there in the first place.
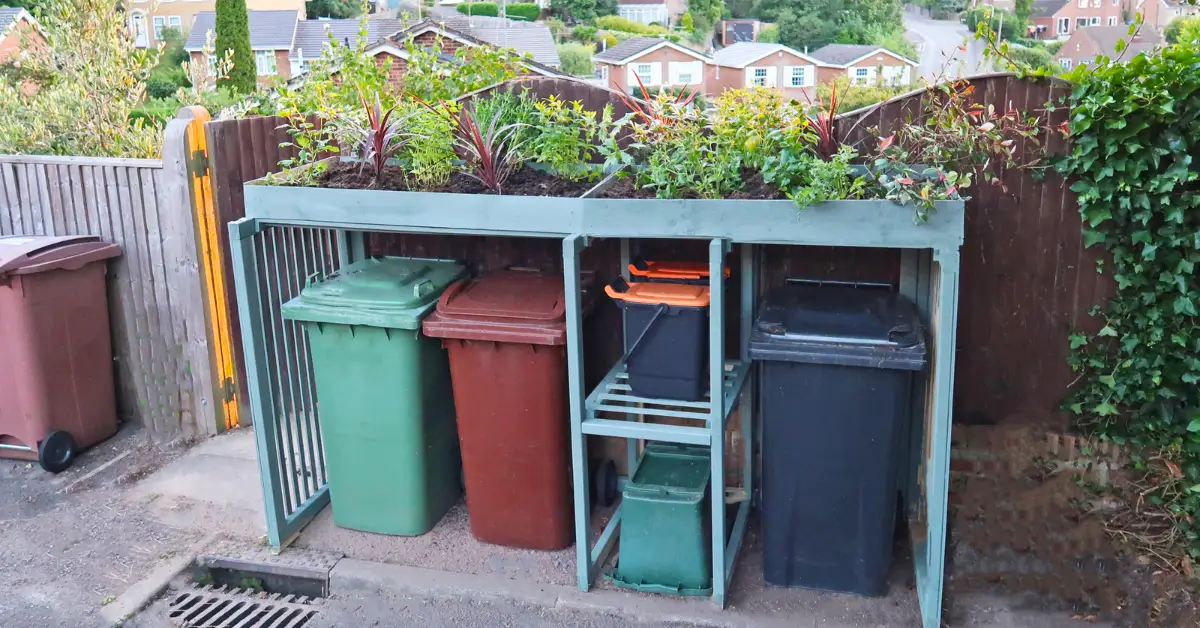
Method 3: Enclosure with Planter Top (Dual-Purpose Design)
Now, if you want to go a step beyond just hiding bins and actually make them part of your garden, build a bin cover with a planter top. This design not only conceals the trash cans but also adds greenery right on top — a smart use of vertical space.
How to Build It:
- Use the same frame as a basic wooden or composite enclosure.
- Add a strong, flat lid reinforced with beams to support the weight of soil and plants.
- Line the inside of the planter section with a waterproof membrane (like pond liner) to prevent moisture damage.
Design Tips:
- Ensure there’s a small drainage hole so excess water doesn’t collect and rot the wood.
- Keep a small gap between the planter base and bin lid for air circulation.
- If you’re using composite material, you can skip sealing altogether — it handles moisture well.
Best Plants for the Planter:
- Succulents and sedum if you get strong sun.
- Fern varieties or hostas for shaded spots.
- Lavender or herbs if you want both beauty and fragrance.
This type of cover does more than hide — it creates a focal point. You’re not just solving a problem; you’re improving your outdoor design. A great example of this kind of style can be found in the creative garden builds on Domino, which show how functional spaces can still look elegant and intentional.
To make your new bin cover stand out beautifully at night, explore these porch lighting ideas that enhance both charm and visibility in your outdoor space.
Method 4: Shed-Style Mini Bin House
If you have a little more space and want something long-lasting, consider a shed-style enclosure — a compact structure that completely hides your bins and protects them from weather. Think of it as a mini outdoor shed built specifically for trash storage.
How to Build It:
- Start with a small platform or base using pressure-treated wood or concrete blocks to keep the floor dry.
- Frame the sides and back using durable materials like cedar or composite boards.
- Add double doors on the front for easy bin access, and hinge the top if you want to toss in smaller trash bags directly.
Design Details:
- The roof should slope slightly backward to help rainwater drain away.
- Include side vents for airflow to reduce odour and moisture buildup.
- Paint or stain the exterior to match your fence, garage, or garden shed for a uniform look.
Extra Tip: If you have space to spare, add a small top shelf for garden tools or a corner for compost bins — you’ll turn a plain storage area into something genuinely useful.
Would you go for something simple like a lattice wall, or are you leaning toward a permanent shed-style build that doubles as garden storage?
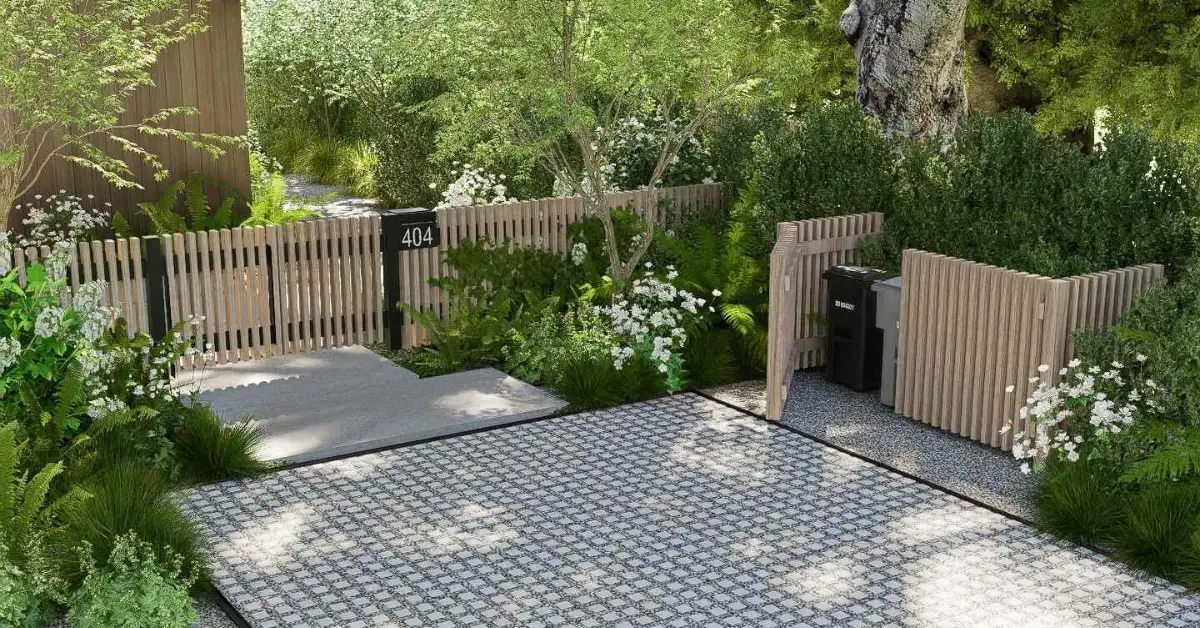
Method 5: Expand Your Existing Fence or Gate Extension
If you already have a fence or boundary wall, why not let it do double duty? Extending your existing fencing material to cover the trash can area is one of the cleanest, most natural-looking solutions. It doesn’t feel like you’re adding something new—it looks like it was part of your yard design all along.
How to Build It:
- Use the same fencing material—whether it’s wood pickets, vinyl panels, or composite slats—to enclose the side or back of your bins.
- Create a small alcove or L-shaped section attached to your main fence line.
- Add a hinged or sliding gate panel at the front for easy access when rolling bins in and out.
Design Tips:
- Match the height, paint, and spacing of your existing fence to keep it consistent.
- If privacy isn’t a concern, leave small gaps for airflow.
- Install a simple latch or magnetic catch to keep the gate shut even in windy weather.
This approach gives a seamless, cohesive finish that’s perfect for homes where you don’t want a separate structure cluttering your yard. You’ll end up with a subtle, clean design that keeps your bins hidden while blending perfectly with your fence line.
Method 6: Modular or Movable Cover for Renters or Flexible Spaces
Not everyone can build permanent structures, especially if you rent your home or plan to move soon. In that case, a modular or movable trash can cover is your best option—it’s practical, lightweight, and easy to take apart or reposition.
How to Build It:
- Use PVC frames, plastic lattice, or foldable wooden panels to create a cover that can be easily lifted or wheeled away.
- Keep the structure simple: three panels with corner joints or a foldable hinge system.
- For stability, set the frame on a gravel pad or small patio tiles so water drains freely underneath.
Make It Adjustable:
- Use slide-in connectors so you can change the width if you upgrade to bigger bins.
- Add small caster wheels for easy movement on patios or driveways.
- Paint or stain the panels to match outdoor furniture for a more finished look.
This type of design is especially handy for people who move often or need temporary setups for rental properties. You’ll get the look and functionality of a fixed bin cover—without the commitment or paperwork.
Method 7: Hybrid Camouflage and Screen Techniques
If you want your trash area to completely disappear into your landscaping, this is the method for you. A hybrid camouflage setup combines fencing materials, decorative screens, and greenery to make your bins blend in so well that guests won’t even realize they’re there.
How to Create the Look:
- Start with a partial structure or screen using metal mesh, perforated panels, or faux stone cladding.
- Surround it with shrubs, tall grasses, or vertical garden panels to soften the edges.
- Mix natural textures (wood or foliage) with modern materials like metal or composite for a designer-style effect.
Ventilation & Odor Control Tips:
- Keep at least a two-inch gap at the bottom for air circulation.
- Add small vent holes in the side panels if the cover is fully enclosed.
- Use gravel or pebbles beneath the bins to prevent puddles and reduce smell.
A great example of this kind of creative blend can be seen on The Spruce, where screen panels and greenery are used together for a sophisticated, modern finish.
This approach is ideal if you want something aesthetically polished and eco-friendly—a design that not only hides your bins but also adds character to your outdoor space.
What kind of look fits your home best: a subtle fence extension, a portable setup you can move around, or a full landscape disguise that completely hides the clutter?
Common Mistakes to Avoid and Pro Tips
I’ve seen a lot of DIY trash can cover projects that look great at first but start falling apart within a season. Most of the time, it’s not because of poor craftsmanship — it’s the small oversights that cause big problems later. Here’s what you should watch out for.
Common Mistakes:
- Blocking airflow: Completely sealed covers trap odour and moisture, leading to mildew and a musty smell.
- Water pooling on top: Flat roofs without a slope collect rainwater, which seeps into joints and damages the wood.
- Tight fit: When the bins barely fit inside, you’ll struggle to lift lids or roll them out.
- Skipping a base: Direct contact with soil accelerates wood rot and makes the cover unstable.
Pro Tips That Make a Big Difference:
- Always leave a small gap behind or underneath for airflow.
- Add a sloped or slightly pitched top for rain runoff.
- Use rot-resistant wood like cedar or pressure-treated timber.
- Anchor the base with pavers or small concrete blocks to keep it stable during storms.
- For easy use, install hydraulic hinges or a foot-pedal mechanism like the clever designs often shared on Reddit’s DIY community.
Maintenance Suggestions:
- Reseal or repaint wooden surfaces every one to two years.
- Inspect hinges, screws, and joints twice a year — a loose screw can quickly turn into a warped door.
- Clear leaves and debris from the base after rain to prevent trapped moisture.
- Keep vents clean so airflow isn’t blocked over time.
These simple habits keep your cover looking sharp and functioning smoothly for years instead of months. Once your trash area looks tidy, consider boosting nighttime safety with well-placed outdoor security lights to protect your property while enhancing curb appeal.
Cost, Time, and ROI Summary
Building your own trash can cover isn’t just about looks — it’s a smart investment in your home’s value. Below is a rough guide to help you estimate your project.
| Method | Approx. Cost (USD) | Build Time | Difficulty | Lifespan (Years) | Curb Appeal Impact |
|---|---|---|---|---|---|
| Slatted Wooden Box | 150–300 | 1–2 days | Moderate | 5–7 | High – natural, handcrafted look |
| Lattice / Trellis Wrap | 80–150 | 4–6 hours | Easy | 3–5 | Medium – adds greenery and softness |
| Planter-Top Enclosure | 250–400 | 1–2 days | Moderate | 6–8 | Very High – functional and stylish |
| Shed-Style Mini Bin House | 400–600 | 2–3 days | Hard | 10+ | Premium – looks like outdoor furniture |
| Fence / Gate Extension | 120–250 | 1 day | Moderate | 7–10 | High – seamless integration |
| Modular / Movable Cover | 70–150 | 4–5 hours | Easy | 3–5 | Medium – portable, renter-friendly |
| Hybrid Camouflage Design | 200–350 | 1–2 days | Moderate | 5–8 | Very High – blends into landscape |
How to Choose the Right Method for Your Situation
There’s no one-size-fits-all solution. The perfect design depends on your space, weather, and how long you plan to stay in the home. Use this quick checklist to decide:
Ask Yourself:
- Do I rent or own my home?
- Is my climate humid, dry, or rainy year-round?
- How much time do I realistically want to spend maintaining it?
- Do I want it to blend with my fence or stand out as a feature?
- Is my budget under $150, around $300, or over $500?
Quick Decision Guide:
- If you rent: Choose a modular or lattice-style cover — easy to remove and move.
- If you live in a rainy area: Go for a sloped roof and pressure-treated wood or vinyl.
- If you value long-term durability: A shed-style or composite build will last the longest.
- If you love greenery: A planter-top or trellis design adds life and softness to your space.
When you match the design to your lifestyle, the result not only looks beautiful but also lasts longer and saves effort down the road.
Hiding your bins might seem like a small upgrade, but once you do it, you’ll wonder why you didn’t start sooner. It instantly makes your yard look neater and your home more polished.
What do you think — which design would fit your home best? Share your thoughts in the comments below, or explore more creative home improvement ideas on Build Like New, where smart projects turn ordinary spaces into something truly beautiful.
Disclaimer: The information provided in this article is for general home improvement guidance only. Always follow local building codes, safety regulations, and manufacturer instructions when constructing or modifying outdoor structures. Build Like New is not responsible for any damages or injuries resulting from DIY projects undertaken based on this content.

