
Don’t Let These 6 Bathroom Spots Undo Your Clean Routine
I used to think my bathroom was spotless. I’d scrub the tiles, shine the mirrors, and feel that post-clean glow — until one day, I dropped my phone behind the toilet and saw the dust and gunk hiding there. That moment changed how I looked at “clean.”
If you’ve ever wondered why your bathroom still smells a little musty even after a full clean, you’re not imagining it. There are hidden zones that quietly collect bacteria, soap scum, and moisture — the kind you never see unless you go looking for them. And because they’re not part of your usual cleaning loop, they keep building up grime that affects both hygiene and air quality.
In the next few minutes, you’ll discover six hidden bathroom spots you’ve probably skipped for years — and exactly how to clean them fast, with zero guesswork. You’ll also learn a few surprising facts that’ll make you rethink what “clean” really means.
So before you grab your cleaning spray again, ask yourself — how confident are you that your bathroom is truly clean, not just looking clean?
Spot #1 – The Base and Bolts of Your Toilet
If your bathroom ever smells off even after a deep clean, there’s a good chance the culprit is right at your feet. The base of the toilet and the bolts holding it down are magnets for hidden splashes, dust, and dried drips you rarely notice until they start to smell. This is where bacteria quietly settle in, especially around the floor edges and the wall behind the toilet. According to Real Simple, this zone is one of the most overlooked areas because people assume the mop or a quick wipe handles it — it doesn’t.
If your bathroom still smells off even after cleaning, it might not just be the base — some of your cleaning tools could be the problem. Check out 10 Bathroom Items You Should Throw Out Right Now to make sure old brushes or sponges aren’t spreading germs instead of removing them.
When you skip this spot, odor builds up fast. Moisture mixes with hair, dust, and cleaning residue, creating a film that traps germs. So even if the toilet bowl shines, the area beneath and around it keeps working against you.
How to clean it
Cleaning this part doesn’t take long, but it does take attention. Here’s how I do it:
- Start by sweeping or vacuuming loose hair and dust around the base.
- Spray a disinfectant or an all-purpose cleaner generously along the toilet’s edges, bolts, and the joint where the floor meets the wall.
- Let it sit for a minute so it can break down buildup.
- Use a small brush or an old toothbrush to scrub around the bolts and under the curve of the toilet base.
- Wipe everything dry with a microfiber cloth — don’t forget the wall behind.
If you haven’t done this in a while, you’ll see why it’s worth the effort. The air smells cleaner immediately.
Frequency & quick tip
Do a quick wipe-down weekly and a deeper scrub once a month. I keep a narrow detailing brush and a small bottle of cleaner in the bathroom cabinet so it’s easy to tackle without making it a whole “cleaning day.”
Spot #2 – Under the Rim & Behind the Toilet Tank

Let’s be honest — most of us never look behind the toilet tank unless something falls there. That’s exactly why it’s a grime trap. Steam, dust, and condensation mix into a thin film that turns into mold if ignored. Under the rim is just as sneaky; that’s where bacteria and mineral deposits hide, even if the bowl looks spotless.
When these areas stay dirty, they spread odor and even encourage mildew growth, which can make your entire bathroom feel damp and stale no matter how much air freshener you use.
How to clean it
Here’s the step-by-step I swear by:
- Lift the toilet tank lid carefully and wipe the top surface — you’ll be surprised how dusty it gets.
- Spray disinfectant behind the tank and along the wall, then wipe it with a long-handled brush or a flexible cleaning wand.
- For under the rim, use a toilet brush or a specialized rim-cleaning brush. Apply a disinfecting cleaner or baking soda + vinegar mix and let it sit for a minute before scrubbing.
- Flush to rinse, and finish by wiping the outside of the tank and handle.
Frequency & quick tip
Make this a once-a-month deep clean. For maintenance, I use a slim crevice vacuum attachment once a week to grab dust behind the tank — it takes under a minute and makes the next clean far easier.
Spot #3 – Shower Door Tracks & Sliding Fixtures
If your shower still looks cloudy after cleaning, the problem probably lies in the tracks. These narrow grooves trap soap scum, hard-water minerals, and even mildew. Because the grime hides under the sliding glass or plastic seals, you don’t notice it until it starts to smell or jam the door.
Ignoring this area can make your entire shower enclosure look dull, and over time, the buildup corrodes the metal tracks — making them harder to slide and more expensive to replace.
How to clean it
This one’s simple once you know the trick:
- Pour a little white vinegar directly into the track and let it sit for 10–15 minutes to loosen buildup.
- Scrub the grooves with an old toothbrush or detail brush, paying attention to corners.
- Rinse the area with warm water, then wipe it dry with a cloth or paper towel.
- For stubborn grime, make a paste with baking soda and vinegar — it fizzes out residue without harsh chemicals.
- Once clean, run a thin line of clear bathroom sealant or rub a little petroleum jelly on metal tracks to prevent rust.
Frequency & quick tip
Give it a quick wipe after every shower so water and soap don’t sit in the tracks. Schedule a full scrub once a month — it keeps the door sliding smoothly and the glass streak-free.
Spot #4 – Exhaust Fan / Vent Cover & Ceiling High Zones
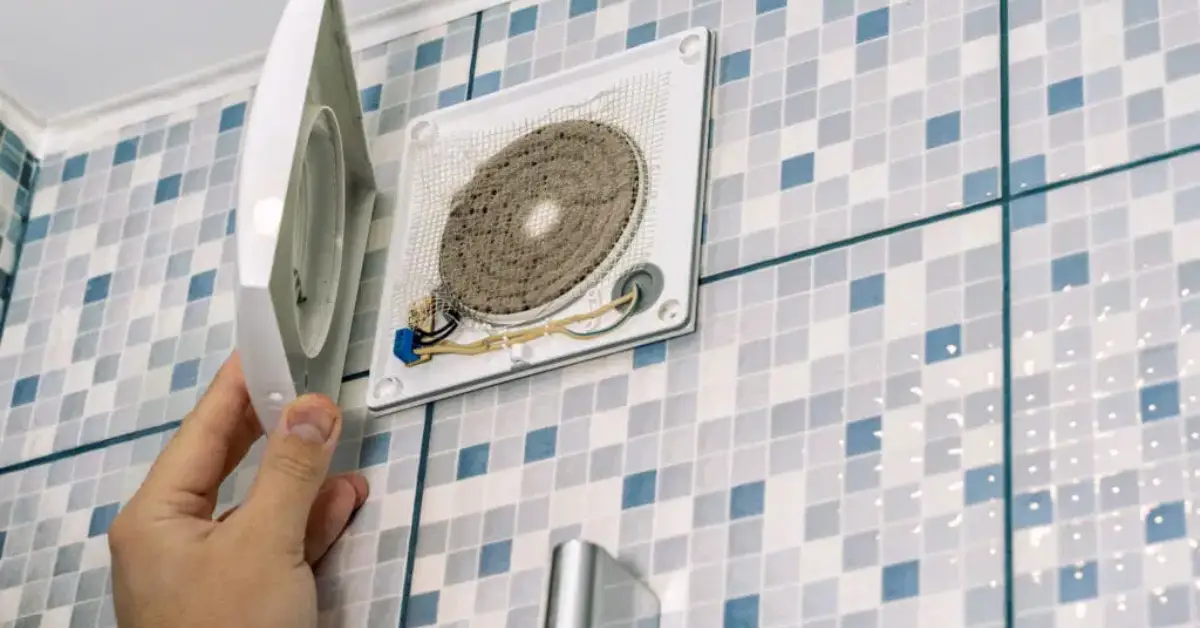
If your bathroom often feels damp even after cleaning, the problem might be above your head. Exhaust fans quietly collect dust, lint, and moisture — a perfect recipe for mold growth. Over time, that buildup reduces airflow and keeps humidity trapped, which means mirrors fog faster, and mildew spreads more easily.
Most people never think to look up there, so months go by before anyone realizes how clogged the vent is. Dirty fan covers not only circulate musty air but can also push dust back into the room every time the fan runs.
How to clean it
Here’s the quick process that keeps mine in check:
- Turn off the power to the fan (safety first).
- Gently pull off the vent cover — most pop out easily.
- Vacuum both sides of the cover to remove dust and lint.
- Wash it with warm soapy water, rinse, and let it dry.
- While the cover dries, use a vacuum or damp cloth to clean the fan housing and blades.
- Reinstall the cover once completely dry.
- For ceiling corners or high spots, use an extendable duster to catch cobwebs and dust buildup.
Frequency & quick tip
Do a full clean every three to six months. For maintenance, run a dry duster along the cover once a month — it keeps airflow strong and reduces that “musty bathroom” smell. If your bathroom still feels damp or smells musty even after cleaning the vent, these 7 Genius Ways to Keep Your Bathroom Fresh and Musty-Free will help you manage humidity and keep that crisp, fresh-air feel longer.
Spot #5 – Light Switches, Door Handles & High-Touch “Invisible” Surfaces
You’d be surprised how much bacteria lives on the things you touch every day — and rarely clean. Light switches, door handles, drawer pulls — they collect the oils from your skin, dust, and bathroom moisture, all of which create a perfect environment for germs.
Southern Living notes that these small, high-touch areas often carry more bacteria than sinks or countertops because we clean around them, not on them. It’s a classic case of “out of habit, out of mind.”
How to clean it
I treat these spots like part of my routine now:
- Spray a disinfectant directly onto a microfiber cloth — never onto the switch or handle.
- Wipe each handle, knob, and switch plate thoroughly.
- Pay attention to the edges where dirt builds up.
- For stubborn grime, dip a cotton swab in cleaner to reach tiny crevices.
- Don’t forget cabinet knobs and drawer handles; they’re easy to overlook.
Frequency & quick tip
Make it part of your weekly clean or any time you wipe down counters. I keep a small pack of disinfectant wipes under the sink — that way, it takes seconds to handle while I’m already tidying up.
Spot #6 – Under the Sink & Inside Cabinets / Drawer Edges
The space under the sink often becomes the “out of sight, out of mind” zone — but it’s where leaks, moisture, and hidden spills quietly cause trouble. Dust, stray hair, and cleaning product residue collect there and can attract mold or rust if ignored.
How to clean it
Here’s how to make it simple and efficient:
- Empty everything out completely — don’t just shuffle things around.
- Wipe down the shelves, walls, and corners with a disinfectant or mild cleaner.
- Check for leaks, damp spots, or rusted pipes.
- Use a microfiber cloth to dry the area fully before putting items back.
- Reorganize so products sit in bins or trays instead of directly on the surface.
- Keep moisture absorbers or a small open box of baking soda inside to control humidity.
Frequency & quick tip
Do a full clean every quarter, but give it a quick glance monthly to catch leaks early. I keep a small cleaning caddy under my sink — it makes it impossible to ignore and reminds me to check that space regularly.
Bonus Hidden Spot – Mirror Edges & Sealants / Caulk Lines
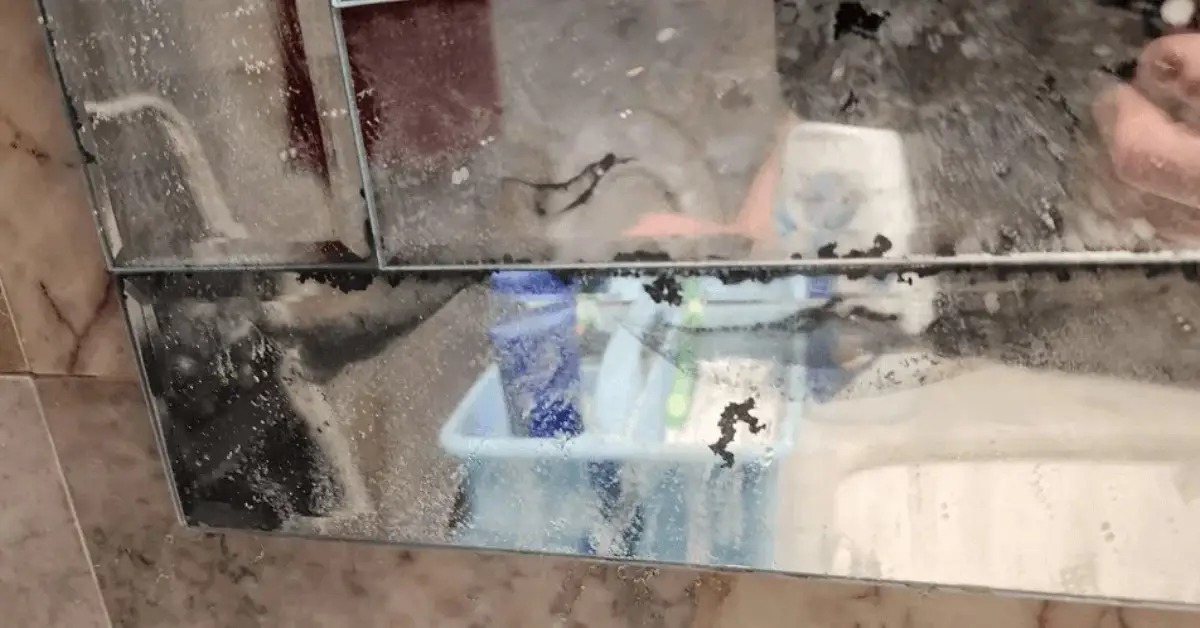
Most people stop cleaning once the mirror sparkles, but the real grime hides in the edges and the caulk around your tub or shower. Those narrow seams trap moisture and soap residue — exactly what mildew loves. Over time, that buildup causes dark spots on your mirror’s backing and blackened lines along the sealant.
How to clean it
Here’s how I tackle it without damaging surfaces:
- Spray glass cleaner on the mirror, but pay extra attention to the borders where water splashes collect.
- Run a cotton swab or microfiber cloth along the mirror’s edge to remove trapped dust and moisture.
- For caulk lines, spray a bleach-based mold remover or a bathroom cleaner specifically for mildew.
- Let it sit for a few minutes before scrubbing gently with an old toothbrush.
- Rinse and dry completely.
- If the sealant is cracked or discolored, scrape it off carefully and reseal — fresh caulk prevents moisture from seeping behind tiles.
Frequency & quick tip
Do a deep inspection every six months, but make it part of your weekly post-shower wipe-down routine. After each hot shower, a quick pass with a dry towel over the mirror edges and caulk lines keeps moisture from settling in. If you notice recurring mildew or dark streaks around your caulk or grout, take a look at 7 Simple Ways to Prevent Mold in Your Bathroom Before It Spreads — it walks you through simple fixes before small spots turn into bigger repairs.
Maintenance Plan + Cleaning Schedule (Weekly, Monthly, Quarterly)
A clean bathroom stays that way only if you treat it like a cycle, not a one-time job. Here’s an easy schedule I use — it keeps everything fresh without feeling like a chore.
| Frequency | Focus Areas | Quick Actions |
|---|---|---|
| Weekly | Toilet base, high-touch surfaces, mirror edges | Wipe base and bolts, disinfect switches and handles, quick mirror border clean |
| Monthly | Shower door tracks, exhaust fan, behind toilet | Deep scrub tracks, clean vent cover, remove dust behind tank |
| Quarterly | Under-sink cabinets, caulk lines, drawers | Empty and disinfect storage spaces, check for leaks, reseal or clean caulk if needed |
If you ever feel too busy for a full clean, try a 10-minute speed clean routine. Martha Stewart suggests breaking bathroom cleaning into micro-tasks — like wiping mirrors, disinfecting handles, and a quick mop — to maintain freshness between deeper cleans.
Even a short, consistent routine prevents grime from building up in hidden spots. And honestly, it’s easier to spend ten minutes maintaining than two hours deep-cleaning later.
Why Missing These Spots Costs You More Than You Think
We all tend to underestimate what a little hidden grime can do. The truth is, those “invisible” bathroom spots you skip today slowly become the reason your space starts feeling less fresh — even right after you’ve cleaned.
When moisture, dust, and bacteria build up in ignored corners, they don’t just make your bathroom smell — they eat away at surfaces, loosen caulk, and encourage mold growth. Over time, that means more scrubbing, faster fixture wear, and even small repair costs you could have avoided.
By paying attention to these hidden spots, you’re not just keeping things neat — you’re protecting your bathroom from slow, invisible damage that’s much harder (and more expensive) to fix later.
Closing Thoughts
Cleaning hidden bathroom spots takes a bit of extra effort, but the payoff is real — fresher air, longer-lasting fixtures, and a bathroom that actually feels clean. Once you build the habit, it becomes a small but powerful part of keeping your home healthier and more comfortable.
The product names and tools mentioned here are just examples; always follow the care instructions that come with your surfaces and finishes. If you ever notice mold, leaks, or structural issues, don’t tackle them alone — reach out to a qualified cleaning or repair professional.
Before you go, I’d love to hear from you — which hidden spot surprised you the most? Drop a comment below and tell me how often you deep-clean your bathroom.
And if you found this guide helpful, visit Build Like New for more practical home care and cleaning advice that actually makes a difference.
Disclaimer: The cleaning tips and product mentions in this article are for general guidance only. Always follow your surface manufacturer’s instructions, and if you suspect mold or structural damage, contact a professional for proper inspection and repair.

