
5 Hidden Reasons Your Ceiling Has Water Stains (and How to Fix Them Fast)
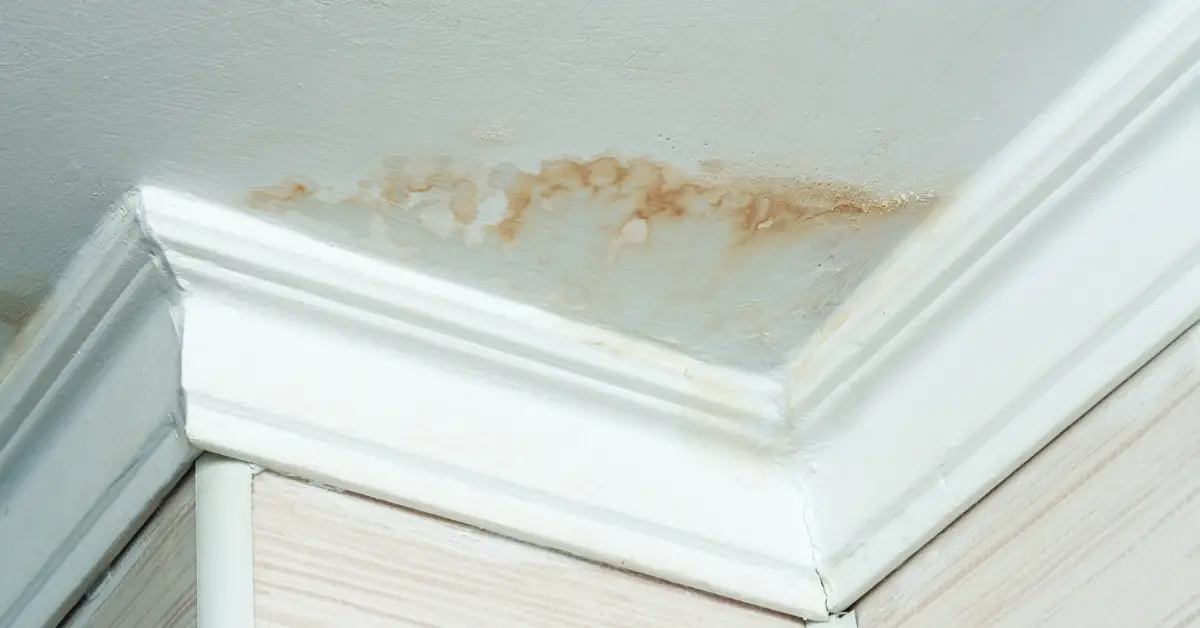
Let’s be honest — when you look up at your ceiling and notice a strange brown ring or faint yellow patch, your first instinct is usually to ignore it. “Maybe it’s just from old paint,” you tell yourself. But that small stain could be your home’s way of warning you that something serious is happening above your head — a roof leak, a sweating pipe, or even trapped moisture slowly eating into your drywall.
I’ve seen this countless times over the years — homeowners who call only after the stain spreads or the ceiling starts to sag. By then, the fix isn’t just about covering a mark; it’s about stopping mold, repairing structure, and preventing hundreds (sometimes thousands) of dollars in hidden damage.
In this guide, I’ll break down the five most common causes of ceiling stains and exactly what you can do to catch and fix them before they turn into a full-blown repair nightmare. Whether your home is brand new or a few decades old, understanding these signs early can save you a lot of stress — and money.
Take a moment, look up, and ask yourself: What story is my ceiling trying to tell me?
Why You Shouldn’t Ignore Ceiling Stains
I get it — when you first spot a small, pale mark on the ceiling, it doesn’t seem urgent. Maybe you tell yourself it’s just an old paint issue or leftover moisture from the last humid spell. But ceiling stains almost never appear without a reason. They’re your home’s early warning system, telling you that something’s leaking, sweating, or failing quietly above your head.
Once you start seeing discoloration, it means moisture has already made its way inside. Ignoring that sign is like ignoring a slow leak in a boat — it may look fine for a while, but it’s only a matter of time before things get worse.
What a Ceiling Stain Really Signals
A stain can tell you more than you think. It’s not just “water damage”; it’s a message about what’s happening behind your ceiling:
- Moisture intrusion from a worn-out roof or cracked flashing.
- Hidden plumbing leaks from loose fittings or slow drips above the drywall.
- Condensation build-up caused by trapped humidity, especially in bathrooms or kitchens.
Think of stains as clues. A single mark could point to an attic vent problem, poor insulation, or even air leaks that let warm, damp air rise and cool on your ceiling surface.
The Hidden Costs If Left Unchecked

The real danger isn’t the mark you see — it’s the decay you can’t. Here’s what typically happens when a ceiling stain is left alone:
- Mold growth starts within 24–48 hours in damp drywall.
- Structural rot spreads across joists, weakening your ceiling.
- Repair costs jump from a simple patch (around $150–$200) to several thousand once you add mold removal or ceiling replacement.
- Health risks increase — mold spores can trigger allergies, headaches, or breathing issues.
As The Spruce points out in its guide on common causes of water stains on ceilings, by the time you notice a visible mark, the leak or moisture source has likely been active for days or even weeks. That delay is exactly what drives up repair bills and long-term damage.
Quick Visual Cues — What the Stain Is Telling You
Before you panic, take a closer look at the color and pattern of the stain — they often reveal where the issue started:
| Stain Appearance | Likely Cause | What to Do First |
|---|---|---|
| Light yellow or tan ring | Minor condensation or dried leak | Let it dry completely; repaint only after confirming no active moisture. |
| Brown or rust-colored spot | Roof or plumbing leak | Check attic or pipe lines directly above the stain. |
| Dark or spreading patch | Ongoing moisture problem | Shut off water or HVAC source; inspect for leaks. |
| Gray or black streaks | Mold or mildew | Avoid touching; improve airflow and call a professional. |
Even a small patch deserves a quick inspection — touch nearby areas gently; if they feel cool or soft, there’s still moisture trapped inside.
The Top 5 Causes of Ceiling Stains
Every ceiling stain has a story — and trust me, most of them start long before the first drop ever shows. Once you understand where that water is coming from, it gets much easier to stop the damage and prevent it from coming back. Here’s what usually hides behind those marks.
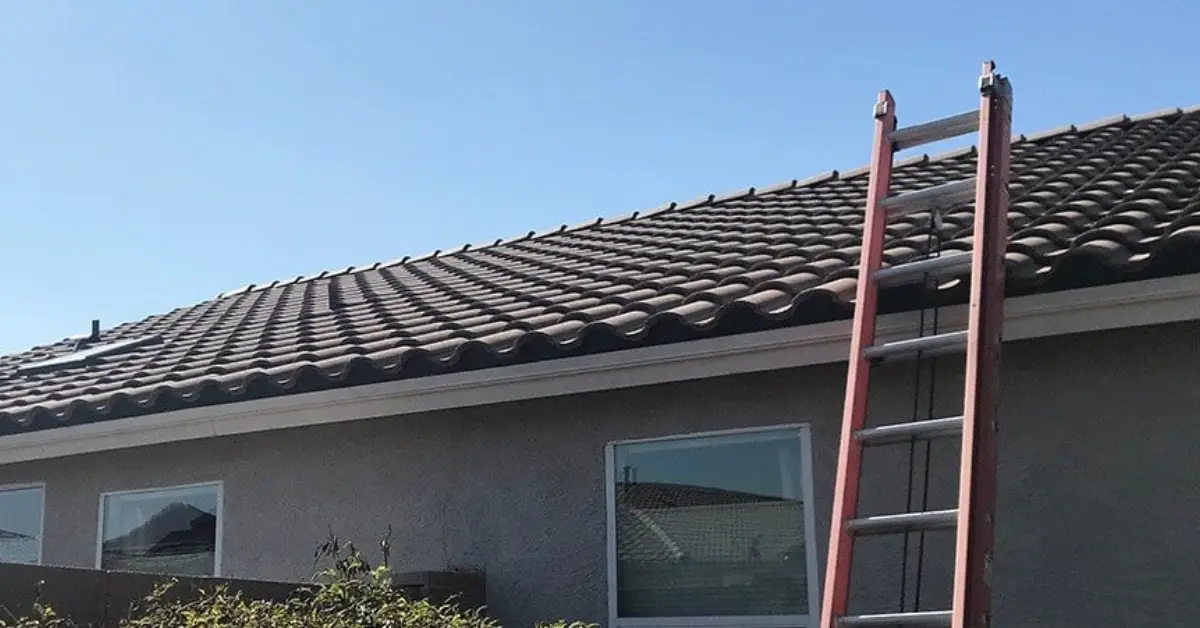
1. Roof Leaks (Shingles, Flashing, Ice Dams)
Typical Scenarios
Roof leaks are easily the top reason I find stains in older or weather-beaten homes. They usually show up after:
- A heavy storm loosens shingles or tears flashing.
- Ice dams form along roof edges, forcing melting snow to seep under tiles.
- Roofs age and small cracks or nail holes start letting moisture in.
Even one missing shingle can send rainwater creeping into your attic, eventually finding its way to the ceiling. If you live in an older home, those ceiling stains might also expose deeper age-related issues like hairline cracks or sagging plaster. You can learn how to identify and repair these safely in our guide on old house plaster ceiling cracks.
How the Water Travels
Here’s what surprises most people — the stain you see might not be directly below the leak. Water can travel along rafters or insulation for several feet before finally soaking through the ceiling. That’s why finding the source often takes more detective work than expected.
How to Detect
If you notice a new stain after rain, grab a flashlight and:
- Check your attic right after a storm for damp insulation or dark wood patches.
- Inspect flashing around chimneys, vents, or skylights.
- Look for sagging drywall or bulges — signs that water is pooling above.
Quick Fix vs. When to Call a Pro
You can temporarily patch small holes with roofing cement or replace a few shingles, but if the stain keeps spreading or the roof is older than 15 years, call a roofer. Persistent leaks need professional sealing and inspection to prevent long-term rot.
2. Plumbing or Pipe Leaks Above the Ceiling
Common Zones
These stains usually appear right under:
- Second-floor bathrooms or laundry areas.
- Supply lines running through ceiling cavities.
- Pipe joints that loosen or corrode over time.
Indicators
Plumbing leaks are different from roof leaks — they often cause:
- Soft or spongy drywall.
- Circular stains that darken after you run water upstairs.
- A faint dripping or musty smell.
DIY Detection & Safety Precautions
If you suspect a pipe leak:
- Turn off the main water supply before inspecting.
- Run water one fixture at a time (sink, shower, toilet) to see which triggers the drip.
- Never poke a soft ceiling — it can collapse suddenly.
When to Call a Plumber
If you can’t isolate the source quickly or the ceiling bulges with water, call a plumber immediately. A small leak can dump gallons overnight and damage electrical wiring.
3. HVAC / Drip Pan / Condensation Issues
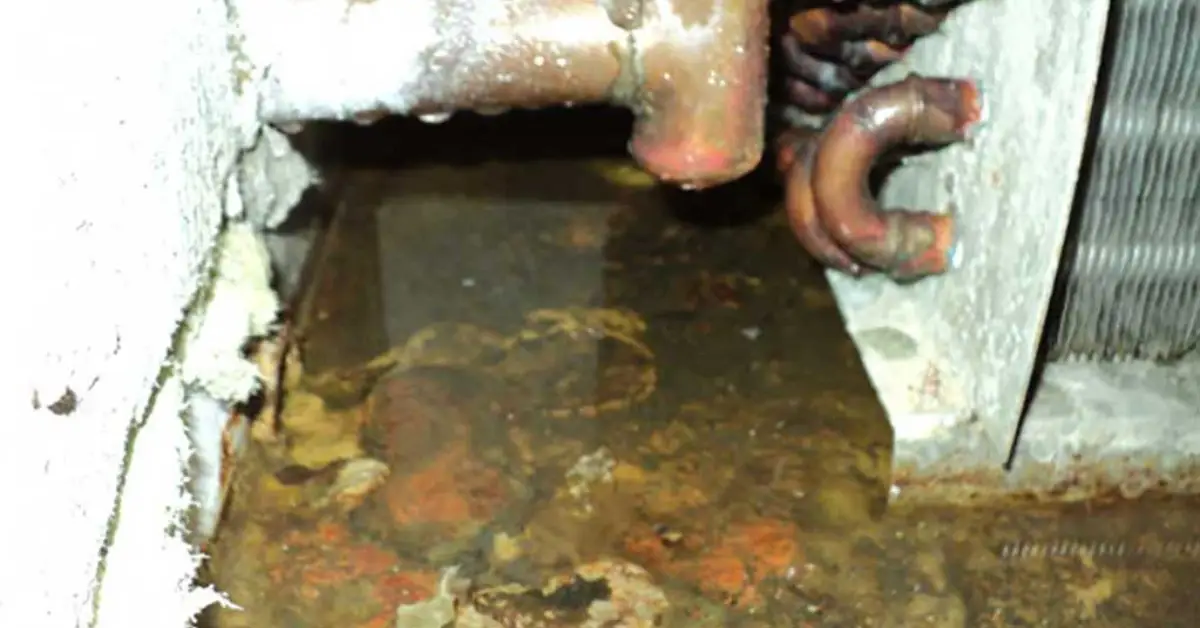
How HVAC Systems Cause Ceiling Stains
Central air units or attic-mounted AC systems can cause staining when:
- Drain lines clog with dust or algae.
- Condensate pans crack or overflow.
- Ductwork sweats due to poor insulation.
These issues are more common in warm, humid regions where cooling systems run constantly.
Rooms Most Likely to Be Affected
- Upper-floor ceilings directly under attic units.
- Rooms near air-handling closets.
- Ceiling corners near vents or registers.
Preventive Maintenance Checklist
- Clean the condensate drain line every few months.
- Replace air filters regularly.
- Have the drip pan inspected for cracks once a year.
- Wrap or insulate cold ducts to prevent condensation.
Even a small clog can lead to overflow and a spreading brown stain overnight, so don’t skip your maintenance checks.
4. High Indoor Humidity & Condensation Build-Up
Explanation of the Condensation Mechanism
When warm, moist air rises and hits a cool ceiling surface, the moisture condenses into water droplets. Over time, those droplets soak into the paint or plaster and leave stains. According to Drainworks Plumbing’s insight on everyday moisture issues, this happens most often in homes with poor ventilation or where humidity consistently stays above 60%.
Typical Scenarios
- Bathrooms without proper exhaust fans.
- Kitchens where steam collects on ceilings.
- Attics with inadequate airflow or insulation gaps.
How to Measure / Manage Indoor Humidity
- Use a digital hygrometer to keep humidity around 40–50%. If you’re unsure what your home’s humidity should ideally be, check out our detailed guide on the ideal humidity level for a healthy and comfortable home — it’ll help you maintain the perfect balance to prevent stains, mold, and musty air.
- Run exhaust fans for at least 15 minutes after showers or cooking.
- Add a dehumidifier in damp rooms or basements.
- Improve air circulation by keeping vents unblocked.
Difference Between Leaks and Humidity Stains
Condensation stains usually look light and blotchy, not sharply defined like leak marks. They often fade in dry weather — a clear clue that moisture, not a pipe or roof, is the culprit.
5. Damaged Waterproofing / Structural Issues
What “Waterproofing” Means in a Ceiling Context
In flat or low-slope roofs, waterproofing refers to the barrier that stops water from penetrating the roof’s surface — materials like membranes, flashing, and sealants. When these start to fail, rainwater seeps into the roof layers and eventually reaches the ceiling.
Signs of Structural / Insulation Failure
- Sagging or cracked ceiling lines.
- Uneven temperature spots in rooms (thermal bridging).
- Stains that appear near walls or parapet edges rather than the center.
Repair & Upgrade Options
- Replace old roof membranes with modern elastomeric coatings.
- Add insulation to reduce thermal gaps that attract condensation.
- Seal parapet walls and flashing transitions properly.
Ignoring these sources doesn’t just risk a stained ceiling — it risks the health of your entire home. Once you know which of these five culprits is at play, you can act fast, fix the root cause, and stop future damage before it spreads.
Which one sounds most likely for your home right now?
How to Fix Ceiling Stains (Step-by-Step)
By now, you’ve likely figured out what’s causing that ceiling stain. But fixing it the right way — and making sure it doesn’t return — takes more than a quick coat of paint. Here’s a simple, clear path I’ve used for years to get from “ugly mark” to “clean ceiling,” without wasting time or money on temporary fixes.
Step 1 – Identify and Fix the Root Cause (Don’t Just Paint Over)
The biggest mistake homeowners make is jumping straight to repainting. Paint hides the mark, but not the problem behind it. You need to find and eliminate the actual source first — whether that’s a leaking roof, a pipe drip, or condensation from your HVAC.
If you’re unsure where to start, I recommend reading the repair checklist from Kanopi by Armstrong, which walks through how to confirm if the leak is active and how to dry the area before repairs.
Quick steps:
- Dry the area completely using fans or a dehumidifier.
- Patch any leaks or replace damaged flashing or pipes.
- Check for mold; if you smell a musty odor, stop and bring in a pro for testing.
Once you’ve stopped the source, only then is it safe to move to cosmetic fixes.
Step 2 – Assess Damage: Dry, Wet, Sagging, or Moldy?
Every ceiling stain tells you how severe the issue is:
- Dry and light – likely an old, inactive leak.
- Wet and spongy – still active; needs immediate drying and repair.
- Sagging drywall – water has pooled; ceiling may need replacement.
- Dark spots or fuzzy patches – mold contamination.
Use a moisture meter or gently press the area (wear gloves). If it feels soft or gives way, that section must be replaced — patching over it will just trap moisture inside.
Step 3 – Cosmetic Repair: Cleaning, Primer, Repainting (or Replacing Tiles)
Once the ceiling is dry and solid, you can move to cleanup and restoration:
- Clean the area with a mix of water and mild detergent (add a little bleach only if mold is confirmed).
- Prime using a stain-blocking primer — this prevents yellow or brown marks from bleeding through new paint.
- Repaint with moisture-resistant ceiling paint; apply at least two thin coats.
- Replace tiles or panels if you have a drop ceiling and the damage is beyond repair. Once your ceiling is dry and primed, it’s also a great time to look around for other overlooked areas that could use a quick refresh. Check out our post on 10 hidden spots in your home that desperately need a paint refresh for ideas to give your space a consistent, clean look.
Keep good airflow while you work — moisture trapped under new paint can undo your progress.
Step 4 – When to Call a Professional
There’s no shame in calling for help — in fact, it often saves money in the long run. Reach out to a roofer, plumber, or restoration expert if:
- The ceiling is sagging or actively dripping.
- You see mold larger than a few square feet.
- You can’t locate the source of the moisture.
- The same stain reappears after repair.
Pros have infrared cameras and moisture sensors that pinpoint hidden leaks far better than guesswork.
Prevention & Maintenance Checklist
Fixing a stain once is good; making sure it never returns is better. A little regular maintenance can keep your ceiling spotless for years.
Roof & Flashing Inspection Schedule
- Inspect your roof every spring and fall.
- Look for cracked caulk, missing shingles, or loose flashing.
- Clean gutters so water drains freely.
Plumbing and HVAC Routine Checks
- Tighten fittings under sinks and near ceiling-level pipes.
- Flush AC drain lines every few months.
- Inspect attic-mounted HVAC pans for cracks or overflow.
Ventilation and Humidity Control Tips
- Run exhaust fans in bathrooms and kitchens for at least 15 minutes after use.
- Keep indoor humidity between 40–50% with a hygrometer.
- Use dehumidifiers in damp spaces or during humid summers.
What to Look for in Your Attic or Ceiling Space
- Damp insulation or discolored wood.
- Cold spots near vents (possible air leaks).
- Dark streaks around nails — an early sign of condensation.
Seasonal and Regional Considerations
- Humid climates: focus on ventilation and dehumidifiers.
- Cold winters: insulate attic floors to prevent warm air from rising and condensing.
- Storm-prone regions: check after every major downpour or snow melt.
A clean ceiling isn’t just about looks — it’s a sign that your home is dry, healthy, and well-maintained. Take half an hour every few months to inspect and adjust; your future self (and your wallet) will thank you.
What’s one small maintenance habit you could start this week to keep those stains from ever coming back?
Summary
If you’ve made it this far, you already know a ceiling stain is more than just a cosmetic issue — it’s a warning. Acting quickly can mean the difference between a small patch-up and a full ceiling replacement. Here’s what you can do right now to stay ahead of the damage.
Quick Actions to Take Today:
- Inspect your ceiling closely: Look for any new discoloration, soft spots, or spreading edges.
- Check your attic after rain: A quick flashlight scan can reveal wet insulation or dark patches.
- Test for active moisture: Touch the area or use a moisture meter to confirm if the leak is still active.
- Control your indoor humidity: Keep levels around 40–50% using a hygrometer or dehumidifier.
- Schedule a roof and plumbing check: Even a short inspection can stop small issues before they grow.
- Don’t just repaint — repair: Fix the root cause before covering up the mark.
Remember, a ceiling stain never happens in isolation — it’s your home’s way of telling you something’s wrong above the surface. The sooner you act, the less you’ll spend fixing it.
If you’re still unsure where to start or want trusted help identifying the source, visit Build Like New for step-by-step home maintenance guides and expert repair insights that keep your home looking and feeling brand new.
Have you spotted a stain you’re not sure about? Drop a comment below — I’d love to hear what you’ve found and help you figure out what’s really going on.
Disclaimer: The information in this article is for general home maintenance guidance only. Always assess your specific situation and consult a licensed contractor, plumber, or roofing specialist for professional diagnosis and repair. Build Like New is not responsible for any damage or loss resulting from DIY repairs or misuse of the information provided.

