
6 Simple Steps to Fix Ceiling Cracks Before They Turn Into Big Problems
I’ve noticed that even small cracks in the ceiling can make you pause. You might think, “It’s just cosmetic,” but I’ve learned the hard way that ignoring them can turn into a bigger headache—water damage, sagging plaster, or even structural trouble.
In this article, I’ll walk you through six practical steps to repair ceiling cracks before they get worse. I’ll show you how to spot the difference between a harmless hairline crack and one that needs serious attention, what tools actually make the job easier, and how to fix it so it doesn’t come back. By the end, you’ll feel confident tackling the repair yourself—or at least knowing when to call a pro.
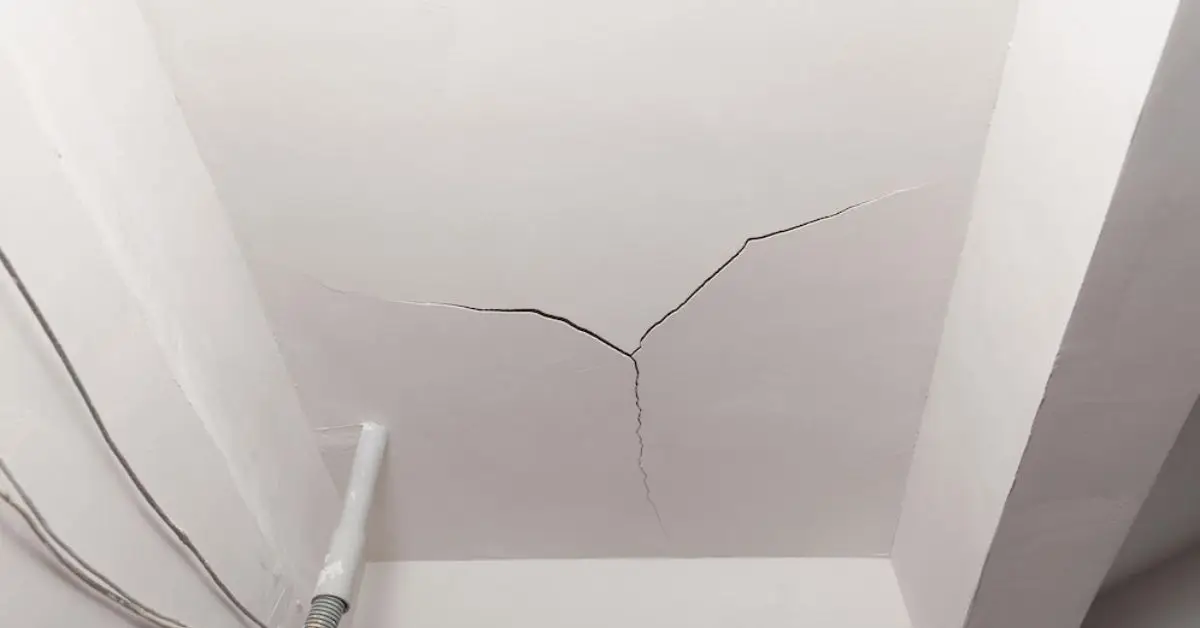
Step 1: Diagnose the Cause — Cosmetic Crack or Structural Warning Sign?
Before you even reach for a scraper or filler, I want you to pause and really look at the crack. Not all cracks are created equal, and knowing what you’re dealing with can save you a lot of time—and headaches. Here’s how I usually break it down:
Common Causes of Ceiling Cracks
Cracks happen for different reasons, and spotting the cause helps you decide whether you can fix it yourself or need a professional.
- Normal settling or house age: Houses move slightly over time. Tiny hairline cracks along plaster or drywall seams are often just cosmetic. Seasonal expansion and contraction can also create small, harmless lines.
- Poor drywall or plaster installation: If the original ceiling wasn’t installed perfectly—missing tape on joints or uneven plaster—cracks can appear even in a new house.
- Water damage: This one’s serious. If a crack appears near water stains, damp spots, or after a heavy rain, it usually points to a leak in the roof or plumbing. Ignoring this can quickly lead to sagging or mold growth, as highlighted in this Hipages guide on ceiling crack repairs. If you want a deeper look at what causes water damage and stains that often lead to ceiling cracks, check out our guide on the top 5 causes of ceiling stains and how to fix them before it’s too late.
- Structural movement or settling: Multiple cracks across rooms or walls, or zig-zag patterns, can signal that your home’s foundation or framework is shifting.
When to Call a Professional
Sometimes DIY is great, but other times it’s safer—and smarter—to call an expert. Watch for these red flags:
- Crack is wide, growing, or irregular—not just a hairline.
- Ceiling feels soft, sagging, or shows signs of water damage.
- Multiple cracks across walls or ceiling, which could point to a bigger structural issue.
Step 2: Prepare the Area & Gather Tools
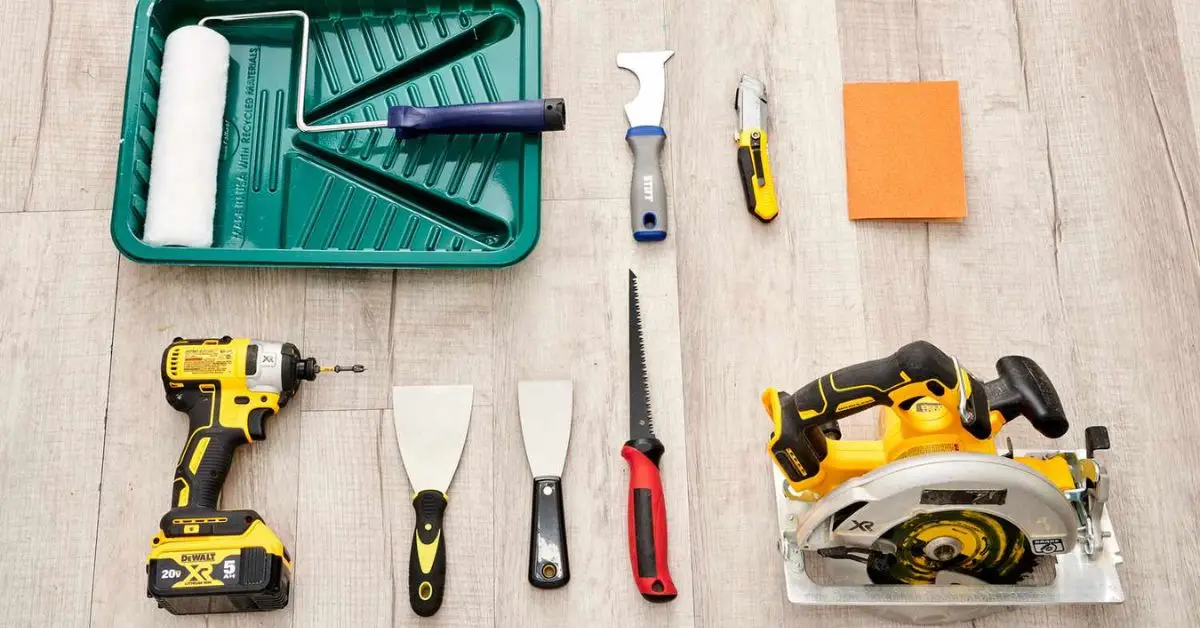
Once you know it’s safe to DIY, preparation is everything. I’ve learned that rushing into a ceiling repair without setting up properly usually leads to messy results and frustration. Here’s how I prepare:
Tools and Safety Gear You’ll Need
- Scrapers and knives: Utility knife, drywall knife, or a 5-in-1 tool to remove loose plaster or paint.
- Filler and reinforcement: Putty knife, drywall tape (mesh or paper depending on crack size), or fiberglass tape for bigger cracks.
- Compound: Joint compound, patching plaster, or a flexible filler works best.
- Finishing and safety: Sandpaper or a sanding sponge, drop cloths or plastic sheets to protect furniture, dust mask, and goggles.
Why Preparation Is Critical
- Proper bonding: Removing loose plaster or paint ensures the filler adheres well. Skipping this step is a common reason repairs fail.
- Protect your space: Covering your floors and furniture keeps cleanup simple and prevents damage—trust me, it’s worth the extra five minutes.
Tip: I like to lay everything out before I start and double-check that my ladder is stable. Once I’m fully prepared, the repair process feels much smoother, and I don’t have to stop midway to hunt for tools.
Step 3: Clean and “Open” the Crack for Best Adhesion
Before you even think about filling the crack, you need to make sure the surface is ready. I’ve learned that skipping this step is one of the main reasons repairs fail.
Remove Loose Plaster, Paint, and Debris
- Gently scrape along the crack using a utility knife or scraper to remove any loose plaster or paint.
- Clean the dust and debris thoroughly—either with a vacuum or a damp cloth—so the filler has something solid to adhere to.
Cleaning and prepping the ceiling area properly not only ensures the filler sticks but also prevents dust and debris from creating more mess — similar to how we emphasize clearing out hidden spots in our guide to the 7 most forgotten places to clean before guests arrive.
Slightly Widen Hairline Cracks
- If the crack is very thin, I like to carefully widen it into a small “V‑groove.”
- This creates more surface area for the filler to bond, which significantly reduces the chance of future cracking.
Step 4: Reinforce + Fill — Tape + Compound for Strong Repair
Once the crack is clean and prepped, it’s time to reinforce and fill it properly. This step is what separates a temporary patch from a long-term fix.
When to Use Tape
- For wider cracks, ceiling joints, or areas prone to movement, apply mesh or drywall tape to strengthen the repair.
- For small hairline cracks, paper or fiberglass tape works better than brittle mesh alone, giving a smooth finish without unnecessary bulk.
Applying Joint Compound or Filler
- Embed the tape into a thin first layer of filler and smooth it evenly across the crack.
- Apply multiple thin layers rather than one thick coat—this prevents shrinkage and cracking later.
Pro tip: For a detailed guide on embedding tape and filling cracks, you can check out Perth Ceiling and Walls’ ceiling crack repair guide.
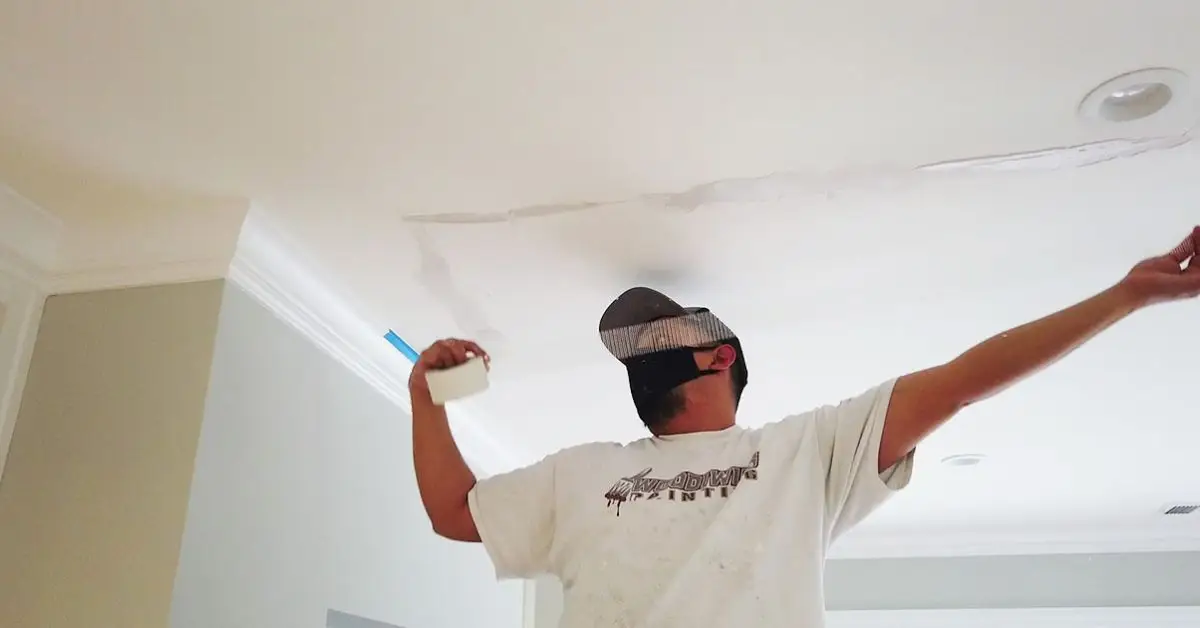
Step 5: Sand, Prime and Paint — Finish Cleanly so Repair Is Invisible
Now that the crack is filled and reinforced, how you finish it makes all the difference. A well‑finished ceiling looks smooth and professional — not like a patch job.
Sanding for a Smooth Ceiling Surface
- Once the filler dries completely, sand the area with fine‑grit sandpaper or a sanding sponge to level it with the existing ceiling surface.
- Clean the dust thoroughly. Even a little leftover dust can prevent paint from adhering properly, which may cause peeling or uneven finish later.
Primer + Matching Ceiling Paint
- If the crack was related to moisture or water damage, start with a stain‑blocking or moisture‑resistant primer.
- Then paint a bit beyond the repaired area — roughly a 12‑inch buffer — so the patched section blends seamlessly with the rest of the ceiling, avoiding visible “patch outlines.”
Step 6: Prevent Future Cracks — Maintenance & Prevention Tips
Fixing a crack is only half the job. If you don’t take steps to prevent the root causes, chances are the crack (or a new one) will come back.
Fix Underlying Causes First
- If the crack came from a leak — roof, plumbing or elsewhere — fix that source first before patching. Otherwise the moisture will just repeat the damage. Before you start filling any crack caused by moisture, it’s important to treat the underlying water stains properly — you can follow our step-by-step guide on ceiling water stains fix to make sure the repair lasts.
- Ensure proper ventilation in roof/attic areas, and keep indoor humidity under control to avoid moisture‑related weakening over time.
Use Flexible Fillers or Compounds
- For ceilings prone to slight movement (settling, temperature/humidity shifts), using a flexible patching compound instead of rigid plaster helps the repair absorb minor shifts without cracking again.
Regular Ceiling Checks
- After heavy rain, monsoon seasons (or other humid periods), or any rooftop/plumbing work — inspect the ceiling for new cracks or damp spots.
- Early detection means easier (and cheaper) fixes — and less chance of a small crack turning into a structural issue.
For more detail on what causes ceiling cracks and how to assess them properly, check out this Groundworks guide on ceiling crack causes and seriousness.
Bonus: Quick DIY vs When to Call a Pro
Not every crack in your ceiling can—or should—be fixed with a DIY approach. Here’s how I usually decide:
- DIY works when: The crack is minor, dry, and the ceiling shows no signs of structural movement or water damage. Small hairline cracks along joints or plaster surfaces are usually safe to tackle yourself.
- Call a professional when: You see water stains, sagging, multiple cracks, or wide irregular lines. A structural engineer or experienced contractor can prevent serious damage that a DIY attempt might make worse.
Safety first: Always use a stable ladder, wear a dust mask and goggles, and never take shortcuts. I’ve seen people try to rush overhead repairs—don’t be that person.
Why Many DIY Fixes Fail — Common Mistakes to Avoid
Even experienced DIYers slip up if they ignore the basics. Here are the most common errors I see:
- Filling the crack without widening it first → poor adhesion and quick re-cracking.
- Skipping tape or reinforcement → the patch won’t last.
- Applying thick filler in one go → shrinkage and cracking.
- Ignoring the root cause (leak, dampness, or structural shift) → the crack comes back.
- Painting before the filler fully dries → visible imperfections and uneven finish.
Now that you know the full process—from diagnosing the crack to preventing future problems—I’d love to hear from you:
- Have you ever tackled ceiling cracks yourself?
- Did a DIY repair work, or did you run into unexpected problems?
Share your experiences in the comments below. And if you want more step-by-step guides, tips, and expert insights on home repair and maintenance, visit Build Like New. We’re here to help you fix, maintain, and improve your home like a pro.
Disclaimer: This article is for general informational purposes only. Always assess your own safety and the condition of your ceiling before attempting repairs. For major cracks, water damage, or structural concerns, consult a licensed professional. Build Like New is not responsible for any damages or injuries resulting from DIY repairs.

