
7 Clear Signs It’s Time to Clean or Replace Your Fridge Gasket
Most people don’t think about their fridge seal until something feels off. I’ve seen this happen a lot—food going bad faster, a strange smell every time you open the door, or the fridge running non-stop for no clear reason. In many cases, the problem isn’t the fridge itself. It’s the rubber gasket around the door that quietly stopped doing its job.
Here’s the thing: a dirty or damaged fridge seal doesn’t fail all at once. It gives small signs first—grime in the folds, moisture around the door, weak suction when you close it. The problem is, most guides jump straight to “how to clean a refrigerator gasket” without helping you figure out whether cleaning is even enough, or if replacement is the smarter move.
In this guide, I’ll walk you through the 7 clear signs your fridge seal needs attention—either a proper clean or a full replacement. I’ll help you spot the difference, avoid common mistakes I see homeowners make, and save money before a small issue turns into an expensive one. As you read, think about your own fridge for a second—when was the last time you actually checked the seal around the door?
What Is a Refrigerator Gasket and Why It Matters
If you’re like most people, you probably call it the “rubber lining” on the fridge door and move on. I get it—I used to ignore it too. But once you understand what the refrigerator gasket actually does, it’s hard to unsee how much damage neglect can cause.
The gasket is the soft rubber seal that runs along the edge of your fridge door. Its only job is to create an airtight seal when the door closes—keeping cold air in and warm air out. When it works properly, your fridge cools efficiently, food stays fresh longer, and energy use stays in check. When it doesn’t, everything else starts to suffer.
Refrigerator gasket basics — function and materials
Here’s what’s happening every time you close your fridge door:
- The gasket presses against the fridge frame
- A tight seal forms, stopping air leaks
- The compressor doesn’t have to work overtime
Most modern fridge gaskets are made from rubber or PVC-based materials. They’re flexible by design so they can mold to the door frame. But that flexibility also makes them magnets for moisture, crumbs, spills, and bacteria—especially inside the small folds you rarely clean.
If the seal breaks even slightly, cold air escapes. You may not feel it, but your fridge definitely does.
Common gasket materials and lifespan expectations
Gaskets aren’t meant to last forever. Over time, rubber dries out, hardens, and loses its grip. Based on appliance maintenance guidance from Gasket Guy UK — how to maintain your door seal, most fridge door seals start showing wear after a few years—especially if they’re rarely cleaned or exposed to heat, grease, or frequent door slamming.
What aging usually looks like:
- Loss of flexibility
- Slight cracking or stiffness
- Gaps forming along the door edge
This is why cleaning alone won’t always fix the issue—and why spotting early warning signs matters.
Sign 1 — Visible Dirt, Mold, or Discoloration
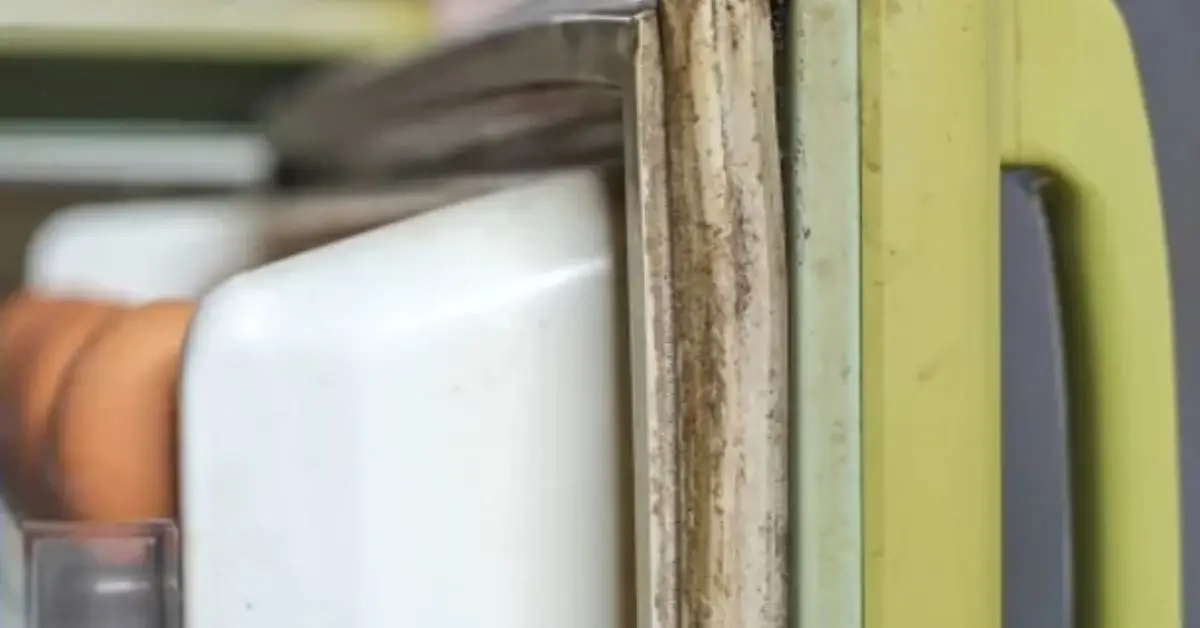
This is usually the first red flag people notice. You open the fridge, glance at the seal, and something just looks… off. Dark spots. Yellowing. Gunk in the corners.
If you’re seeing buildup, it’s not just a cosmetic issue. I’ve seen many cases where visible dirt was the start of seal failure.
How grime hiding in folds accelerates gasket failure
The most important thing to know is this: dirt doesn’t sit on the surface—it hides deep inside the folds.
Common things that get trapped:
- Food splashes and grease
- Condensation and moisture
- Mold spores and bacteria
Over time, this buildup:
- Breaks down the rubber
- Prevents the gasket from sealing flat
- Creates tiny air leaks you won’t notice right away
Once the seal can’t sit flush, your fridge starts losing cold air even when the door looks “closed.”
Reddit reality check — tough stains and DIY attempts
If you’ve ever tried cleaning a gasket and felt frustrated, you’re not alone. Homeowners often share the same complaints online:
- “I cleaned it, but the black stains came back.”
- “No matter what I use, the smell won’t go away.”
- “The folds are impossible to reach.”
These real-world experiences matter because they show a pattern: visible dirt is often the symptom, not the root problem.
Sign 2 — Bad Odor Around the Seal
Sometimes the seal looks fine—but your nose tells a different story. A sour or musty smell near the fridge door is one of the most common reasons people start searching for help.
And yes, it’s often the gasket.
Why odors originate from gasket grooves
The gasket traps moisture more easily than almost any other part of the fridge. Add food particles to that moisture, and you’ve got the perfect environment for odor-causing bacteria.
Typical causes include:
- Condensation that never fully dries
- Milk, sauces, or raw food residue
- Mold growing inside tight grooves
Even if the inside of your fridge smells clean, the gasket can be holding onto odors on its own. One simple fix I’ve seen work well is using everyday kitchen items correctly—this guide on this one kitchen staple that keeps your fridge spotless and odor-free explains why it works and how to use it safely.
When odor means replace, not just clean
Here’s the honest truth I don’t see mentioned enough:
If you’ve cleaned the gasket thoroughly and the smell keeps coming back, cleaning isn’t the solution anymore.
Persistent odor usually means:
- Mold has penetrated the rubber
- The material is breaking down internally
- Bacteria are trapped beyond reach
At that point, replacement is often safer and more effective than repeated scrubbing.
Before we move on, take a quick second and think about your fridge. Have you noticed dirt, stains, or smells around the door that you’ve been ignoring?
Sign 3 — Gasket Feels Sticky, Hard, or Brittle
This is one of those signs you usually notice by accident. You run your hand along the seal while cleaning, or your finger sticks slightly when you close the door. I pay close attention to this because texture changes almost always show up before cracks or gaps become visible.
A healthy gasket should feel soft, smooth, and flexible. Anything else is your early warning.
How to check flexibility safely
You don’t need tools for this—just your fingers.
Here’s what I suggest you do:
- Gently press the gasket at different points (top, sides, bottom)
- Lightly pinch it between two fingers
- Let go and see how quickly it returns to shape
What you want:
- Quick bounce-back
- No cracking sound
- No residue on your fingers
If it feels stiff, slow to recover, or oddly tacky, that’s not normal.
What sticky vs brittle means for seal life
Sticky usually means the rubber is breaking down from heat, grease, or chemical cleaners. Brittle means it’s drying out and aging.
According to maintenance insights from Dave Smith Appliance Services – maintaining refrigerator door seals, once a gasket loses flexibility, it can’t maintain consistent contact with the fridge frame—even if it looks fine.
That’s when air leaks start quietly.
Sign 4 — Frequent Condensation or Frost Around the Door
If you’re wiping moisture from the fridge door more often than usual, don’t ignore it. I’ve seen this sign brushed off as “humidity” when it was actually a failing seal.
Condensation around the door is the fridge telling you warm air is getting in.
Why moisture means air is leaking
Here’s what’s happening in simple terms:
- Warm air from your kitchen enters through weak seal spots
- Cold air inside the fridge meets that warmth
- Moisture forms as condensation or frost
This isn’t random. It’s physics. And it almost always points back to the gasket not sealing evenly.
Differentiating frost from normal fluctuation
Not all moisture is a problem, so here’s how I look at it:
Likely gasket issue:
- Moisture only around the door edges
- Frost buildup near the seal
- Condensation that comes back after wiping
Probably normal:
- Light condensation during extreme humidity
- Temporary fogging that clears on its own
Persistent moisture near the seal deserves a closer look.
Sign 5 — Higher Energy Bills or Constant Running
This one surprises a lot of homeowners. You don’t connect a thin rubber seal with your electric bill—but the fridge definitely does.
When a gasket leaks, your fridge works harder all day, every day.
Typical energy penalty of a compromised seal
A bad seal causes:
- Cold air to escape continuously
- The compressor to cycle more often
- Longer run times to maintain temperature
Over time, that extra workload shows up as higher energy use—and more wear on the appliance. If you’re trying to lower power usage, the gasket isn’t the only thing worth checking—these quick steps to clean your refrigerator coils and cut your power bill can make a noticeable difference too.
Quick check — compare past bills and patterns
Ask yourself:
- Has your fridge been running more often lately?
- Did your energy bill creep up without other changes?
- Do you hear the compressor kick on frequently?
If yes, the gasket is a smart place to investigate before blaming the fridge itself.
Sign 6 — Door Doesn’t Close Tight or Feels Misaligned

This is one of the most reliable DIY checks, and I always recommend it because it removes guesswork.
If the door doesn’t feel snug when closing, trust that instinct.
How to do the dollar bill test (step-by-step)
Here’s the quick test:
- Place a dollar bill halfway inside the door
- Close the fridge
- Gently pull the bill out
Test multiple spots:
- Top
- Middle
- Bottom
If the bill slides out easily at any point, the seal isn’t gripping properly there.
What uneven gaps tell you about gasket wear
When some areas pass the test and others don’t, it usually means:
- The gasket is warped or hardened unevenly
- Certain sections have lost flexibility
- Air is leaking in specific zones
That uneven wear is a strong sign the gasket is nearing the end of its usable life.
Before moving on, quick question for you: Have you ever actually tested your fridge door seal—or just assumed it was fine because the door closed?
Sign 7 — Persistent Temperature Issues Inside the Fridge
This is where a lot of people get misled. You notice milk spoiling faster, leftovers not staying cold, or the fridge feeling uneven inside—and your first thought is usually, “Something’s wrong with the fridge.”
I’ve learned that in many cases, it’s not the fridge. It’s the seal.
How gasket leaks cause inconsistent cooling
When the gasket doesn’t seal properly, cold air escapes in small amounts all day long. The fridge senses this and keeps trying to correct the temperature.
Here’s what that looks like in real life:
- Some shelves feel colder than others
- The fridge runs longer than usual
- Temperature settings don’t seem to “stick”
The thermostat reacts to warm air sneaking in, not realizing the problem is at the door—not the cooling system.
When it’s the gasket vs other causes
I usually tell people to look at patterns.
More likely a gasket issue if:
- Temperature problems come with condensation or weak door closure
- Food near the door spoils faster
- The fridge runs constantly
More likely something else if:
- The fridge doesn’t cool at all
- You hear loud mechanical noises
- Temperature issues appeared suddenly overnight
The gasket causes gradual, frustrating changes—not instant failure.
How to Clean Your Refrigerator Gasket (Step-by-Step)
At this point, you’ve seen the signs. Now the big question is: can cleaning fix it?
Cleaning works best when the gasket is still flexible and intact. If the rubber is already cracked or hardened, cleaning won’t save it—but it’s still the right first step.
Tools and safe cleaning solutions
You don’t need anything fancy. I keep it simple:
- Soft cloth or microfiber towel
- Warm water
- Baking soda
- Mild dish soap
- Old toothbrush (for folds)
This approach aligns with cleaning guidance from Martha Stewart’s refrigerator gasket cleaning guide.
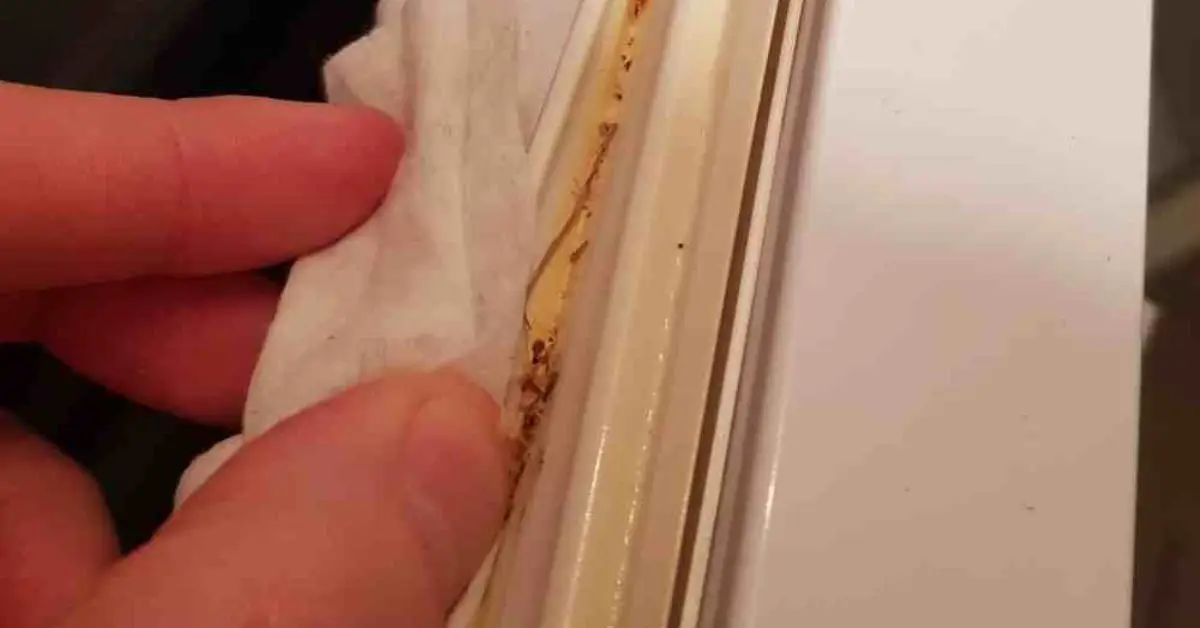
Cleaning process — from easy to deep clean
Here’s how I do it:
- Mix warm water with a small amount of mild soap or baking soda
- Wipe the gasket surface first to remove loose grime
- Gently pull back the folds and clean inside using a toothbrush
- Rinse with a clean, damp cloth
- Dry completely with a towel
If mold is deep in the folds, take your time. Rushing this step usually means it comes back.
Experts say: avoid harsh bleach or ammonia
This is where many people go wrong. Strong chemicals may kill surface mold, but they also dry out rubber fast.
What to avoid:
- Bleach
- Ammonia
- Abrasive scrub pads
These can shorten gasket life and make brittleness worse. A lot of people mean well but make cleaning worse without realizing it—some of the most common errors are covered in these cleaning mistakes that let bacteria thrive in your home, and gasket care is a big one.
When cleaning doesn’t fix the seal
Cleaning won’t help if:
- The gasket stays stiff or warped
- Odors return within days
- The door still fails the seal test
Those are signs the material itself is breaking down.
Maintenance Tips to Prolong Gasket Life

This is the part most guides skip—and it’s exactly why gaskets fail early. A little routine care goes a long way.
Weekly or monthly care routine recommendations
I recommend:
- Wipe the gasket once a week during regular fridge cleaning
- Do a deeper fold-clean once a month
- Dry it fully every time
Moisture left behind is the real enemy.
Lubrication and flexibility tips
If the gasket feels slightly dry but still flexible:
- Apply a very thin layer of petroleum jelly or food-safe silicone
- Focus on contact areas, not the entire seal
- Wipe off excess
This helps the gasket stay soft and improves door closure.
When to check the gasket after spills
Any time you spill:
- Milk
- Raw meat juices
- Sauces
Check the gasket immediately. Those spills love to hide in the folds, and that’s where long-term damage starts.
Before we wrap up, let me ask you something honestly— when was the last time you cleaned or even touched your fridge seal on purpose?
Quick Checklist — Diagnose Your Fridge Seal in 10 Minutes
I like checklists because they cut through doubt. You don’t need tools, experience, or technical knowledge—just a few focused minutes.
Use this as a quick self-check you can come back to anytime.
- Run your fingers along the gasket
→ Does it feel soft and flexible, or sticky and stiff? - Look closely at the folds
→ Any dark spots, grime, or mold buildup? - Do the dollar bill test
→ Test top, middle, and bottom of the door - Check for moisture
→ Condensation or frost near the seal? - Smell around the door edges
→ Any sour or musty odor that won’t go away? - Listen to your fridge
→ Running more often than usual?
If you checked two or more of these, your gasket needs attention—either a deep clean or replacement. This checklist alone can save you hours of guessing.
Replacement: When It’s Time to Buy a New Gasket
At some point, cleaning stops being helpful. I always tell people this: replacement isn’t a failure—it’s maintenance.
If the gasket is cracked, warped, brittle, or keeps failing tests after cleaning, replacement is the smarter and safer move.
Average cost and what influences it
In most US homes, gasket replacement typically depends on:
- Fridge brand and model
- Size and door type
- OEM vs aftermarket seal
In general:
- DIY replacement is usually affordable
- Professional installation costs more but saves time and hassle
The key factor isn’t just cost—it’s whether the seal fits perfectly.
Basic steps for replacing a gasket (DIY vs professional)
DIY replacement usually involves:
- Ordering the exact model-specific gasket
- Softening it in warm water
- Removing the old seal
- Pressing or screwing the new one into place
- Letting it settle and re-testing the seal
Go professional if:
- The door is misaligned
- You’re unsure about fit
- The fridge is high-end or built-in
A poorly installed gasket defeats the whole purpose.
Summary — Diagnose, Clean, Maintain, Replace
Here’s the simple framework I want you to remember:
- Diagnose using signs and quick tests
- Clean if the gasket is still flexible
- Maintain it so problems don’t return
- Replace when cleaning no longer works
A fridge seal is a small part, but it has an outsized impact on food safety, energy bills, and appliance life. Once you start paying attention to it, you’ll catch problems much earlier—and avoid bigger ones later.
Now I’d love to hear from you.
Have you checked your fridge seal recently, or did this article make you realize something you’ve been ignoring? Drop your experience or questions in the comments—I read every one.
And if you want more practical, no-fluff home maintenance guides like this, explore Build Like New. That’s where I break down everyday fixes that actually make your home work better.
Disclaimer: This content is for general home maintenance guidance only. Appliance designs and conditions can vary, so results may differ. For electrical safety or complex repairs, always follow your manufacturer’s instructions or consult a qualified appliance professional.

