
10 Expert Roof Protection Tips to Prevent Ice Dams & Leaks This Winter
If you’ve ever walked outside in January and seen thick icicles hanging off your roof, it might’ve looked kind of magical. But what you’re really looking at? A problem in progress.
Those icicles often signal ice dams, and once they show up, water’s probably backing up under your shingles. That means leaks — not just on your roof, but into your insulation, your drywall, even your floors. And if you’ve ever dealt with a soggy ceiling mid-winter, you already know: it’s not just inconvenient. It can wreck your home, your energy bills, and your peace of mind.
So let’s break this down simply.
Ice dams form when heat escapes from your house and melts snow sitting on your roof. That melted snow trickles down to the colder eaves, refreezes, and slowly creates a ridge of ice. As more snow melts, that water has nowhere to go — except back into your house.
This isn’t rare, either. According to Brown Bros Roofing, ice-dam-related leaks make up around 22% of all winter roof damage claims in the U.S. Another report from Fortified (Verisk) shows interior water damage severity jumped 8% in just a few years — a direct result of issues like ice damming.
The worst part? You might not even notice the damage right away. Water seeps in slowly. It soaks into insulation, invites mold, and by the time stains show up inside, you’re already facing thousands of dollars in repairs — not to mention a miserable winter living through it.
And while snow might be the trigger, the real culprits are poor insulation, hidden attic air leaks, and weak roof ventilation — stuff you can actually fix.
This article is here to help you do that. Not with vague advice like “clear your gutters” (you’ve heard that before), but with expert-level tips that actually prevent ice dams, backed by roofing pros and real homeowners who’ve been through it.
Now, let’s get into the steps that matter.
Tip #1 – Upgrade Attic Insulation (R-Value Matters)
If there’s one place most homeowners underinvest in, it’s attic insulation. And I get it — it’s not visible, it’s not pretty, and it doesn’t feel urgent… until your ceiling starts dripping in January.
Here’s the deal: your attic needs to stay cold in winter. That sounds wrong, but it’s the truth. If your attic is warm, it melts the snow on your roof — and that melted water refreezes at the colder eaves, triggering ice dams. Good insulation keeps the warmth where it belongs: in your living space, not leaking upward.
Let’s talk numbers. For most cold U.S. climates, the recommended attic insulation is R-38 to R-49, according to the National Weather Service. That’s about 12 to 16 inches of fiberglass or cellulose, depending on the type. Still relying on old batt insulation from 20 years ago? It’s probably time for an upgrade — or at least a top-off.
And don’t just pile on insulation randomly. Uneven coverage causes cold spots, and compressed insulation loses effectiveness fast. A proper install is more important than just quantity.
This isn’t just about ice dams, either. Better attic insulation helps cut down energy bills, stabilizes indoor temps, and makes your home way more comfortable in both winter and summer. It’s one of the rare fixes that pays off in every season.
If you only do one thing this winter, get your attic insulation checked. A pro can measure your current R-value, look for gaps, and tell you exactly what’s missing. You’ll stop ice dams at the source — and save yourself a massive headache later.
Tip #2 – Seal Hidden Attic Air Leaks
Even the best insulation can fail if warm air is sneaking into your attic through small gaps and cracks. And the truth is, almost every home has them — especially older ones.
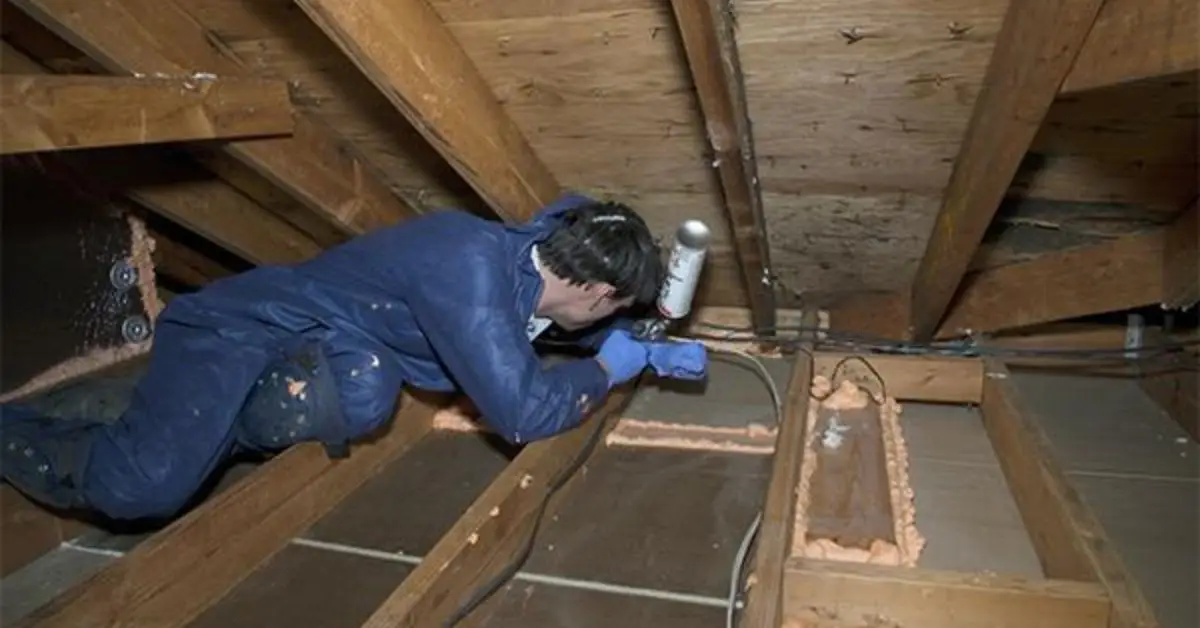
Think of it like this: your attic isn’t just a space above your ceiling. It’s a pressure zone. Warm air rises naturally, and it’s constantly looking for ways to escape. If there are openings around recessed lights, plumbing vents, electrical chases, or the attic hatch, that heat leaks right into the attic. That’s what melts the snow on your roof from underneath — and that’s what starts the ice dam process.
Sealing these air leaks is one of the most effective but most overlooked steps in winter roof protection.
Here’s where the leaks usually hide:
- Around bathroom exhaust fans
- Gaps around chimneys or flues
- Recessed lighting fixtures (can lights)
- Attic hatch doors
- HVAC ductwork or vent boots
You don’t need fancy equipment to test for leaks. A simple smoke pen or even an incense stick held near suspected areas can show airflow. If the smoke moves sideways or gets pulled into a crack, you’ve found a leak.
Sealing these gaps with spray foam, caulk, or weatherstripping (depending on the material) creates a proper air barrier. This works together with your insulation — stopping heat from getting in the attic in the first place.
Here’s the difference: insulation slows heat flow, but air sealing blocks it. You need both.
And if you’re hiring a contractor, ask them if they do a blower door test or thermal imaging scan — these can catch leaks you’d never spot yourself.
Before sealing up attic gaps or making ventilation changes, it’s smart to double-check whether your project needs a permit — some surprisingly simple upgrades do. Here’s a list of home improvements that might require a license — even ones as basic as painting.
If you want to break the cycle of ice dams for good, start by sealing off the attic’s invisible heat escape routes. It’s not expensive, and the results last for years.
Tip #3 – Balance Roof Ventilation (Soffit + Ridge)
You might not think about roof vents when you’re dealing with leaks or ceiling stains, but trust me — poor ventilation is a silent troublemaker. It’s one of the most common causes of winter roof issues that most homeowners overlook completely.

Here’s what happens: if warm air sneaks into your attic (and it often does), proper ventilation helps carry that heat out before it builds up. Without ventilation? That heat sits in your attic, warms your roof deck, melts the snow, and boom — ice dam.
The goal is to keep the underside of your roof as close to outside temperature as possible. And to do that, you need two things: soffit vents to pull in cold air, and ridge or gable vents to push warm air out. Think of it as a controlled airflow cycle — cold air in, warm air out, 24/7.
A lot of homes have vents but no balance. For example: if you have a ridge vent but your soffit vents are blocked (or nonexistent), you’ve got exhaust with no intake — and that doesn’t work. Ventilation only works when both ends are moving air.
A few quick tips:
- Clear any insulation that might be blocking soffit vents
- Use baffles (vent chutes) to keep air paths open above insulation
- Don’t cover ridge vents with snow; they still function in winter
- Don’t use powered attic fans unless a pro confirms it won’t depressurize your attic
And if you’ve had a new roof installed recently? Check that the contractor didn’t accidentally block or remove vents during installation. That happens more often than you’d think.
Ventilation isn’t just a summer thing. In winter, it’s your roof’s pressure-release system. When it’s balanced and working, you lower your attic temperature, reduce moisture buildup, and stop ice dams before they start.
Tip #4 – Clean Gutters + Install Gutter Guards
Let’s talk about your gutters — probably the most ignored part of your winter roof prep. But if they’re clogged with leaves, sludge, or frozen water when that first snow hits, you’re setting yourself up for trouble.
Here’s why it matters: when snow melts off your roof, it needs a clear path to drain. If your gutters are jammed, that water backs up, refreezes, and contributes directly to ice damming at the roof’s edge. Even worse, that frozen blockage can damage your fascia, pull gutters away from the roof, and cause water to creep under shingles.
So first, clean your gutters thoroughly in late fall — before the first freeze. And don’t just scoop out the big stuff. Flush them with water to make sure downspouts are clear. A leaf blower or wet/dry vac works well if you’re comfortable with ladders.
Then, consider installing gutter guards to reduce buildup long-term. Mesh guards are the most effective — they keep debris out but still let water in. Foam inserts and metal screens are okay, but tend to clog over time or collapse under heavy snow.
One more tip: check that your downspouts extend at least 4–6 feet away from your foundation. Melting water from your roof can turn into basement seepage fast if it’s not properly diverted.
While you’re tackling outdoor prep like gutter cleaning, fall is also a great time to boost your curb appeal. Check out these stunning fall garden ideas that can instantly elevate your home’s exterior.
Clean, free-flowing gutters don’t prevent ice dams alone, but they’re a crucial part of the system. Think of them as your roof’s drainage pipes — if they’re blocked, the whole system fails.
Tip #5 – Use a Roof Rake After Major Snowfalls
Most ice dams don’t form after one light snowfall — they build up over time, especially when snow piles up, melts, refreezes, and repeats the cycle. That’s why one of the most effective, low-tech prevention tools you can own is a roof rake.
A roof rake is exactly what it sounds like — a long-handled rake designed to pull snow off your roof from the ground. It lets you clear the lower few feet of snow from your roofline without climbing a ladder or damaging your shingles.
Here’s how to use it safely:
- Start within 3–4 feet of the eaves — that’s where dams usually form
- Work in a downward motion; don’t drag upward (you’ll risk shingle damage)
- Clear snow in small sections to avoid bending the rake
- Never climb onto an icy roof or use metal tools to chip ice
By clearing that lower snow before it has a chance to melt and refreeze, you’re removing the raw material ice dams need to form.
Pro tip: Don’t wait for a foot of snow to build up. If you get a few inches followed by a sunny or warmer day, rake the roof right away. That’s when meltwater starts to move — and where most ice dams begin forming invisibly under the snowpack.
Also, don’t worry about removing every last bit of snow. You’re just trying to keep the edge of the roof clear, so water can drain properly.
A $50 roof rake and 15 minutes after a snowstorm can save you thousands in repairs. It’s low effort, high reward — and way safer than climbing up there in February with a shovel and regret.
Tip #6 – Apply Ice-Melt Socks or Call for Steam Removal
Sometimes, even with the best prep, you end up with an ice dam. And when that happens, it’s tempting to grab a hammer or salt and go to war with the ice. Don’t. That’s a fast track to damaging your roof — or hurting yourself.
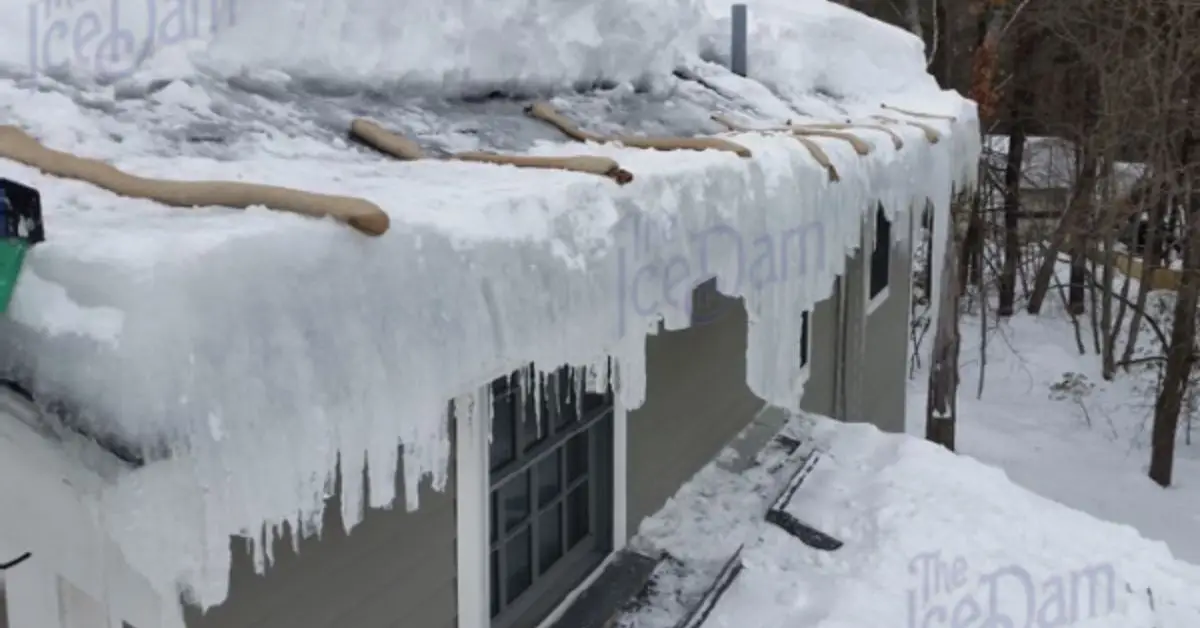
Instead, if you’ve already got ice built up, there are two safe and effective ways to deal with it: ice-melt socks and professional steam removal.
Ice-Melt Socks (DIY method)
This is one of the few quick fixes that actually works — if done right.
Here’s how to make one:
- Fill a long, thin sock or pantyhose leg with calcium chloride (not rock salt)
- Tie it shut
- Lay it vertically across the ice dam so it crosses the gutter line
The calcium chloride melts a channel through the dam, giving water a place to escape. It won’t eliminate the whole dam, but it reduces pressure and buys you time. Be careful not to let the sock rest directly on shingles too long, or it can leave stains.
Avoid using rock salt or ice-melt blends not designed for roofs — they’ll corrode metal gutters and damage roofing material over time.
Steam Removal (Pro method)
If the dam is large, already leaking, or close to causing damage, skip DIY and call a professional roofer who offers steam removal. This method uses low-pressure steam to safely melt the ice without damaging shingles or gutters.
It’s not cheap — usually starts around $300–$500 — but it’s way cheaper than replacing insulation, drywall, and flooring.
If an ice dam has already formed, don’t panic and don’t attack it with tools. Use a melt sock as a short-term fix, and call in a pro if water is already backing up. There’s a right way to handle it — and it doesn’t involve climbing a ladder in the snow with a crowbar.
Tip #7 – Install Ice & Water Shield Underlayment
This is the tip that separates temporary fixes from long-term protection. If you’re planning a new roof — or even partial repairs — installing ice and water shield underlayment should be a non-negotiable step.
So what is it?
Ice and water shield is a waterproof membrane that goes beneath your shingles, usually along the roof edges, valleys, and around chimneys or vents. Think of it as a hidden layer of defense. Even if ice dams form, even if water sneaks past your shingles, this barrier stops it from getting into your home.
Most standard roofs only have felt paper underneath — which helps with general moisture, but it can’t stop standing water. Ice & water shield is thicker, adhesive-backed, and seals around nails. It’s built to resist pooling and seepage from ice dams.
If you live in a snow-heavy region like Minnesota, New York, or Colorado, some roofers recommend going beyond the edges and applying it across the entire roof deck. That’s especially useful for low-slope roofs, which are more prone to water backup.
And while it’s not something you can DIY once your roof is already finished, it’s 100% worth bringing up next time you’re getting shingles replaced. A good contractor should already recommend it — if they don’t, ask why.
Also consider adding a metal “ice belt” flashing along the eaves. It helps reflect heat and encourage snow to slide off before it can melt and refreeze.
This is your insurance policy against future ice dams. You might not see it once the shingles go on, but if water ever starts trying to sneak inside, this hidden layer is what saves you.
Tip #8 – Consider Heat Cables (Last Resort)
Let’s be clear — heat cables aren’t a silver bullet. But if you’ve done everything right and you’re still getting ice dams in a trouble spot (like over a vaulted ceiling or in a shady roof corner), roof heat cables can be a smart backup tool.
Heat cables, also called heat tape, are electric wires installed in a zigzag pattern along your roof edge or in gutters. When turned on, they warm the area just enough to melt snow and keep water flowing off the roof instead of freezing up and causing dams.
But they only work if the rest of your system — insulation, air sealing, ventilation — is already in place. Otherwise, you’re just melting snow that keeps refreezing higher up on the roof, creating a new problem in a different spot.
Here’s what to know before using them:
- Use self-regulating cables that adjust heat output based on temperature
- Only install them on problem areas, not your entire roof
- Plug them into a thermostat or timer so they don’t run constantly
- Make sure your electrical system can handle the load safely
Don’t install them yourself unless you’re confident with electrical work — bad installs cause shorts, overheating, and even fire risk
Some insurance companies even caution against widespread heat cable use because of those risks. And while they do help in specific spots, they’re not a replacement for fixing the root issues.
Reddit users on r/Roofing and r/HomeImprovement say the same thing: “They help — but if you haven’t insulated and sealed properly, you’re wasting electricity.”
Heat cables are your safety net, not your strategy. Use them where necessary — but only after you’ve addressed the real causes of heat loss and damming.
Tip #9 – Schedule a Winter Roof Inspection
Sometimes you just can’t see what’s going wrong from the ground. Or worse — everything looks fine, right up until your ceiling starts dripping. That’s why bringing in a pro for a winter roof inspection isn’t just smart, it’s necessary if you want real peace of mind.
A good roofing contractor knows where to look for early signs of failure — even the ones you’ll miss. They’ll check for:
- Cracked or curling shingles
- Loose flashing around chimneys and vents
- Gaps in sealant or nail pops near ridge caps
- Blocked or missing ventilation
- Sagging roof lines or signs of past leaks
They’ll also check inside your attic if you let them — and that’s where many issues start. Mold, condensation, thin insulation, or frost on roof nails all point to serious heat loss and ventilation problems.
Winter inspections are especially important if:
- You’ve had ice dams before
- You’ve noticed unexplained moisture or cold spots
- Your roof is over 10 years old
- You’ve never had a professional look at it
And no, you don’t have to wait until spring. A qualified roofer can safely check your roof in cold weather — no need to climb up there yourself.
A professional set of eyes on your roof could mean the difference between catching a $200 fix or missing a $5,000 leak. Don’t wait until the damage shows up on your drywall.
Tip #10 – Monitor Weather Patterns & Seasonal Triggers
Even with the best roof prep in the world, timing matters. What really causes ice dams and winter roof damage isn’t just snow — it’s the pattern of snow, melt, and refreeze. That’s why staying ahead of the weather is one of the smartest things you can do.
Here’s what to watch for:
- Heavy snow followed by sun or warm temps (32–36°F) — snow melts fast, water pools, and then refreezes at night
- Deep cold snaps after a thaw — gutters freeze solid and trap runoff
- Multiple freeze/thaw cycles within a week — ideal condition for building ice dams layer by layer
If you know a warm front is coming after a storm, that’s your cue to rake the roof, check attic temps, or install an ice-melt sock in a trouble spot. These small, well-timed actions prevent major damage.
You can even automate part of this:
Set up weather alerts in your area for snow, freezing rain, or freeze-thaw patterns. Apps like AccuWeather or NOAA can notify you when your roof is about to go under pressure.
Also, keep an eye on the inside of your home. If you notice:
- Water stains near exterior walls
- Dripping from door frames or window tops
- Frost on the attic ceiling
…then act quickly. That’s usually your first (and only) warning.
Your roof responds to weather in real-time — so should you. Knowing what’s coming, and acting on it early, often makes the biggest difference between staying dry and dealing with a mid-winter mess.
Winter Roof Protection Isn’t About Luck — It’s About Prep
If there’s one thing I’ve learned over the years, it’s this: most winter roof disasters don’t happen overnight. They build up, layer by layer, from small oversights — blocked vents, missed insulation gaps, or snow that sits too long.
The good news? Every single one of those 10 tips we just covered is preventable. You don’t need to be a roofing pro. You just need to be proactive.
Start with what’s in your control:
- Walk around your house and look up — any snow traps, sagging gutters, or bare spots?
- Peek into the attic — does it feel unusually warm? See any signs of frost?
- Make a checklist from the tips above and knock them out one by one
And if you’re still unsure or your home has had leaks before? Don’t wait. Get a winter roof inspection or call a local pro for a consult. One hour with an expert can save you thousands — and a lot of stress — later.
And once your roof is ready for winter, don’t forget to cozy up your indoor space too. Here are 5 stylish and budget-friendly home office updates for 2025 you’ll love.
Your move: Which of these tips have you already done — and which one are you tackling next? Drop your thoughts or questions below. I’d love to hear what’s working for you (or what’s still confusing). Let’s make sure your roof doesn’t become a headline this winter.
Looking for more expert home care and roofing tips? Visit Build Like New for practical guides, seasonal checklists, and trusted advice to keep your home protected — all year round.
Disclaimer: This article is for informational purposes only and does not replace professional roofing advice. Always consult a licensed roofing contractor or building expert before making any structural changes or attempting repairs, especially in hazardous winter conditions.

