
7 Must-Do Home Tasks Before the First Freeze
I see the first freeze coming — and I don’t want you scrambling when a frozen pipe or an ice dam shows up overnight. I’ve helped homeowners prioritize the few urgent steps that actually prevent the worst damage, and that’s what this short guide is for: quick, practical tasks you can do now.
A single frozen or burst pipe can cost thousands in repairs and weeks of hassle. You don’t need a full winter overhaul today — you need the right seven checks and fixes that stop common, costly problems before they start.
In the next sections I’ll walk you through each must-do item, in the exact order I’d do them if I were standing at your front door: what to look for, what to fix yourself, and when to call a pro. No fluff — just the actions that save you time, money, and sleepless nights.
Ready to protect your home before the temperature drops? Let’s start with the first, most urgent step.
1. Inspect Your Roof and Clean the Gutters Before the Freeze
When that first freeze hits, your roof and gutters become the frontline defense between you and thousands of dollars in water damage. I’ve seen too many homeowners ignore this one step — and regret it when the thaw begins.
Before the temperature drops, get up there or hire someone who can. Look for:
- Cracked or missing shingles — even a few can let melted ice seep in.
- Loose flashing around chimneys or vents.
- Spots where shingles look warped, soft, or discolored.
A small leak during the freeze-thaw cycle can quickly turn into a soaked attic or ruined drywall. According to The Spruce, minor roof damage is one of the most common culprits behind winter leaks and ice dams. And once water sneaks under shingles, repairing it in freezing weather becomes both difficult and expensive.
Your gutters matter just as much. When leaves, dirt, or roof granules block the flow, melting ice has nowhere to go — it refreezes, expands, and forces water back up under your roofline. That’s how ice dams form. So:
- Clear out gutters and downspouts.
- Make sure downspouts push water at least a few feet away from your foundation.
- Check that gutter brackets are secure — heavy ice can tear them off if they’re loose.
Quick tip: after cleaning, run a hose to ensure everything drains smoothly. If you see pooling near the base of your home, extend your downspouts immediately.
The cost of skipping this step? A single ice dam repair can run from a few hundred to several thousand dollars, not counting interior water damage or insulation replacement. It’s the kind of expense that turns a simple afternoon chore into a financial headache.
So, if you do one exterior task before that first freeze — make it this one. Your roof protects everything beneath it.
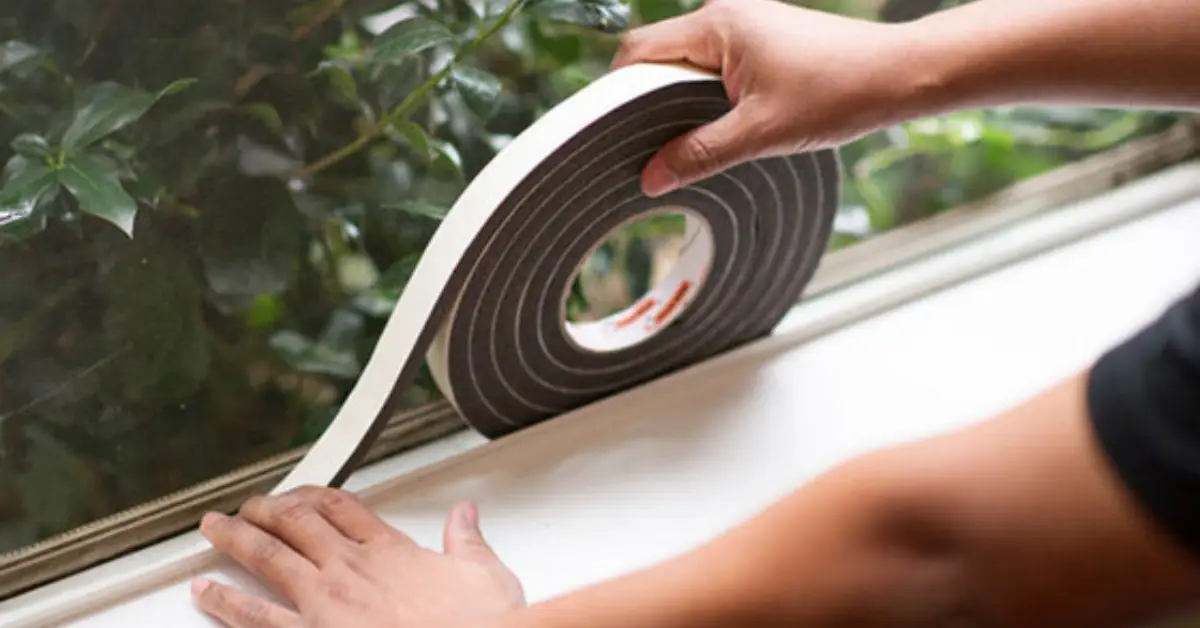
2. Seal Draft Points: Windows, Doors, and Exterior Cracks
You might not notice small drafts now, but once the first freeze arrives, those gaps start pulling in icy air like a vacuum. Every cold gust sneaking in through a window frame or door seal makes your heater work overtime — and worse, it can drop temperatures near walls and plumbing just enough to freeze pipes inside them.
Here’s what I do every fall:
- Walk the inside perimeter of my home with a candle or incense stick — if the flame flickers, air’s leaking.
- Feel around window edges and under doors for cold air.
- Mark problem spots with tape so you know where to seal later.
Then, fix what you find:
- Apply weather-stripping around doors and windows.
- Use silicone caulk for cracks or gaps in exterior walls.
- Don’t forget dryer vents, foundation openings, and spots where cables or pipes enter your home — these are sneaky culprits.
Sealing leaks can save up to 20% on heating costs while reducing the strain on your HVAC system. But for me, it’s not just about energy bills — it’s about comfort. No one wants to sit near a window and feel that icy draft creeping in mid-November.
If you’re unsure where to start, focus on areas near plumbing — drafts in these walls can lead to frozen pipes faster than you think.
Here’s a quick checklist to run through:
- Replace worn-out door sweeps.
- Add foam gaskets behind electrical outlets on exterior walls.
- Use clear plastic film over old single-pane windows for an easy insulation boost.
- Check basement or crawl-space vents — seal or insulate them temporarily.
It’s simple, cheap, and the payoff is immediate. You’ll feel the difference the first cold night, and your heating system will too.
Now, I’m curious — when’s the last time you checked your windows and doors for leaks? You might be surprised at how much heat (and money) is slipping through those tiny gaps.
3. Protect Your Plumbing: Insulate Pipes and Shut Off Exterior Faucets
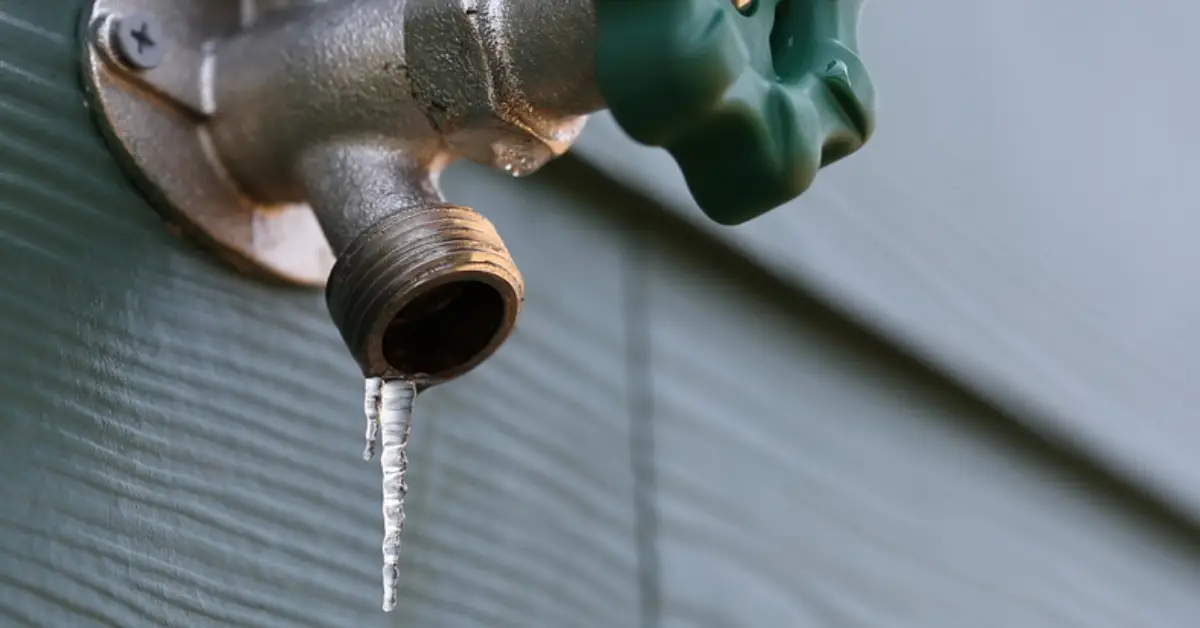
Every winter, the first calls plumbers get are about burst pipes. I’ve heard those stories too often — ceilings caving in, water flooding basements, families scrambling to find a shut-off valve in the middle of the night. It’s not dramatic to say that frozen pipes are one of the most expensive and avoidable cold-weather disasters.
Start by finding the vulnerable spots in your home. Pipes running through:
- Unheated areas like attics, garages, and crawl spaces.
- Exterior walls or under sinks near outside walls.
- Basements where the air tends to stay colder.
These are the first to freeze when temperatures dip below 32°F. Even a few hours of exposure can cause water to expand and split copper or PVC lines.
Once you’ve identified the risk areas, insulate them. Foam sleeves are easy to install — just cut to size and snap over exposed pipes. If you’re in a region with hard freezes, use heat tape or self-regulating heat cables for extra protection. A quick, low-cost trick I like is using old pool noodles slit lengthwise; they do the same job for a fraction of the price.
Don’t forget the exterior water connections.
- Disconnect hoses completely and drain them.
- Shut off outdoor faucets from the interior valve (usually located near where the pipe exits your home).
- Open the outside spigot afterward to let any remaining water drain out — that tiny bit of pressure relief can prevent cracking when temperatures plunge.
Before you finish, locate your main water shut-off valve and make sure everyone in your household knows how to use it. If a pipe bursts while you’re away, shutting off the main supply quickly can save thousands in repair costs.
The average burst-pipe claim runs well over $10,000 once you add water cleanup and structural repair — all for something that can be prevented in an afternoon. If you want a deeper step-by-step on protecting every line in your home, check out our full guide on how to prevent frozen water pipes this winter — it walks you through insulation materials, emergency fixes, and common mistakes most homeowners miss before a freeze. You don’t need to overhaul your plumbing, just insulate smartly and drain what’s exposed.
When the forecast shows the first freeze warning, don’t wait until morning. Go through your checklist that evening — you’ll sleep easier knowing the pipes are protected.
4. Make Sure Your Attic and Crawl Spaces Are Properly Insulated and Ventilated
If your attic or crawl space isn’t well insulated, your home’s heat escapes faster than you think — and the freeze hits from above and below at the same time. I’ve seen homes where the roof formed thick ice ridges after a single cold night, all because warm air leaked into the attic and melted snow unevenly. That meltwater then refroze at the roof’s edge, creating ice dams that forced water under the shingles.
Good insulation and ventilation work together to stop that. Warm air should stay inside your living space, not the attic. Check your attic floor insulation — it should be thick, even, and without gaps. Look for dark spots on the insulation, which often show air leaks.
In crawl spaces, the goal is the opposite — keep the cold out. Add insulation around exposed plumbing, close vents temporarily during severe cold, and lay a vapor barrier if you don’t have one. These steps not only prevent frozen floors but also keep pipes running through the space from freezing solid.
Here’s a quick mini-checklist:
- Verify at least 10–14 inches of attic insulation (R-38 or higher).
- Seal around vents, chimneys, and light fixtures to stop heat escape.
- Add baffles near eaves to keep air flowing while insulation stays in place.
- Insulate crawl-space walls and seal access doors.
A well-insulated attic keeps your roof surface just warm enough to prevent ice buildup, while proper ventilation lets moisture escape — preventing mold and rot later.
For a simple reference, Energy.gov recommends checking insulation levels every fall and adding more if the joists in your attic are visible.
Think of insulation as your home’s winter coat — it only works if it fits right and covers everything. A few hours of checking now could save you hundreds in heating costs and untold frustration when the cold sets in.
Now tell me — have you ever actually looked inside your attic since last winter? If not, this weekend might be the perfect time.
5. Service Your Heating System and Ensure Safety Detectors Are Working

When the first real cold snap hits, your furnace or boiler doesn’t ease into it — it’s instantly expected to keep the whole house warm. That’s why I always recommend testing your system before the freeze arrives. If it’s been sitting idle since spring, there’s a good chance it’s collected dust, debris, or even developed a small mechanical issue that could turn into a big problem under full load.
Start with a basic furnace or boiler inspection:
- Replace or clean the air filter — it’s the simplest step yet the most ignored.
- Turn on the system and listen for unusual sounds like banging or clicking.
- Check vents and flues for blockages or nests (yes, it happens more often than you’d think).
- Make sure warm air is coming evenly from all registers — cold spots often mean airflow issues.
Most heating systems lose efficiency if they aren’t serviced annually, which can drive up energy costs by 10–20%. More importantly, proper maintenance helps prevent carbon monoxide leaks — something no homeowner wants to discover the hard way.
If you use a fireplace or wood stove, get your chimney inspected before lighting that first fire. Creosote buildup is highly flammable, and even a small amount can cause smoke to backdraft into your living space. When you’re not using it, keep the flue closed to prevent warm air from escaping up the chimney.
Finally, check your smoke and carbon monoxide detectors. Test the alarms, replace batteries, and make sure you have one near every sleeping area and furnace zone. Winter means closed windows and less ventilation — which makes any heating malfunction more dangerous.
A few hours of prep now could mean the difference between a cozy night in and a costly, risky emergency later. Once your heating system’s ready, take a minute to improve your indoor winter air quality — a small daily habit can make your home feel fresher, reduce dry-air issues, and keep your space healthier all season long. Don’t wait until the freeze hits to find out your furnace isn’t ready.
6. Ensure Proper Exterior Drainage: Downspouts, Grading, Basement Windows
One thing I notice many homeowners overlook before the first freeze is water flow — not the pipes inside, but how water behaves outside their homes. When the ground freezes, it stops absorbing moisture. That means any meltwater, rain, or runoff has to go somewhere, and too often, it ends up against the foundation.
Start by checking your downspouts and extensions. After cleaning the gutters, make sure the water actually drains away — at least 5 feet from your home’s base. Add extensions if needed, and angle them slightly downhill.
Next, look at the grading around your house. The soil should slope away, not toward the foundation. Over time, settling can reverse this, creating low spots where water pools and freezes. That repeated freeze-thaw cycle can cause tiny cracks that grow each year. Seal any visible foundation cracks now before temperatures make the job impossible.
Don’t forget about window wells, decks, and porches. Water trapped in these spots can freeze into solid ice, pushing against basement windows or creating dangerous slicks that refreeze overnight.
According to Retro Foam, properly directing water flow can prevent not only foundation cracks but also frost heaving — a common but often misunderstood issue that happens when frozen ground expands and shifts under your home.
Here’s a simple walk-around checklist for a weekend afternoon:
- Check that each downspout flows freely.
- Extend drains if water pools near the foundation.
- Fill in dips in soil with topsoil or gravel for better runoff.
- Clear leaves and debris from basement window wells.
It’s small maintenance, but it’s what keeps meltwater from turning into basement leaks or foundation cracks. The first freeze may only last a night or two, but it’s enough to expose weak spots you’ll be paying for all winter.
If you’ve never looked at how water drains around your house, do it once — you’ll be surprised how much you can prevent with just a shovel, a hose test, and an hour of daylight.
7. Prepare for the Unexpected: Power Outages, Cold Snaps, and Emergency Kits
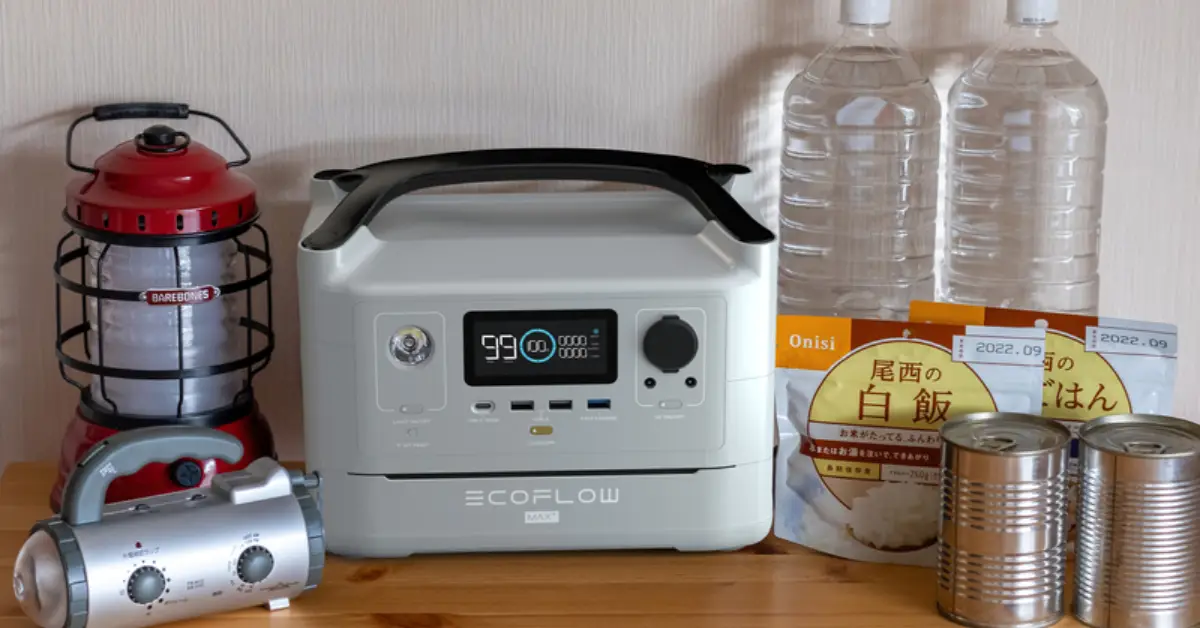
If there’s one thing the first freeze can teach you, it’s that nature doesn’t give much warning. A few hours of sleet or a quick temperature drop can cut power, freeze pipes, and leave you scrambling in the dark. I’ve seen it happen every year — and the homeowners who fare best are the ones who treat preparedness as part of their fall routine, not a last-minute panic move.
Start with back-up power and heating options. If you have a generator, test it before the freeze, not during it. Make sure you’ve got enough fuel stored safely, and never run it indoors. For homes without a generator, consider smaller battery-powered backup units that can keep phones charged or run space heaters short-term. A propane or kerosene heater (approved for indoor use) can make all the difference if the furnace stops working overnight.
Then, build your first-freeze emergency kit. You don’t need to overdo it — just cover the basics that keep you warm, safe, and able to communicate:
- Flashlights or headlamps (and extra batteries)
- Blankets or sleeping bags
- Bottled water and shelf-stable snacks
- A battery-powered or crank radio
- Backup heat source (propane heater or hand warmers)
- Recheck your carbon monoxide and smoke detectors
Lastly, don’t underestimate communication and check-ins. If you’re traveling during the first freeze, ask a neighbor or friend to check your house. If you’re planning to travel this season, our guide on how to avoid winter damage your home while you’re away covers exactly what to shut off, how to monitor your home remotely, and the simple habits that prevent nasty surprises after a trip.
Even something as small as turning off water during a power outage can prevent thousands in water damage. And if you have older neighbors, make it a point to check on them when the weather dips — it builds community safety and goodwill.
Getting ready early isn’t about fear — it’s about being smart and practical. You’ll rest easier knowing your home, your family, and even your neighbors are prepared when the freeze hits.
Bonus: Priority Timeline and Quick Checklist
Let’s turn all this planning into action. Below is a simple timeline to help you prep your home step-by-step — so you’re never caught rushing when temperatures plunge.
Two Weeks Before the Freeze
- Inspect roof and gutters
- Seal windows, doors, and exterior cracks
- Service heating system and chimney
Five Days Before the Freeze
- Drain and shut off exterior faucets
- Insulate exposed pipes
- Clear debris from downspouts and grading
Day Of / Night Before the Freeze
- Open cabinets under sinks to let warm air circulate
- Keep a trickle of water running in vulnerable pipes
- Charge backup batteries and phones
- Check emergency kit and flashlights
If You Only Do Three Things This Week, Do These:
- Insulate your pipes and outdoor faucets.
- Test your heating system and smoke detectors.
- Clean and check your gutters and downspouts.
These few actions can prevent 80% of first-freeze problems homeowners face every year.
Final Thoughts: Stay Ahead of the Freeze — Save Your Home and Wallet
Preparing your home for the first freeze isn’t just about comfort — it’s about prevention. Every small task you do today protects you from bigger repairs, insurance headaches, and sleepless winter nights. Don’t wait for temperatures to drop below 32°F before you act. Start now while it’s still manageable — because once the ground hardens and pipes chill, the cost of inaction multiplies fast.
At Build Like New, we believe that preparation builds peace of mind. Whether you’re checking insulation, cleaning gutters, or testing detectors, each step makes your home stronger, safer, and more efficient for the winter ahead.
Now I want to hear from you — what’s one first-freeze prep step you’ll tackle this week? Share it in the comments below, or visit Build Like New for more real-world home maintenance guides that keep your house running like new, season after season.
Disclaimer: This article is for general informational purposes only. Always consult a licensed contractor, plumber, or HVAC technician for major repairs or installations. Local building codes and safety standards may vary.

